Content Management Meets DevOps (Part 2 of 2) How a Git-based CMS Supports Continuous Integration and Delivery
As we learned in Part 1 of this series: Content Authoring and Publishing; development and content authoring are both a major part of producing today’s digital experiences. Unfortunately, development support is not something traditional CMS platforms handle very well at scale. CrafterCMS, a 100% open source project not only supports authors but DevOps as well.
In this article, we’re going to expand on the authoring workflow and publishing mechanics we looked at in the last article and explain how CrafterCMS seamlessly supports DevOps tools and process.
Development Requires Environments
The CMS where authors work is typically considered a production system. That’s not to say that the edits they make are immediately live. Typically CMS platforms support a concept of a “draft” type workflow with the ability to publish approved content and make it “Live”.
CrafterCMS is no exception here. As we described in our last article in this series, Authors work in a decoupled authoring environment and content is published from authoring to delivery on approval.
In the authoring environment, content can be edited and previewed via our web-based authoring tool called Crafter Studio. Edits are saved in a Git-based repository called “Sandbox”. On approval, edits are moved to a repository called “Published.” Crafter Studio handles all of the mechanics of making editing and publishing safe and simple for authors. Authors simply click edit and make changes, perform reviews and publish work via the UI. In the background, Crafter Studio will lock content, perform commits and take any other actions necessary to perform the low-level repository tasks necessary.
The authoring environment is akin to a work and test area for the authors. Relative to the live site or app the content authors are deploying content to, the Crafter Studio (and the Sandbox repository) where they edit, preview and approve content is what we would call a lower environment. Work is promoted from the lower environment (authoring) to the live environment (delivery.)
Developers almost always work in lower environments. No real developer modifies the code in production. Experience shows that making changes in production leads to outages and hinders future upgrades. Interestingly, many headless CMS platforms making their way to the market today require developers managing content types to work directly in production! While the scope of development in these systems is limited, the end results are the same.
In CrafterCMS, because we decouple authoring from delivery, it is possible for developers to work directly with the production system via authoring. Changes can be made and tested in the authoring environment before being pushed live.
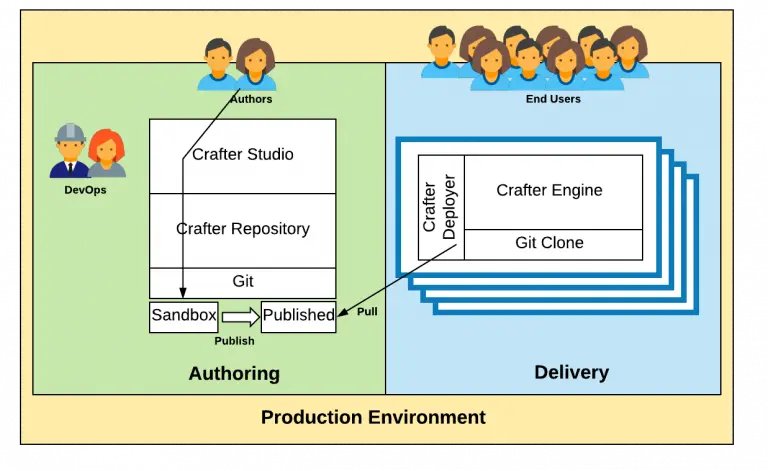
Figure 1: Production environment. Showing DevOps as part of the production workflow. DevOps do not want to touch production directly and should not have to. Unfortunately, most CMS platforms force them to do so.
That said, developers do not want to work with CMS tools! They want to work with their own Integrated Development environments (IDE) and other tools. They want to work locally on their own machines where they have control and can debug. They want the ability to collaborate with their teammates on feature branches. They want to be able to work in parallel with other development teams without fear of stepping on each other or interfering with content authoring activities and they want to be able to easily move their work through the various environments of their certification and testing process out to production. Developer environments and process are complex.
To illustrated this I have included a diagram below of a typical developer process and set of environments which must be followed in order to get new functionality to production.
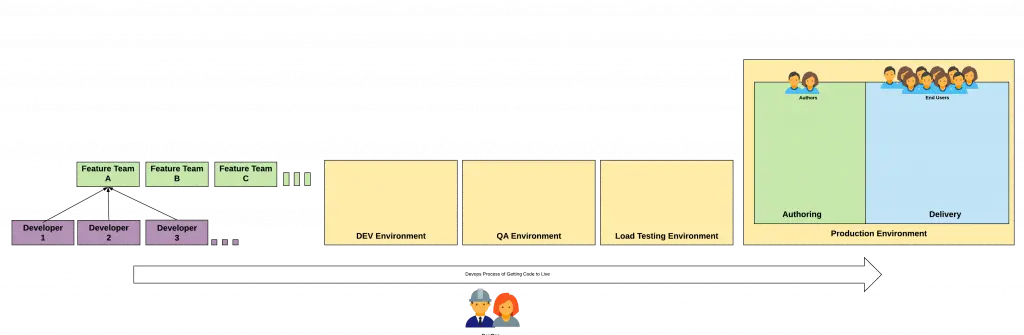
Figure 2: Typical DevOps workflow. Today’s modern app development DevOps workflows include parallel development efforts on the same project and extend from the developer’s local environment and team sandbox all the way to production.
Traditional CMS Systems and Environments, Code Artifacts and Process Don’t Mix Well
It is difficult at best to support this kind of process with traditional CMS architecture. Server-side code is typically managed in a source code repository while CMS related code artifacts like templates, Javascript and CSS (that should be managed in a source code management) want to live in the CMS. Server-side code typically requires heavy packing and deployment systems like JARs, WARs and OSGi bundles. It takes a lot of effort on the part of the developer to get an environment setup locally so that they can develop and it’s equally difficult to get a specific set of code into one of the often many environments. Worse, content is always stored in a JCR repository or SQL database and it’s a huge burden to get the latest production content to a lower testing environment. The whole process of “code forward, content back” with traditional CMS is a nightmare for DevOps. Still worse, in some environments, going to production means interruptions in content authoring ability for content authors while their environment is updated with the latest code. These outages can last hours to days or in some cases even longer.
These conditions are unacceptable. This is no way to support innovation at a time when the amount and speed of innovation an organization can sustain is a major key to competitive advantage.
CrafterCMS Provides the Solution
Crafter’s Git-based dynamic CMS tackles all of these challenges head-on with a set of technologies that incorporate lightweight development, integration with developer tools and process and elastic scalability that provides the ability to serve any front-end technology via API or markup with fully dynamic content.
First: CrafterCMS supports a fully featured, Spring-enabled, Groovy-based scripting layer. This is a subject for a whole blog of its own — but without getting too in-depth, it’s huge. You can create classes on your own in Groovy. You can leverage classes in the classpath. You can create your own beans based on Groovy or Java classes, you can inject existing beans and services. It’s a rich, robust powerful environment full of services for you to build on at the speed of scripting in the same languages and frameworks that you are used to.
Second: CrafterCMS sits on top of Git. Git is traditionally speaking, a source code version control system. That means that all of your code can live in the same version control system as the business content, together. It’s versioned together and it can be packaged and deployed together. CrafterCMS makes the world of CMS simple for content authors and developer native for DevOps.
Third: Because Crafter is Git-based you can natively support your ideal DevOps process for Continuous Integration and Delivery (CI/CD).
Let’s jump in and take a look at how it works.
Below is what you might think of as the archetype of a developer workflow that’s integrated with the production authoring environment. In this diagram, you will find a mechanism for both a “code forward” activity in which code can be moved through a development process through to production as well as a “content back” activity in which production content, including in-process content, can be brought back to lower development environments! including local development machines.
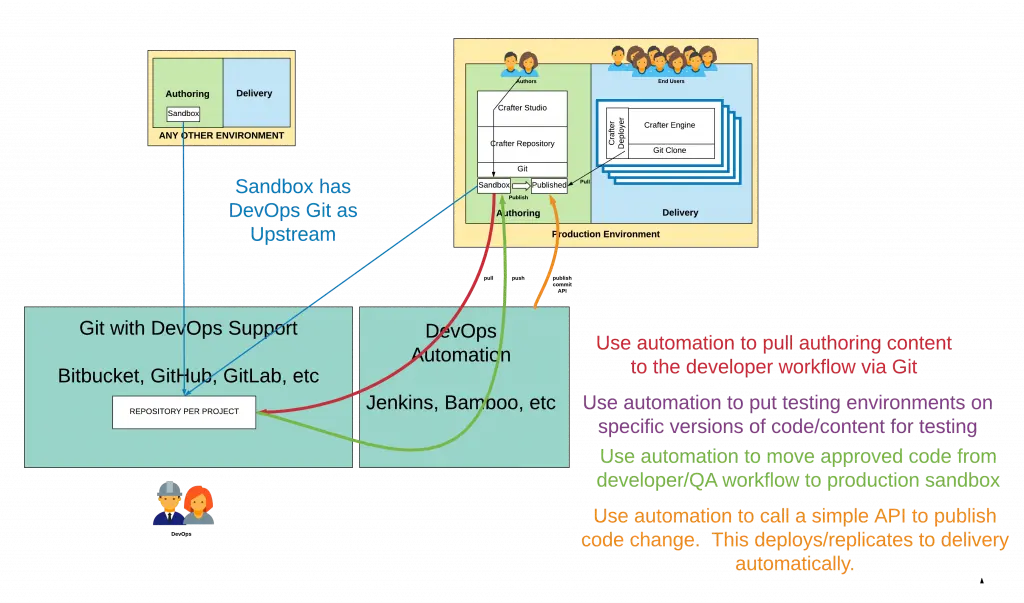
Figure 3: Archetypal DevOps workflow that describes in general how content flows back to the development process and code flows forward through the certification process to production.
The above diagram has a lot going on. Let’s break it down and explain things a step at a time.
Step 1: Create an Upstream Repository
In order to facilitate a developer workflow, you want to establish an upstream repository for your Sandbox in your production authoring environment. Any Git repository will work. It’s typical to use a Git repository that has a UI/Workflow atop of it such as Github, Bitbucket, Gitlab and other similar systems. The upstream repository is the root of the developer workflow.
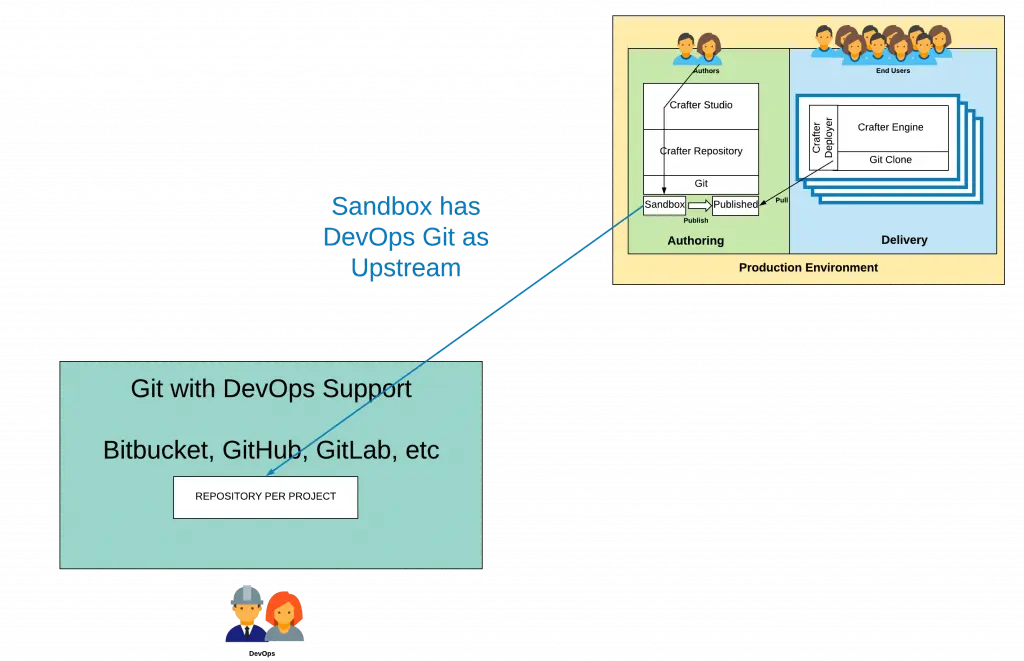
Figure 4: A Git repository with support for “developer/team workflow” such as Github, GitLab or Bitbucket is configured as a remote upstream repository of the Production Authoring Sandbox repository. This is the primary point of contact between the authoring process and the development and code release process come together.
Step 2: Use Automation to Sync Sandbox with the Upstream
Note that the repository is what the Git community refers to as an “upstream” remote repository. That means in a sense the Production Sandbox becomes subordinate to it from a Git log perspective. This upstream repository is where content and development work will be merged before making its way to the production Sandbox and ultimately to the Published repository and the delivery nodes themselves. Also, note that nothing changes about the publishing and deployment configuration and topology of the Production environment.
You will want to keep the upstream repository up to date with authoring. The best way to accomplish this is to use a DevOps automation platform such as Jenkins or Bamboo to orchestrate a push to the upstream on a schedule. Keeping the upstream repository up to date with the authoring Sandbox repository provides downstream development and testing repositories with the latest content and helps to avoid conflicts when it’s time to promote from the upstream repository to the authoring Sandbox repository.
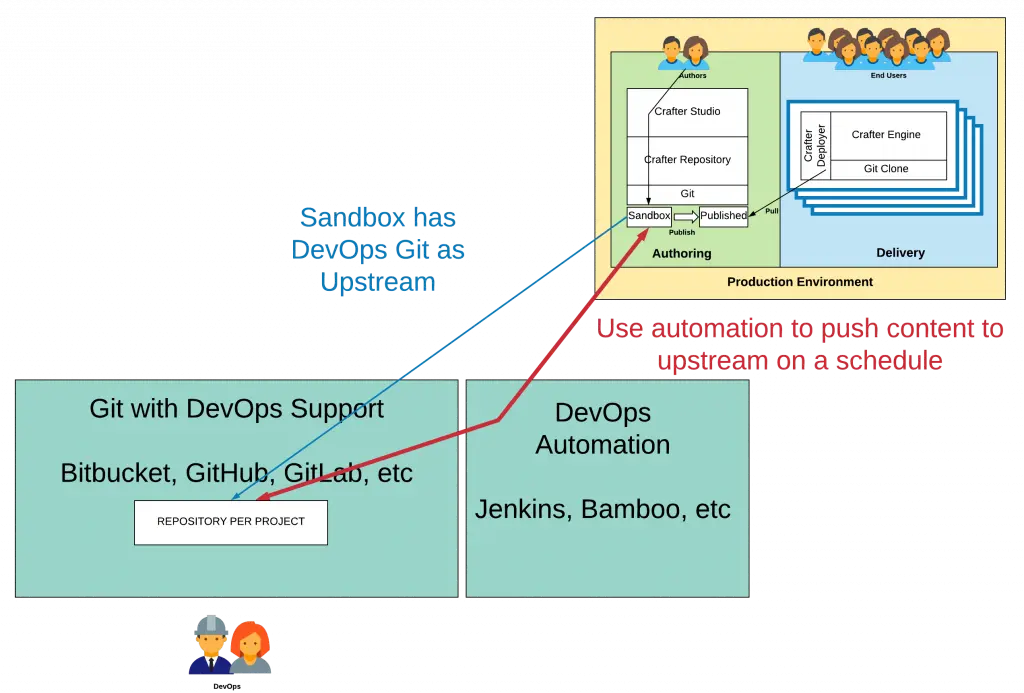
Figure 5: Content flows from Production Authoring Sandbox to the Developer repository via automated Git Push
Step 3: Use the Upstream Repository to Support Development and Testing Environments and Workflow
From this upstream repository, you will feed all lower environments and branch for each of your development efforts. From the upstream repository, you can support any development process and supply content to any development or testing environment. Lower environments may consist of Authoring and Delivery, or just Authoring, or just Delivery. It depends on the needs. For example, Development often contains both Authoring and Delivery, while QA tends to focus only on Delivery. Simple “Git pull” mechanics are used to move code and content from the upstream repository, typically from a branch.
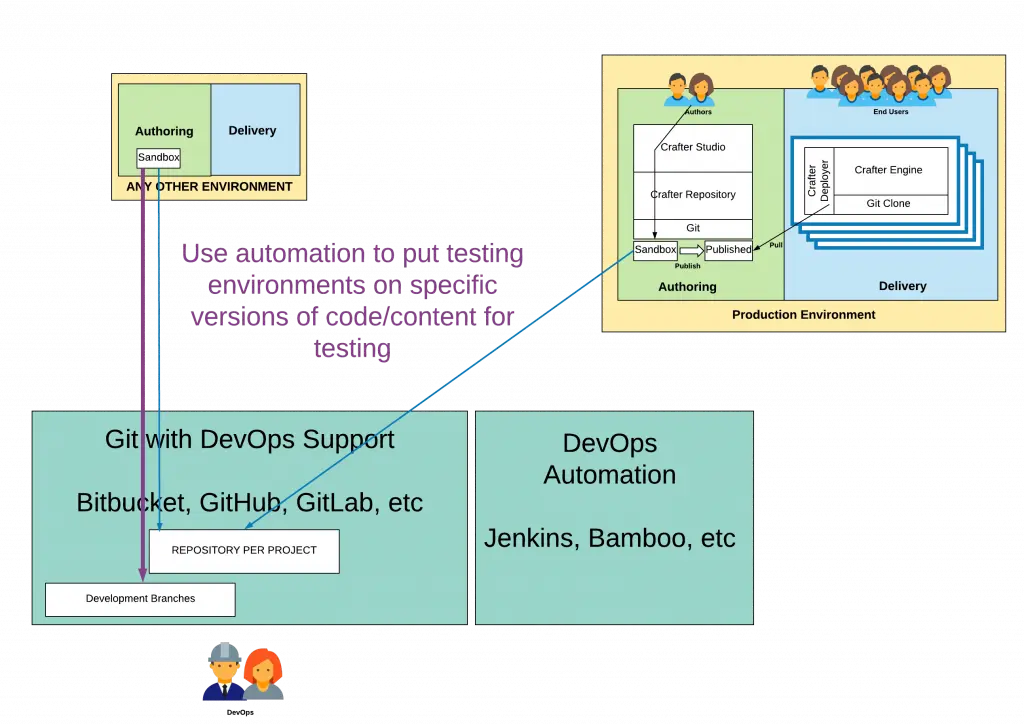
Figure 6: Development branches and forks can be created to meet your specific workflow needs. Lower environments use these repositories and branches as their upstream.
Step 4: Merge Code Updates Into the Upstream Master and Pull them to the Production Authoring Sandbox Repository
When you are ready to move code from a development branch to the authoring Sandbox you will first merge the work into the master of the upstream repository. You can do merge all of your commits or you can merge them into a single commit by using the Git rebase command. By Squashing all of the commits into a single commit you make it easier to move the workaround as a single unit. Merges are typically done via pull requests on repositories that support development workflow.
Once the merge operation is complete in the upstream repository your automation will carry that work to the production authoring Sandbox.
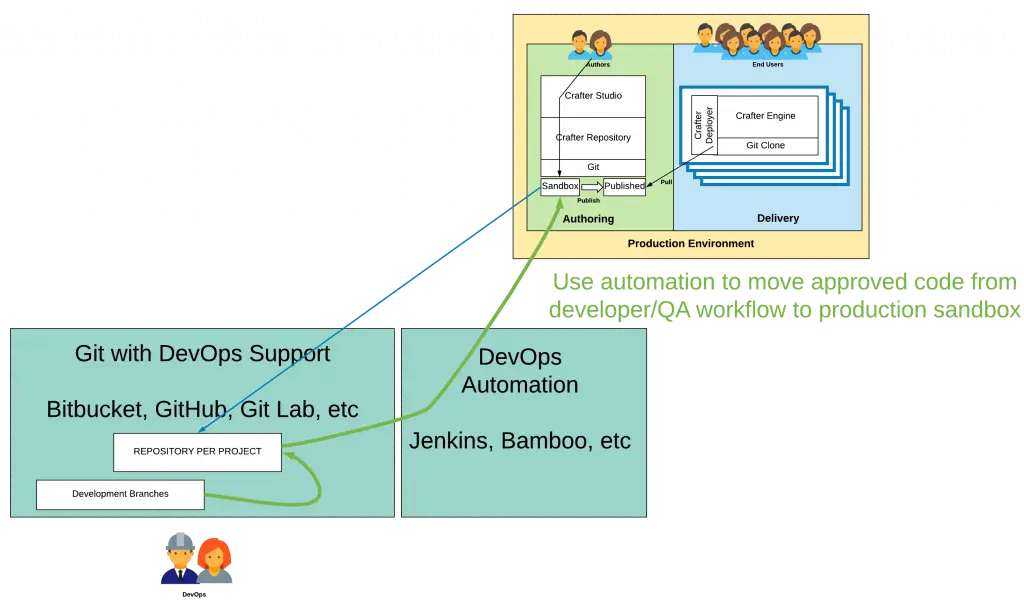
Figure 7: Use “Pull Requests” and other Git workflow mechanics to promote code through the process. When it’s ready to go live merge it to the “Master” of the Developer Repository. At this point, it will flow via automation to the Production Authoring Sandbox.
Step 5: Use Crafter Studio’s Publish Commits API to Publish Code to Delivery
Once your development work is in the Production Sandbox you will want to publish it. To do this Crafter Studio provides a REST API that will trigger the publishing on one or more commits. Simply call Crafter Studio’s Publish Commits REST API (/api/1/services/api/1/publish/commits.json) via the DevOps automation platform passing the required parameters including the commit IDs to be published and Crafter Studio will move the work to the Published repository from which it will be replicated to your delivery nodes.
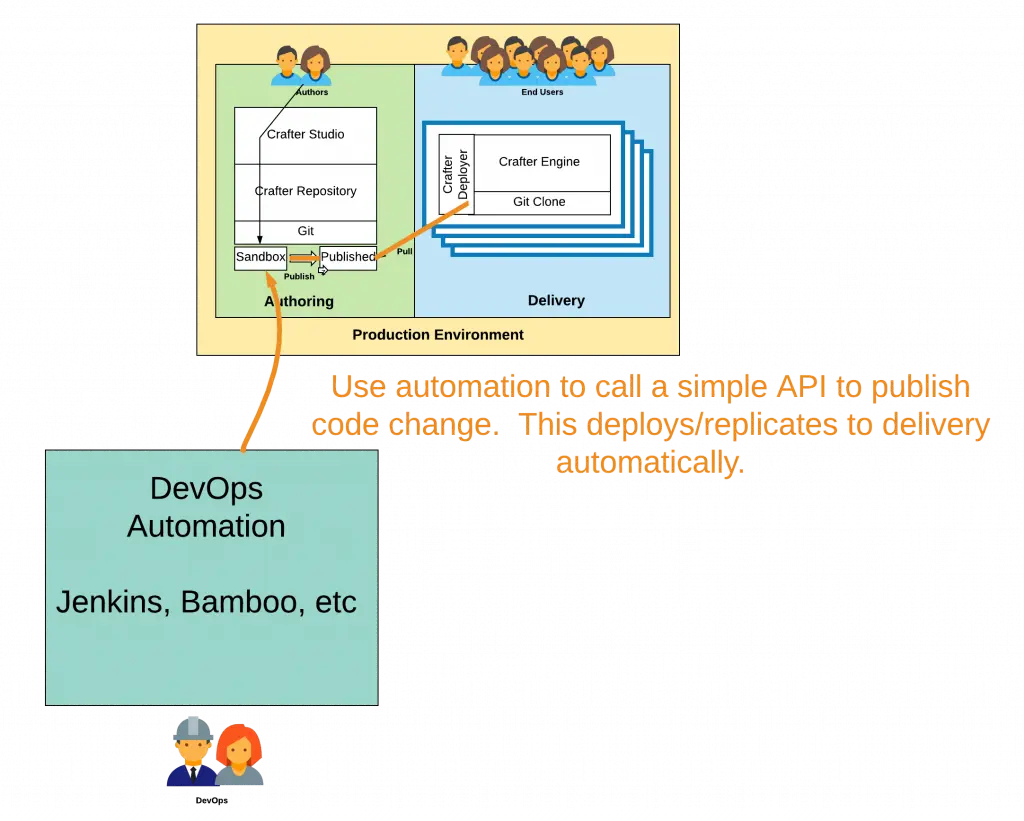
Figure 8: Move code from Sandbox to Published with a simple API call.
Step 5: Build Tons of Amazing Things
Now that you have the basic mechanics of Crafter’s native Git-based distributed repository and development workflow you are ready to support any amount of parallel development you want with the kind of tools and process rigor you are used to. Because Crafter’s Git-based repository is distributed, authors and developers, even developers working locally are all working out of what is essentially the same repository.
The workflow enables the team to collaborate and work simultaneously without ever interrupting or stepping on each other’s toes. It’s time to start innovating!
How do I set up this workflow?
For the purpose of simplicity, we’ll assume you’ve got Crafter Studio up and running and you are about to create a new project.
Step 1: Create your upstream
Create an empty repository in your upstream (GitHub, Bitbucket etc.) The specific steps depend on the repository you are using. The key here is that you want to create an empty or what’s sometimes called a “bare” repository.

Figure 9: Create a bare repository in your developer Git. In this example, we’re using Github.
On Github, once created you will see the following screen. Here you will note the repository URL (https://github.com/russdanner/devworkflowexample.git) which you will need for the next step. Also, if you’re trying to create an upstream for an existing project (out of scope for this blog), you’ll find the instructions below in the “push an existing repository from the command line” section.
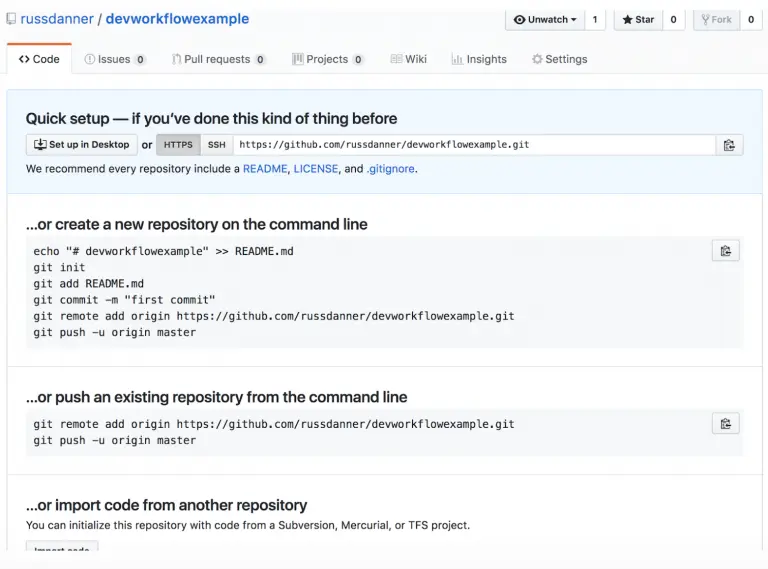
Figure 10: Bare repository created.
Step 2: Create Your Project In Crafter Studio
Next, you want to log in to Crafter Studio as the admin user. The admin user has the rights to create new projects (called sites.) Click Create Site.
Figure 11: Create site via Crafter Studio
Clicking Create Site will present you with the Create Site dialog. This dialog changes depending on what you choose. Below is an example of the dialog filled out in a way that creates your project locally, set the Github repository as its upstream remote and pushes the initial project contents to the upstream repository.
Let’s walk through each part of the dialog:
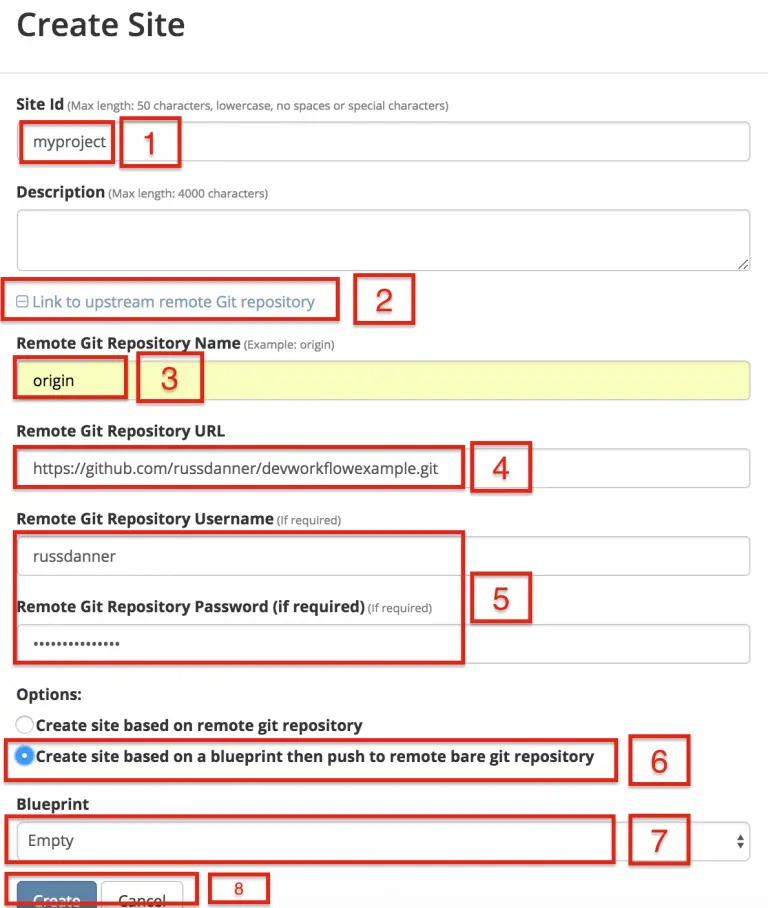
Figure 12: Create Site Dialog in Crafter Studio, populating a bare upstream Git repository.
- The first thing you need to do is give your site an ID. The ID itself doesn’t matter in a sense. It doesn’t need to match anything per se, technically speaking the only requirement is that it’s unique. That said, it’s a best practice to provide an ID that is meaningful/recognizable to the team. If your website is called FreshFlowers.com a good ID might be “freshflowerscom”
- Next, because you plan to connect this project to an upstream repository you want to click the plus (+) on “Link to upstream remote Git repository” This will open a number of new fields.
- In the “Remote Git Repository Name” field you want to provide a repository name that makes sense. It’s common to use “origin” or “upstream.”
- In the “Remote Git Repository URL” field you must provide the link to the Git repository discussed in Step #1: https://github.com/russdanner/devworkflowexample.git
- Provide your credentials in Git Remote Repository Username and Password
- Choose the option: “Create site based on blueprint push to a remote bare repository.” This means that Crafter Studio will create a new site based on the blueprint you choose, link the remote repository as an upstream and then once the blueprint is installed in the local Repositories it will be pushed automatically to the upstream remote.
- Choose your blueprint. There are several out of the box blueprints provided by default. Choose one of these or one of your own. For our example, we’ll choose Empty which is the “Hello World” of blueprints.
- Click Create. CrafterCMS will create the local repositories, Solr core and internal data structures required to support the project and install the blueprint. Once complete it will connect to the upstream and push the contents of the Sandbox repository to the remote.
Figure 13: Site is created and the contents of the sandbox are automatically pushed to the upstream repository.
Step 3: Set up Your Delivery Nodes
Now that your project is created you can set up the rest of your production environment by initializing your delivery nodes to receive deployments from authoring. Remember these delivery nodes will pull from Crafter Studio’s repositories, not the upstream remote repository.
When you add a new delivery node a simple command line script is run on that node that configures it to replicate and process content from the “Published” repository from authoring.
- Instructions for creating a site can be found here.
- Instructions for initializing a delivery node can be found here.
Step 4: Set up your Developer Workflow and Lower Environments
Now that your upstream repository is initialized in GitHub you can set up any developer workflow you want. It’s typical to consider Master to be in-sync with the Production Authoring Sandbox. Given that, you don’t want to work in Master. Create branches to isolate development work from work that’s ready to move to Production Authoring. Below is an example topology that shows multiple environments and developer workflow that include feature branches, developer forms, and local developer clones.
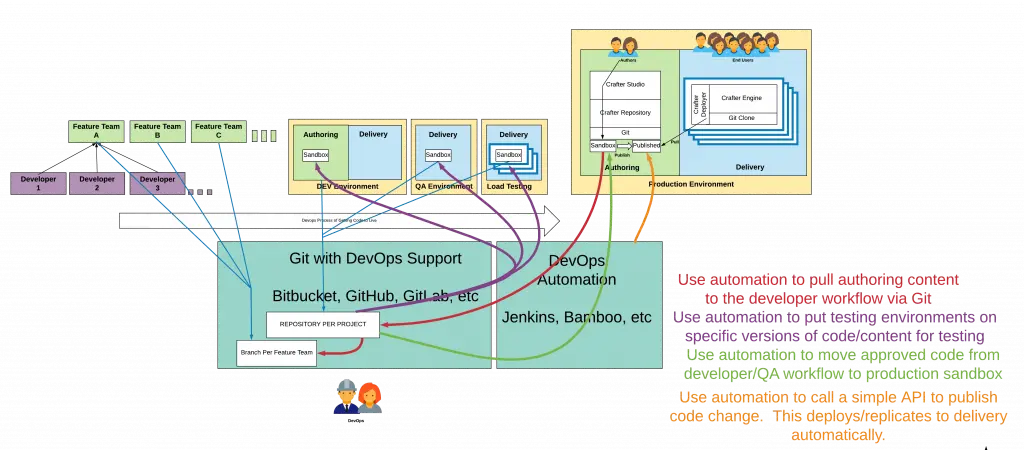
Figure 14: Full DevOps “Code Forward, Content Back” workflow for CI/CD with CrafterCMS leveraging Git mechanics and DevOps automation.
I Am a Developer, I Want to Work Locally Against The Upstream
Let’s consider for a moment that your a new developer joining the team. The topology above is already set up and you just want to get a local environment up and going. Simple. Follow these instructions.
- Install Crafter Studio locally (Source build or Binaries bundle)
- Login as Admin
- Click Create Site
- Fill out the Create Site Form as in a similar fashion described in Step 2, except this time you chose the option to create your site based on an existing upstream repository. This can be your team’s branch or your own fork. The exact workflow is up to you.
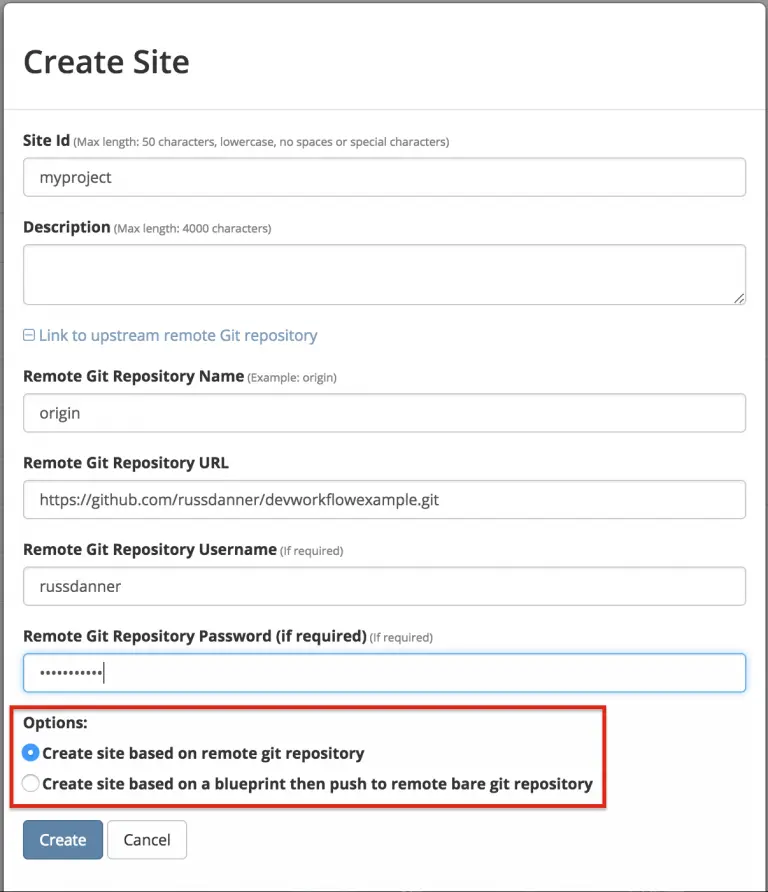
Figure 15: Set up a project based on existing remote Git repository via Crafter Studio
Conclusion
Today’s digital marketplace is constantly evolving. Companies are always iterating on existing functionality with improvements and deeper integration or introducing new functionality and channels for their employees, partners, and customers. CrafterCMS provides the right technology and integrates seamlessly with your DevOps processes to enable you to achieve a high, sustainable continuous rate of constant, iterative development, integration and delivery (CI/CD.)
Digital experience teams finally have a toolset that allows authors to work continuously without being interrupted by developers.
Developers have a means for easily moving code forward through environments and pulling content back from production to lower environments.
Further, with Crafter’s distributed repository development shops can run as much parallel development as they want and developers are able to leverage the workflow and local tools they are accustomed to.
“Code Forward, Content Back” is a trademark of Crafter Software Corporation