Building Angular2 Single Page Applications with CrafterCMS
Single Page Applications (SPA) are quickly becoming the industry standard for HTML5 based applications and responsive websites because they tend to be more user friendly, feel faster and are more responsive.
As with most applications today, SPA’s frequently contain a lot of content and related digital media such as images and videos. Often times content and digital media are deployed statically along with the application. This approach creates unwanted dependencies for content updates on the developers and requires heavy deployment processes.
In the business context this misalignment and lack of independence can slow activities way down and ultimately impact the bottom line. To address this common problem developers often build custom applications for non-technical users or leverage content management system (CMS) technology. Building custom authoring tools doubles development time and creates an additional support burden on your development team. Leveraging a CMS is a great idea, but you need to make the right choice. Many CMS architectures impose serious limitations on application and API architecture and design. As we’ll see in this article, CrafterCMS supports application developers with Content-as-a-Service that does not force any constraints on the application itself.
In this article we’ll build a simple (but not too trivial) SPA based on Angular2, then we’ll update it so that non-technical users may edit and deploy/publish content through CrafterCMS.
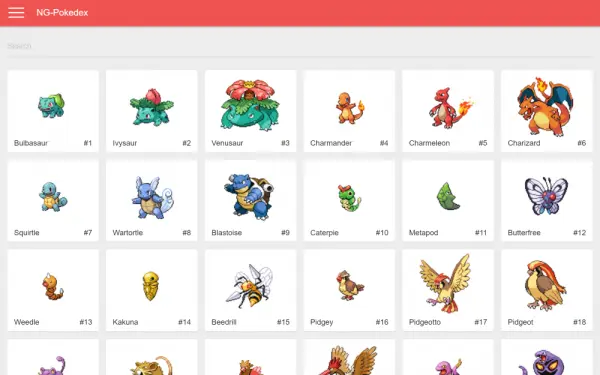
For our application we’ll start with a fun, simple Angular2 application called Pokedex written by Cory Rylan. The application is freely available via Github the AngularExpo. This application is a great example of a content application because, like most real-world applications, it contains content-oriented data that should be separated from the application code. Smart web/mobile/digital app developers separate content from their code.
The example application has two modes for retrieving data, the first option is via a static JSON data store that’s built at compile time and the second is pulling the data from a traditional data store. Both out-of-the box options are not ideal for this real world scenario because to add new Pokemon to the Pokedex you need to be technical (i.e., a developer). In this article we’re going to fix that so that any basic non-technical user can manage the Pokemon content, while the application consumes the data via Crafter’s API that provide Content-as-a-Service.
Step 1: Get CrafterCMS downloaded and installed
The first step is to get the CMS downloaded and installed. CrafterCMS is free and open source software licensed under GPL v3.
1.1 Download the CrafterCMS bundle
- Download CrafterCMS here: https://craftercms.com/downloads
- Simply click the Download button.
1.2 Install CrafterCMS and start it up
- Unzip the download
- Execute startup.sh inside the unzipped folder
- Open a browser to http://localhost:8080/studio. I recommend using Chrome. Chrome has the best support for desktop file drag and drop of all the browsers which will come into play later in this article.
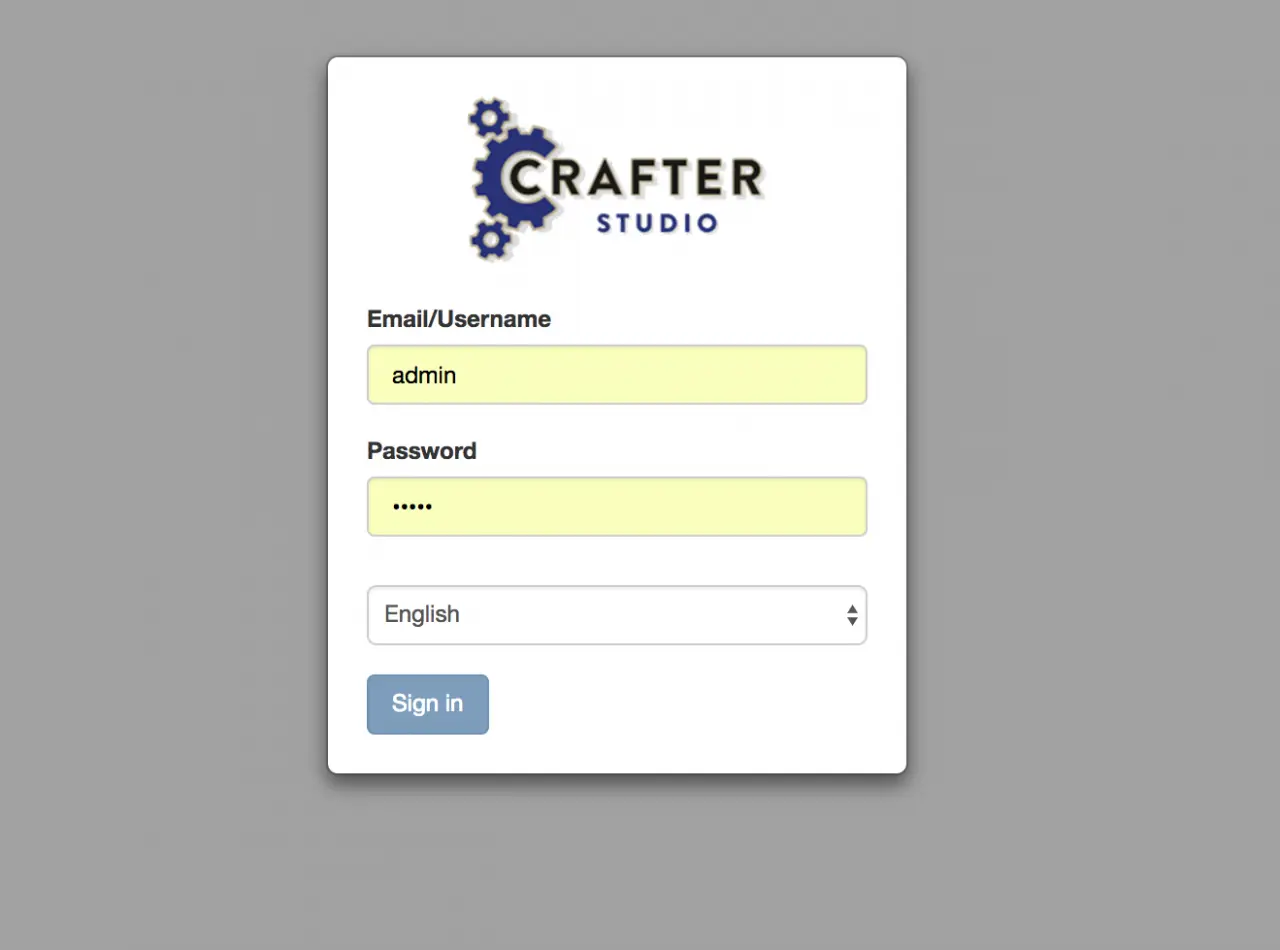
- Log in with username ‘admin‘ and password ‘admin‘
Step 2: Get the Angular2 application downloaded, compiled and tested
Now we want to get the application source code and get it running. To get and and build the code for this application you will need Git and NPM installed.
2.1 Download the source code
- On a command line, execute: git clone https://github.com/splintercode/ng-pokedex.git
- This will give you a folder called ng-pokedex in the same directory where you executed the command.
2.2 Compile the source code
- On a command line, execute: the following commands
- cd ng-pokedex
- ng init (answer (N)o to all questions)
- ng build –target=development
- If you get the following error: ‘You have to be inside an angular-cli project in order to use the build command.‘
- Simply add “angular-cli”: “1.0.0-beta.28.3”, to your package.json under devDependencies
- and re-run the ng-build command.
- To test your build:
- Execute ng serve
- and open a browser to http://localhost:4200/
Step 3: Install the application as a project in the CMS
We now have the prerequisites done and we’re ready to party! Let’s install the application into the CMS.
It’s worth noting that this step is completely optional. You can run and manage the application code itself completely outside the CMS and simply leverage the CMS for the Pokemon content itself.
So why add the whole app to the CMS?
Several reasons:
- To show that it’s possible. You’ll note we’re able to load the entire application into the CMS with no changes at all outside of a few static asset path modifications to CSS and Javascript.
- Deployment. Once in the CMS, the application is now easily deployed (i.e., published) to any delivery infrastructure at the push of a button.
- Ease of Editing. With the app in the CMS we can overlay advanced authoring tools on the application via the CMS and allow the authors to edit In-Context of the application. That’s sweet.
If you plan to manage the application outside the CMS completely simply follow Step 3.1 and move to Step 4.
3.1 Create and setup a CMS project to manage your application
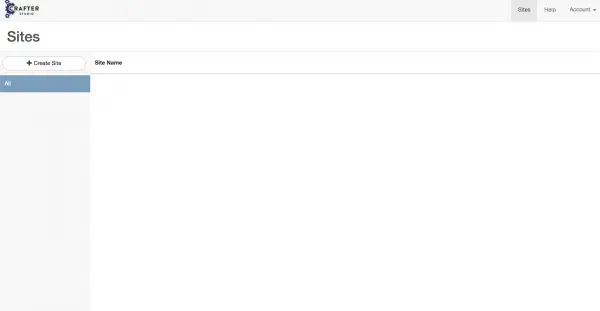
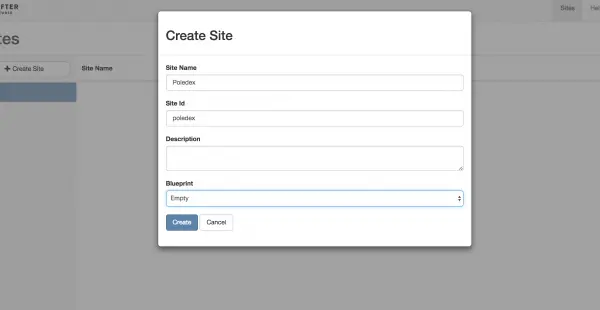
- In Step 1.2 you logged into the CMS as the admin user which has an admin role. On the screen you will see a button on the left hand that says “Create Site.” Locate and click this button.
- Enter Pokedex as the application name. CrafterCMS will generate an Site ID for you.
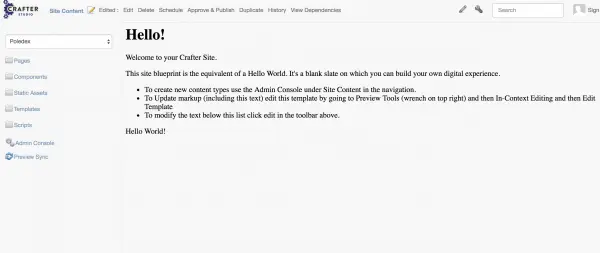
- Select “Empty” for you blueprint and click the Create button. CrafterCMS will create a new project for your Pokedex application with an basic “Hello World” type configuration.
3.2 Upload your application to the CMS
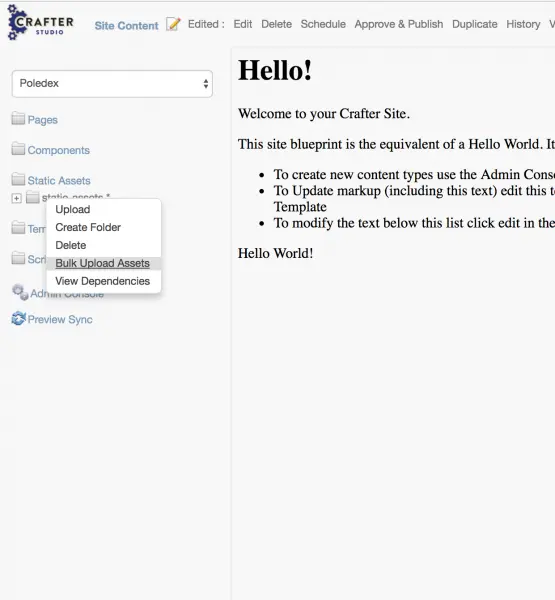
- Click on Site Content in the menu at the top of the screen. This will open a panel on the left
- Click on the Static Assets label this will open the folder.
- Right click on static-assets folder and choose Bulk Upload Assets
3.3 Update the site template with the AngularJS 2 HTML page
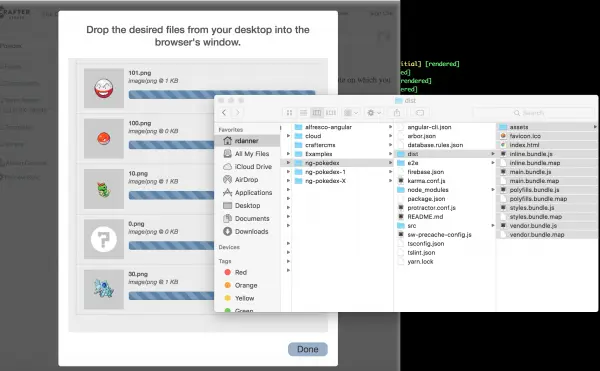
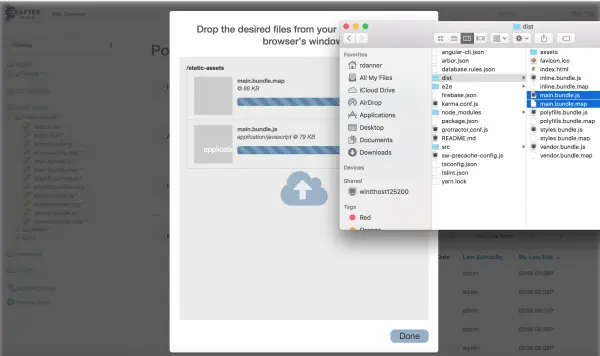
- In your ng-pokedx folder from step 2 you will find a dist folder. If is not there, execute ng build again. Drag the contents of the dist folder on to the upload dialog in the browser. When it’s done you will be able to click Done.
- By uploading the compiled assets we’ve loaded the app into the CMS. Now we have to tell the CMS to render our single page. To do this we must update our out-of-the-box template provided to us by the blueprint. In CrafterCMS, templates are coded in Freemarker and can contain any kind of markup (typically HTML 5) as well as special Freemarker Directives that make it dynamic.
- To update the template: click “Site Content” in the menu at the top to hide the Site Content panel. Then locate the Wrench in the upper right hand corner on the toolbar. Clickthe Wrench. This will open the Preview Tools panel on the right hand side of the screen.
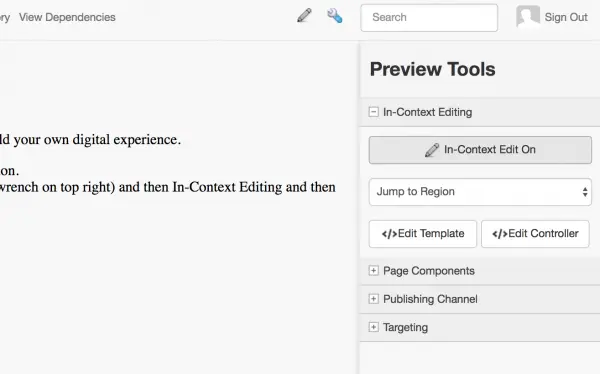
- Now click on In-context Editing to expand that specific tool. You will notice this tool allows you to edit content, templates and controllers. We’re interested in the templates. Click Edit Template.
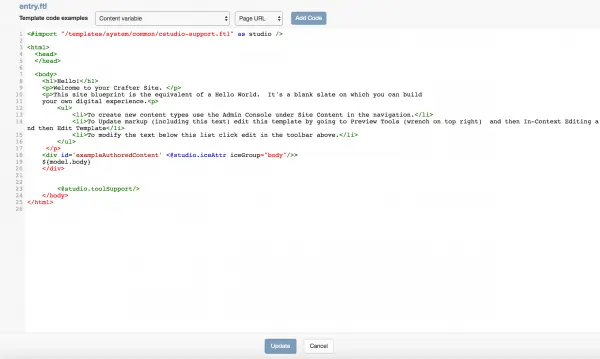
- Replace the code in this template with the HTML found in your build directory at dist/index.html.
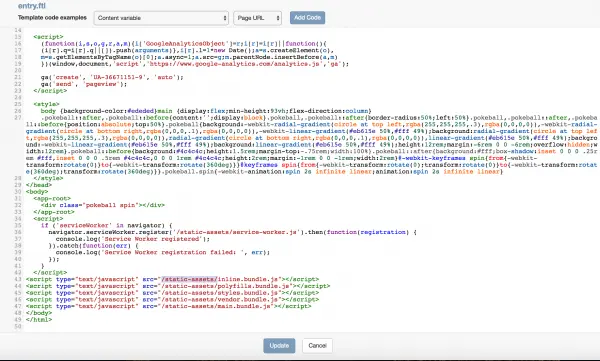
- Note that the build assumes the application assets are at / on the server. In CrafterCMS, static assets like CSS, Java Scripts and images are served from /static-assets. You will want to modify the paths in the HTML template to use the /static-assets folder as shown above. Once done, click update.

- Your app is now running in the CMS! Congrats! With this complete, we can start working on making the application dynamic, editable by a non-technical user and updatable at any time without a deployment.
Step 4: Content enable the application
The first step in content enabling the application is determining what the content model is. A content model is a definition and structure of the content. We maintain the definition of the content structures within CrafterCMS by declaring Content Types.
To figure out what your Content Types should be, look for the NOUNS in the application that you want a non-technical user to be able easily update and publish at any time. In our case, this is an individual Pokemon creature.
While a Pokemon in this simple application will be pretty basic, real world applications leveraging CrafterCMS can model very complex objects as well as relationships between objects.
Before get into the CMS, let’s figure out what the definition for our Pokemon type should be. We do this by looking at the application and seeing what fields the app will require.
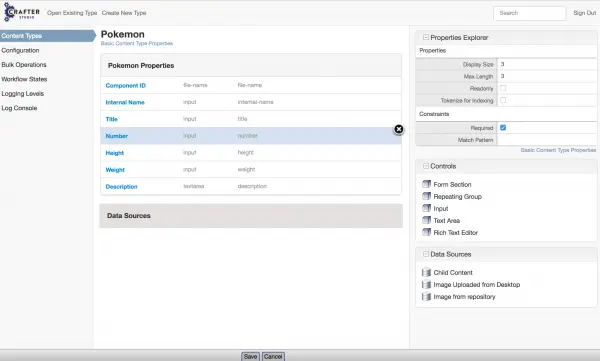
By clicking around in the application we come to learn that every Pokemon instance will require the following fields:
- Title
- Number
- A list of “Attacks”
- Height
- Weight
- Description
It appears we also need an image; however, looking closely at the application code, we’ll find that the application assumes an image has been uploaded with a filename based on the Pokemon number. For simplicity sake, we’ll maintain this assumption even though it’s worth noting that enabling authors to upload and pick images, videos and other rich media is very simple in CrafterCMS.
OK! We have a list of fields we need for our Pokemon, let’s get started defining the type inside the CMS:
4.1 Declare a Pokemon Content Type
- Open the Site Content panel.
- Locate and click the menu item for Admin Console. This will take you to power user area in the CMS used to manage and perform various site administration tasks.
- On the left panel in the Admin Console, locate and click the menu option for Content Types. This tool is used to create new Content Types and edit existing ones.
- On the toolbar at the top of your screen you will notice two options: Open Existing Type and Create New Type. Because a Pokemon is a new concept you want to introduce and define in the CMS, click on Create New Type. This action will pop up a dialog to prompt you for some basic information about the content type.
- Enter Pokemon for the display label. CrafterCMS will suggest a content type name automatically for you.
- The Type you want to choose is Component. In CrafterCMS anything that you are modeling which is NOT a page is a Component. The main difference in the CMS between pages and components is that page objects are automatically URL addressable while components are not.
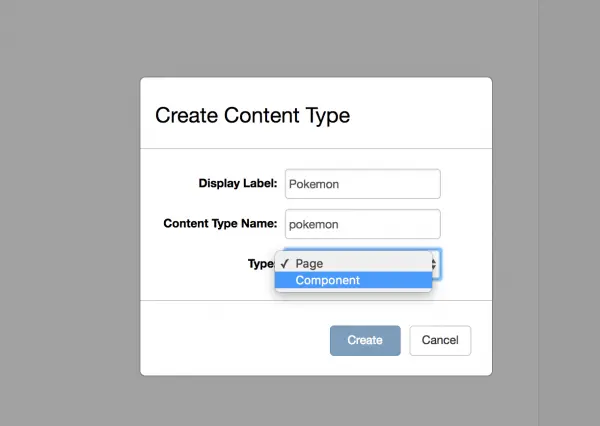
- Once the dialog is configured, click Create. This will open the content type editor for your Pokemon Content Type. You can learn more about the content type editor in detail at http://docs.craftercms.org/en/stable/developers/content-modeling.html
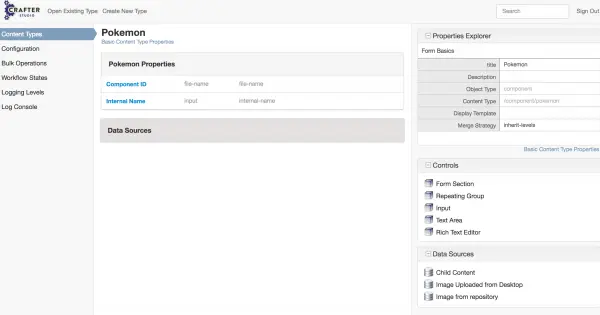
- The Content Type Editor lets you drag/drop editing field types from the right hand controls list into your Content Type definition. You then click on the individual controls and configure them with Labels, properties, data sources and constraints.
- For each field you need to add (Title, Number, A list of “Attacks”, Height, Weight. Description), look through the controls list and find the appropriate editing control for that content and drag/drop it into the Pokemon properties area.
- After you add a field to the Content Type, click on it to configure it in the Properties Explorer.
- Add a label. This is the user facing name the author will see by the input control.
- CrafterCMS will automatically suggest a variable name which you can use later in templates and controllers to access the content values.
- Scroll down in the Properties Explorer to see all the properties and constraints for the given field. This is how you mark fields as required, change their input length and make other adjustments.
- Notice that “Attacks” is a multi valued field. Also, it uses a predefined list of attack types. To support this field we’re going to want to use a control that allows the user to select several values and that gets its values from a list of options. In CrafterCMS the way picker type controls get their values is via a Data Source. There are several out of the box Data Sources and it’s possible to define your own as well. For our example we’re going to use the most basic data source called a Static Key Value Pairs Data Source. Scroll down in the Data sources area until you see it then drag/drop it on to the Data Sources portion of the Content Type definition.
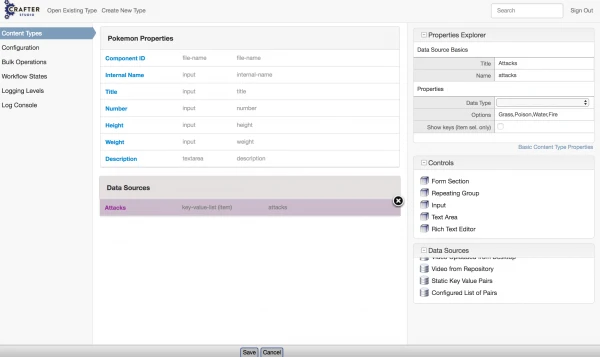
Click on the added Data Source and begin to configure it. Provide the title “Attacks“. CrafterCMS will suggest a name automatically. When you click on Options you will be prompted to enter a list of Key and the Value pairs. The “key” is stored with the user’s selection. The “value” is used for a label in the entry form. Add a few attacks to the list and click Save.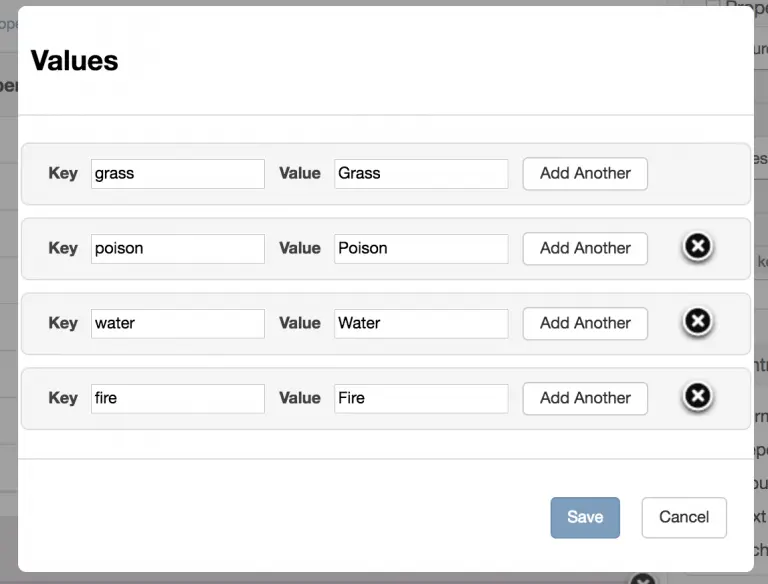
Clearly the Static Key Value pair Data Source is pretty basic. If you need to access a managed taxonomy or re-use the same key value pairs in different content types you’ll want a different Data Source type but for our needs here it works well. - Once our Attacks Data Source is defined, lets add a control to the Content Type definition to capture the attack values as data. The control you want is the “Grouped Checkbox” control.
- Drag/drop it on the Pokemon properties area then click on it to configure it.
- Provide the title “Attacks“.
- CrafterCMS will suggest the variable name.
- Scroll down in the Property Explorer until you see the “Attacks” data source listed and select it. This binds the data source you created to this Group Checkbox control.
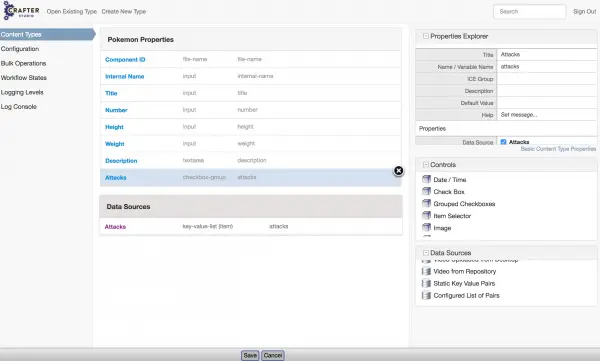
- Drag/drop it on the Pokemon properties area then click on it to configure it.
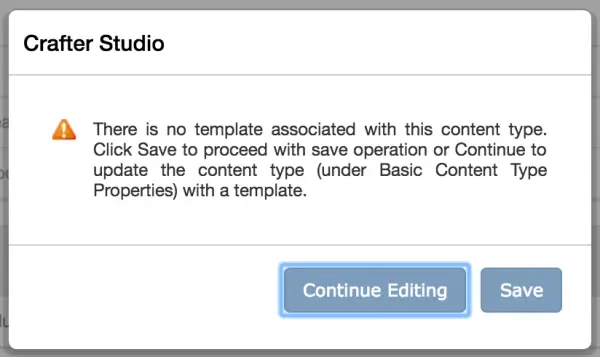
- Perfect! Your Content Type definition is now complete. Click Save at the bottom of the screen.Note that you are going to get a warning that the content type does not have a template associated to it. That’s ok. Not every Content Type needs a template. In our case the app already knows how to render the content and we don’t need another template. Click Save on the dialog. You’ll notice a small save indicator on successful save.
4.2 Create Pokemon Content Objects
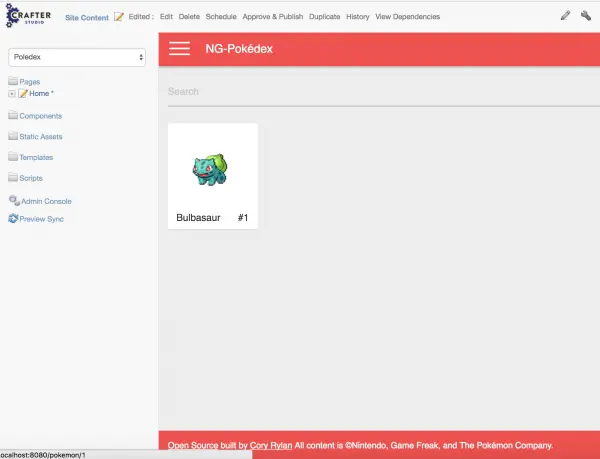
Now it’s time to create some test content. To return to your project Click the Crafter Logo on the toolbar in the top left corner of the screen. This takes you to your workflow dashboard. From here you can create content or navigate back to your application preview via the Site Content panel.
- Click on Site Content in the menu at the top of the screen. This will open a panel on the left
- Click on the Components label this will open the folder.
- Right click on components folder and choose New Content.
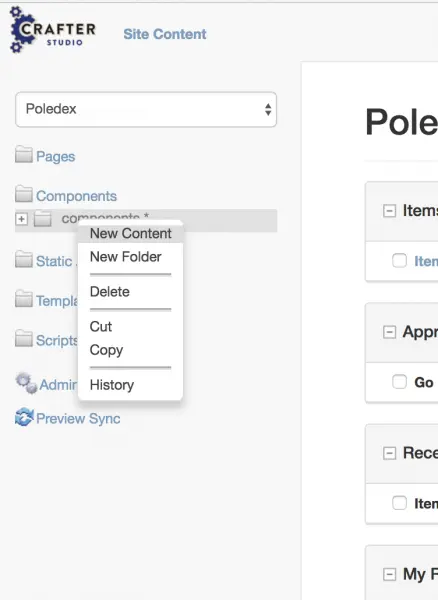
- The CMS will prompt you for the type of content you want to create. You will note the Pokemon option. Choose Pokemon and click “Ok.”

- Once you click OK you will be given the entry form for your Pokemon which you can start filling out. Awesome! CrafterCMS automatically creates your Pokemon editing interface based on the Content Type Definition.
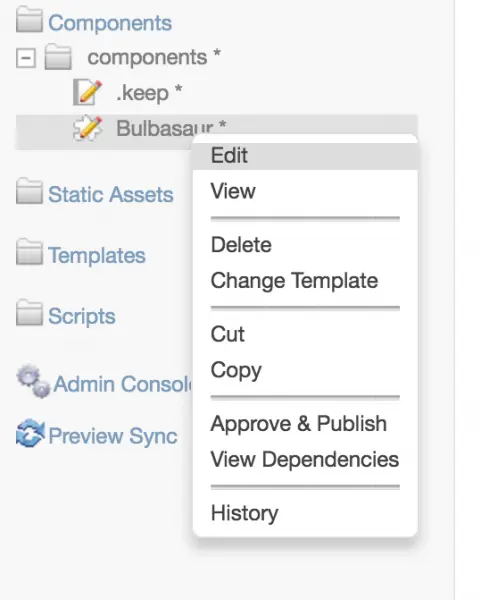
- Repeat this process as many times as you want, creating a new Pokemon each time. When you save the form you will see the Pokemon item listed under the Components folder as whatever value you entered into the Internal Name field (which is only used by the CMS editing tools as a label in the tool.)
Step 5: Configure a JSON based REST service to provide Pokemon content as service to the app
Any CMS worth its salt today can provide content via REST in JSON and other formats. Crafter does this out of the box — but Crafter also provides an important capability a lot of CMS do not and that’s an ability to easily define your own service. The dirty little secret with Content as a Service (CaaS) and CMS’s is that if you use the CMS’s out of the box APIs to get content you may be locking your self into the CMS and you are almost certainly forcing your app to adapt to the CMS. That’s the tail wagging the dog. Let’s look at how we can do small amount of scripting so that our JSON service response matches EXACTLY what the app expects (rather than changing the app to match the CMS.)
5.1 Create a RESTful Controller
- Click on Site Content in the menu at the top of the screen. This will open a panel on the left
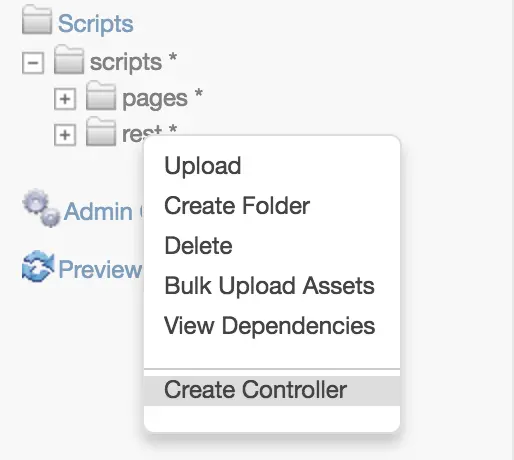
- Click on the Scripts label this will open the folder.
- Expand the scripts folder, right click on the rest folder and choose Create Controller.
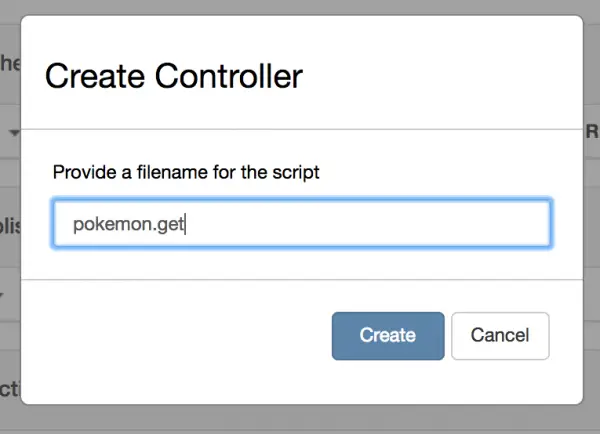
- Once you click Create Controller you will be prompted to enter a controller name. In CrafterCMS the name of the controller in the REST folder follows a naming convention that defines the HTTP method that the controller responds to. Our name is going to be “pokemon.get” This means that we’ll end up with a service at the following URL “http://localhost:8080/api/1/services/pokemon.json” that responds to GET requests.
- When ready click create and you will be provided with a code editing screen. In CrafterCMS, controllers are coded in Groovy (or Java). There are many different kinds of controllers: REST controllers, page controllers, component controllers, request interceptors, scheduled jobs and others.
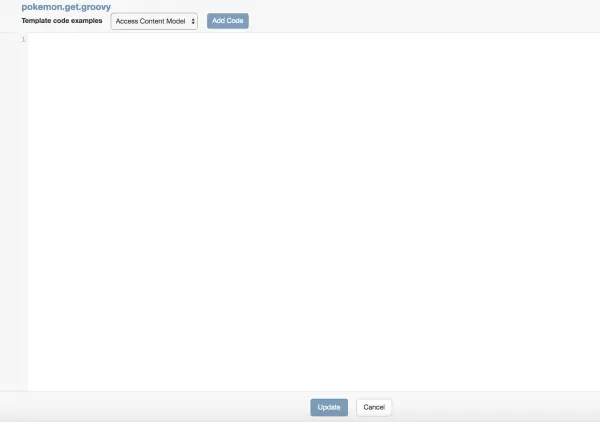
- Enter the following code in the editor and click update.
def data = []// Define a query for pokemon content
// CrafterCMS uses SOLR query syntax
def queryStatement = ‘content-type:”/component/pokemon”‘
def query = searchService.createQuery()
query = query.setQuery(queryStatement)// Execute the query
def executedQuery = searchService.search(query)
def items = executedQuery.response.documents// For each result item, map the content type values to the names and JSON structure that the app expects
// On the left hand side we see the fields the app expects on the right, the field variable names we defined.
items.each { item ->
def pokemon = [:]
pokemon.id = item.number as Integer
pokemon.name = item.title
pokemon.description = item.description
pokemon.height = item.height as Integer
pokemon.weight = item.weight as Integer
pokemon.types = item[“attacks.item.key”]
data.add(pokemon)
}// Return the data structure, which CrafterCMS will MARSHALL into JSON automatically
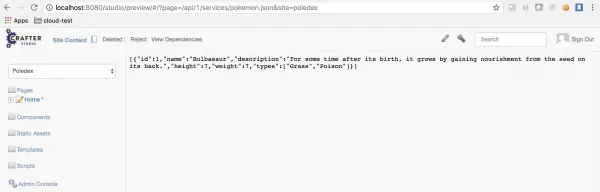
return data - Now that our REST service is defined we can test it. Open a browser to the following URL::
- http://localhost:8080/studio/preview/#/?page=/api/1/services/pokemon.json?site=poledex
Step 6: Update the app to use the RESTful Service
We’re in the home stretch now! We have a dynamic service that updates any time we add, update or remove Pokemon content. All we have to do now is change the application to use the new service.
6.1 Update src/app/shared/services/pokemon.service.ts
- Add the following import:
import { Response } from '@angular/http'; - Add the following method:
public getPokemon() {
return this.http.get('/api/1/services/pokemon.json').map((res: Response) => res.json());
} - Update the constructor to use the new getPokemon method:
constructor(private http: Http) {
this.store = { pokemon: pokemonData };
this._pokemon = new BehaviorSubject(Object.assign({}, this.store).pokemon);
this.pokemon = this._pokemon.asObservable().map(pokemon => pokemon.map(p =>         this.setPokemon(p)));
this.pokemon = this.getPokemon();
} - Rebuild your distribution by executing ng buld
- In the CMS, Under the Site Content Panel:
- Click on Site Content in the menu at the top of the screen. This will open a panel on the left
- Click on the Static Assets label this will open the folder.
- Right click on static-assets folder and choose Bulk Upload Assets
- Drag/drop main.bundle.js and main.bundle.map to upload the latest build into the CMS.
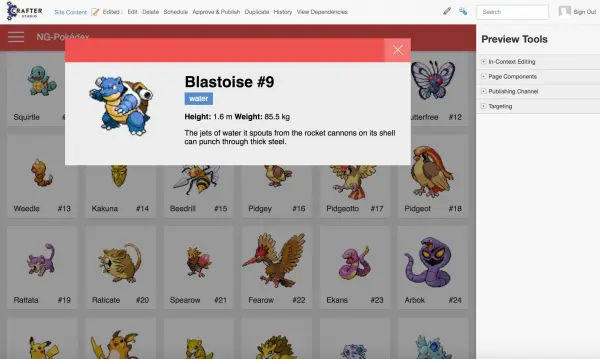
- Under pages in the Site Content panel click home to load the preview and test the application.
- Congrats! Your app is now consuming content from the CMS. You can now use the CMS to add new records or update existing ones!
Conclusion
Single Page Applications and the frameworks that help developers build them like AngularJS 2 are quickly becoming the defacto approach for building user-friendly responsive applications. Smart developers will separate code from content so that non-technical users can quickly and easily update the application’s content without involvement from technical resources for code updates or deployments. Integrating your CMS with your SPA is a strong pattern for solving this problem — but architects beware, not all CMS platforms are the same. The wrong CMS will interfere with the development process and force interface and implementation details. CrafterCMS offers the right architecture for the job. CrafterCMS integrates with your development process and tools and puts you app in control of the interfaces and implementation code while providing content authors with the tools they need to update and publish the application independently. To learn more check out CrafterCMS at https://craftercms.com and https://craftercms.org.
Special thanks to Cory Rylan and the Angular Expo for providing a fun application!