Setup CrafterCMS Delivery Using Crafter's AWS AMI

Step 1: Launch an AWS EC2 instance using a CrafterCMS Delivery AMI
Crafter provides a prebuilt AMI(s) for Crafter Engine, the delivery component of CrafterCMS. In this step we'll walk you through the initial launch of your instance. To get started, go to your EC2 dashboard and click "Launch Instance." AWS will prompt you to choose your AMI type/image.

You can find CrafterCMS Delivery by entering the keywords "CrafterCMS Delivery." in the search box as shown below. You will find a number of options in the search results.
- CrafterCMS Community Delivery is our open source version
- CrafterCMS Enterprise Delivery is our supported enterprise version
Click "Select" on the AMI type you want to use and then follow the launch instance/configuration wizard to determine the sizing and networking details for your instance. Please note, we recommend "C" class machines for best results with typical production use.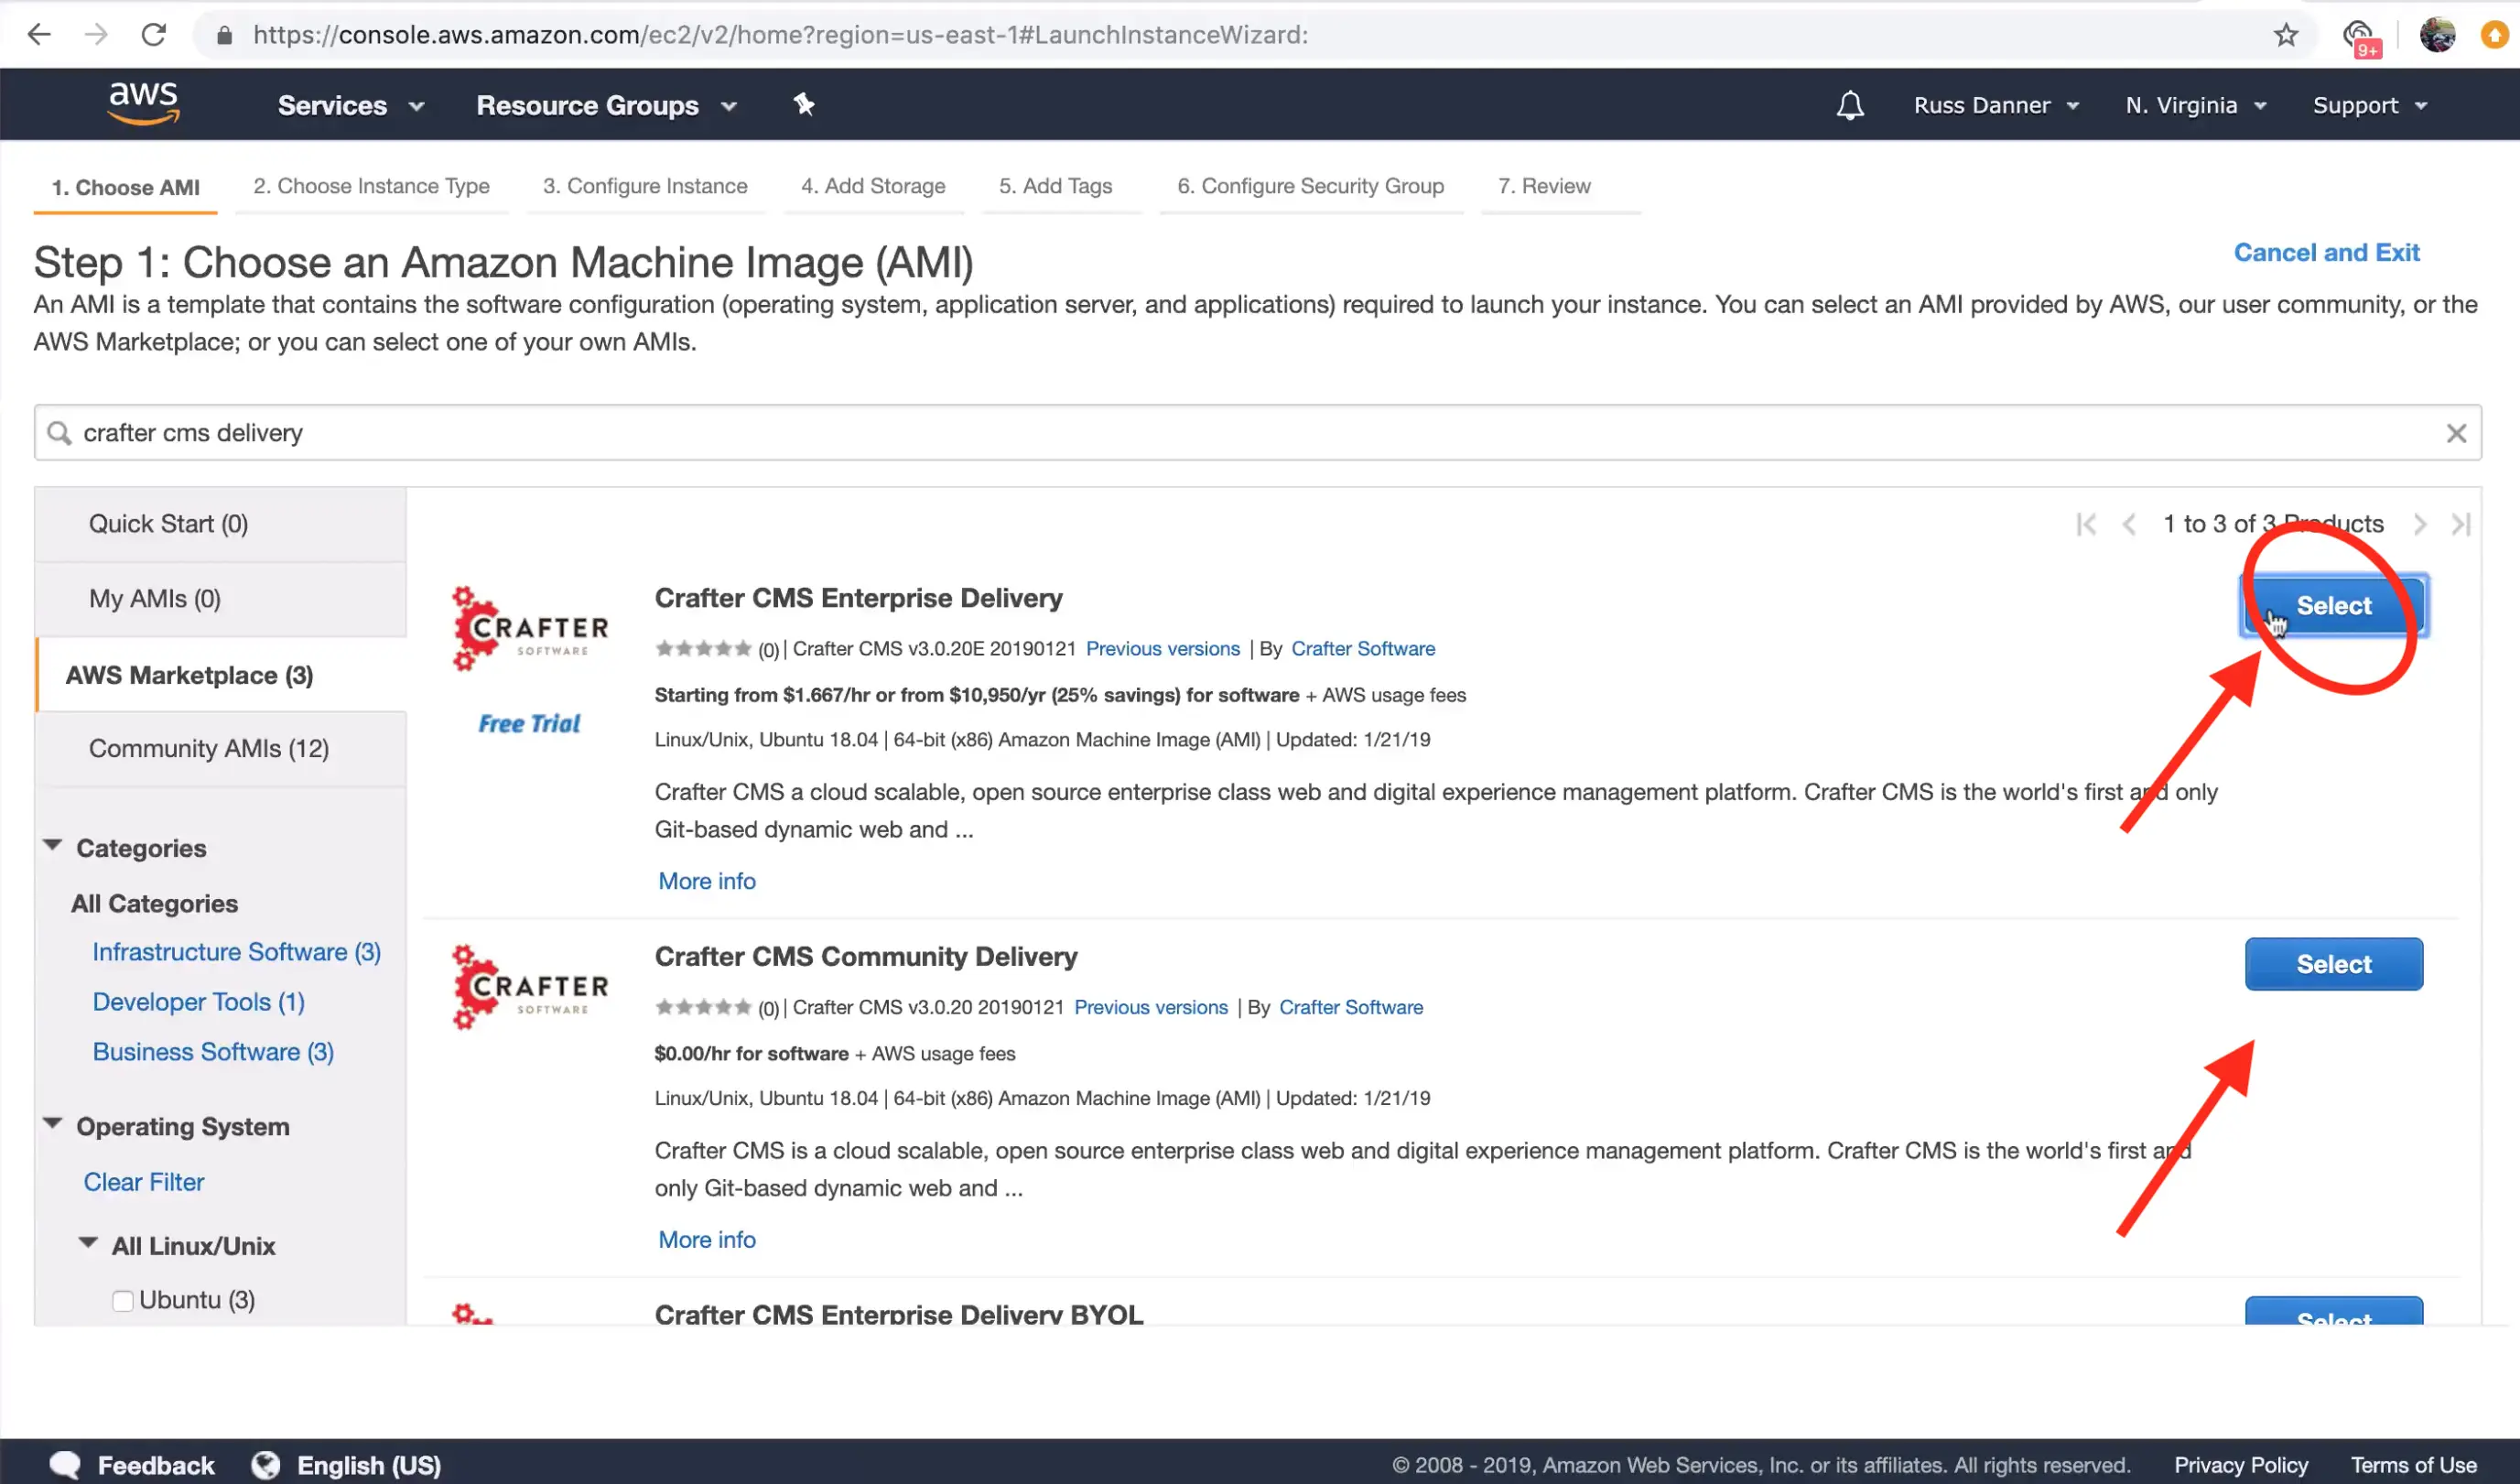
The launch instance wizard gives you the ability to tweak your instance's configuration details. In the next step we will connect to the machine with SSH via a terminal/console inorder to acquire the administrators initial login password for the Crafter Studio web application. You will need to add SSH to your inbound security settings for the instance to complete the next step and acquire the password. To do so, click the "Configure Security Group" tab.
To add the rule for SSH, click the "Inbound traffic" tab and then "Add Rule" to configure SSH. You can restrict the inbound traffic for SSH in the source column. To allow SSH from anywhere you can enter a CIDR of 0.0.0.0/0. Use the ports and IP masks/policies that align with your needs. 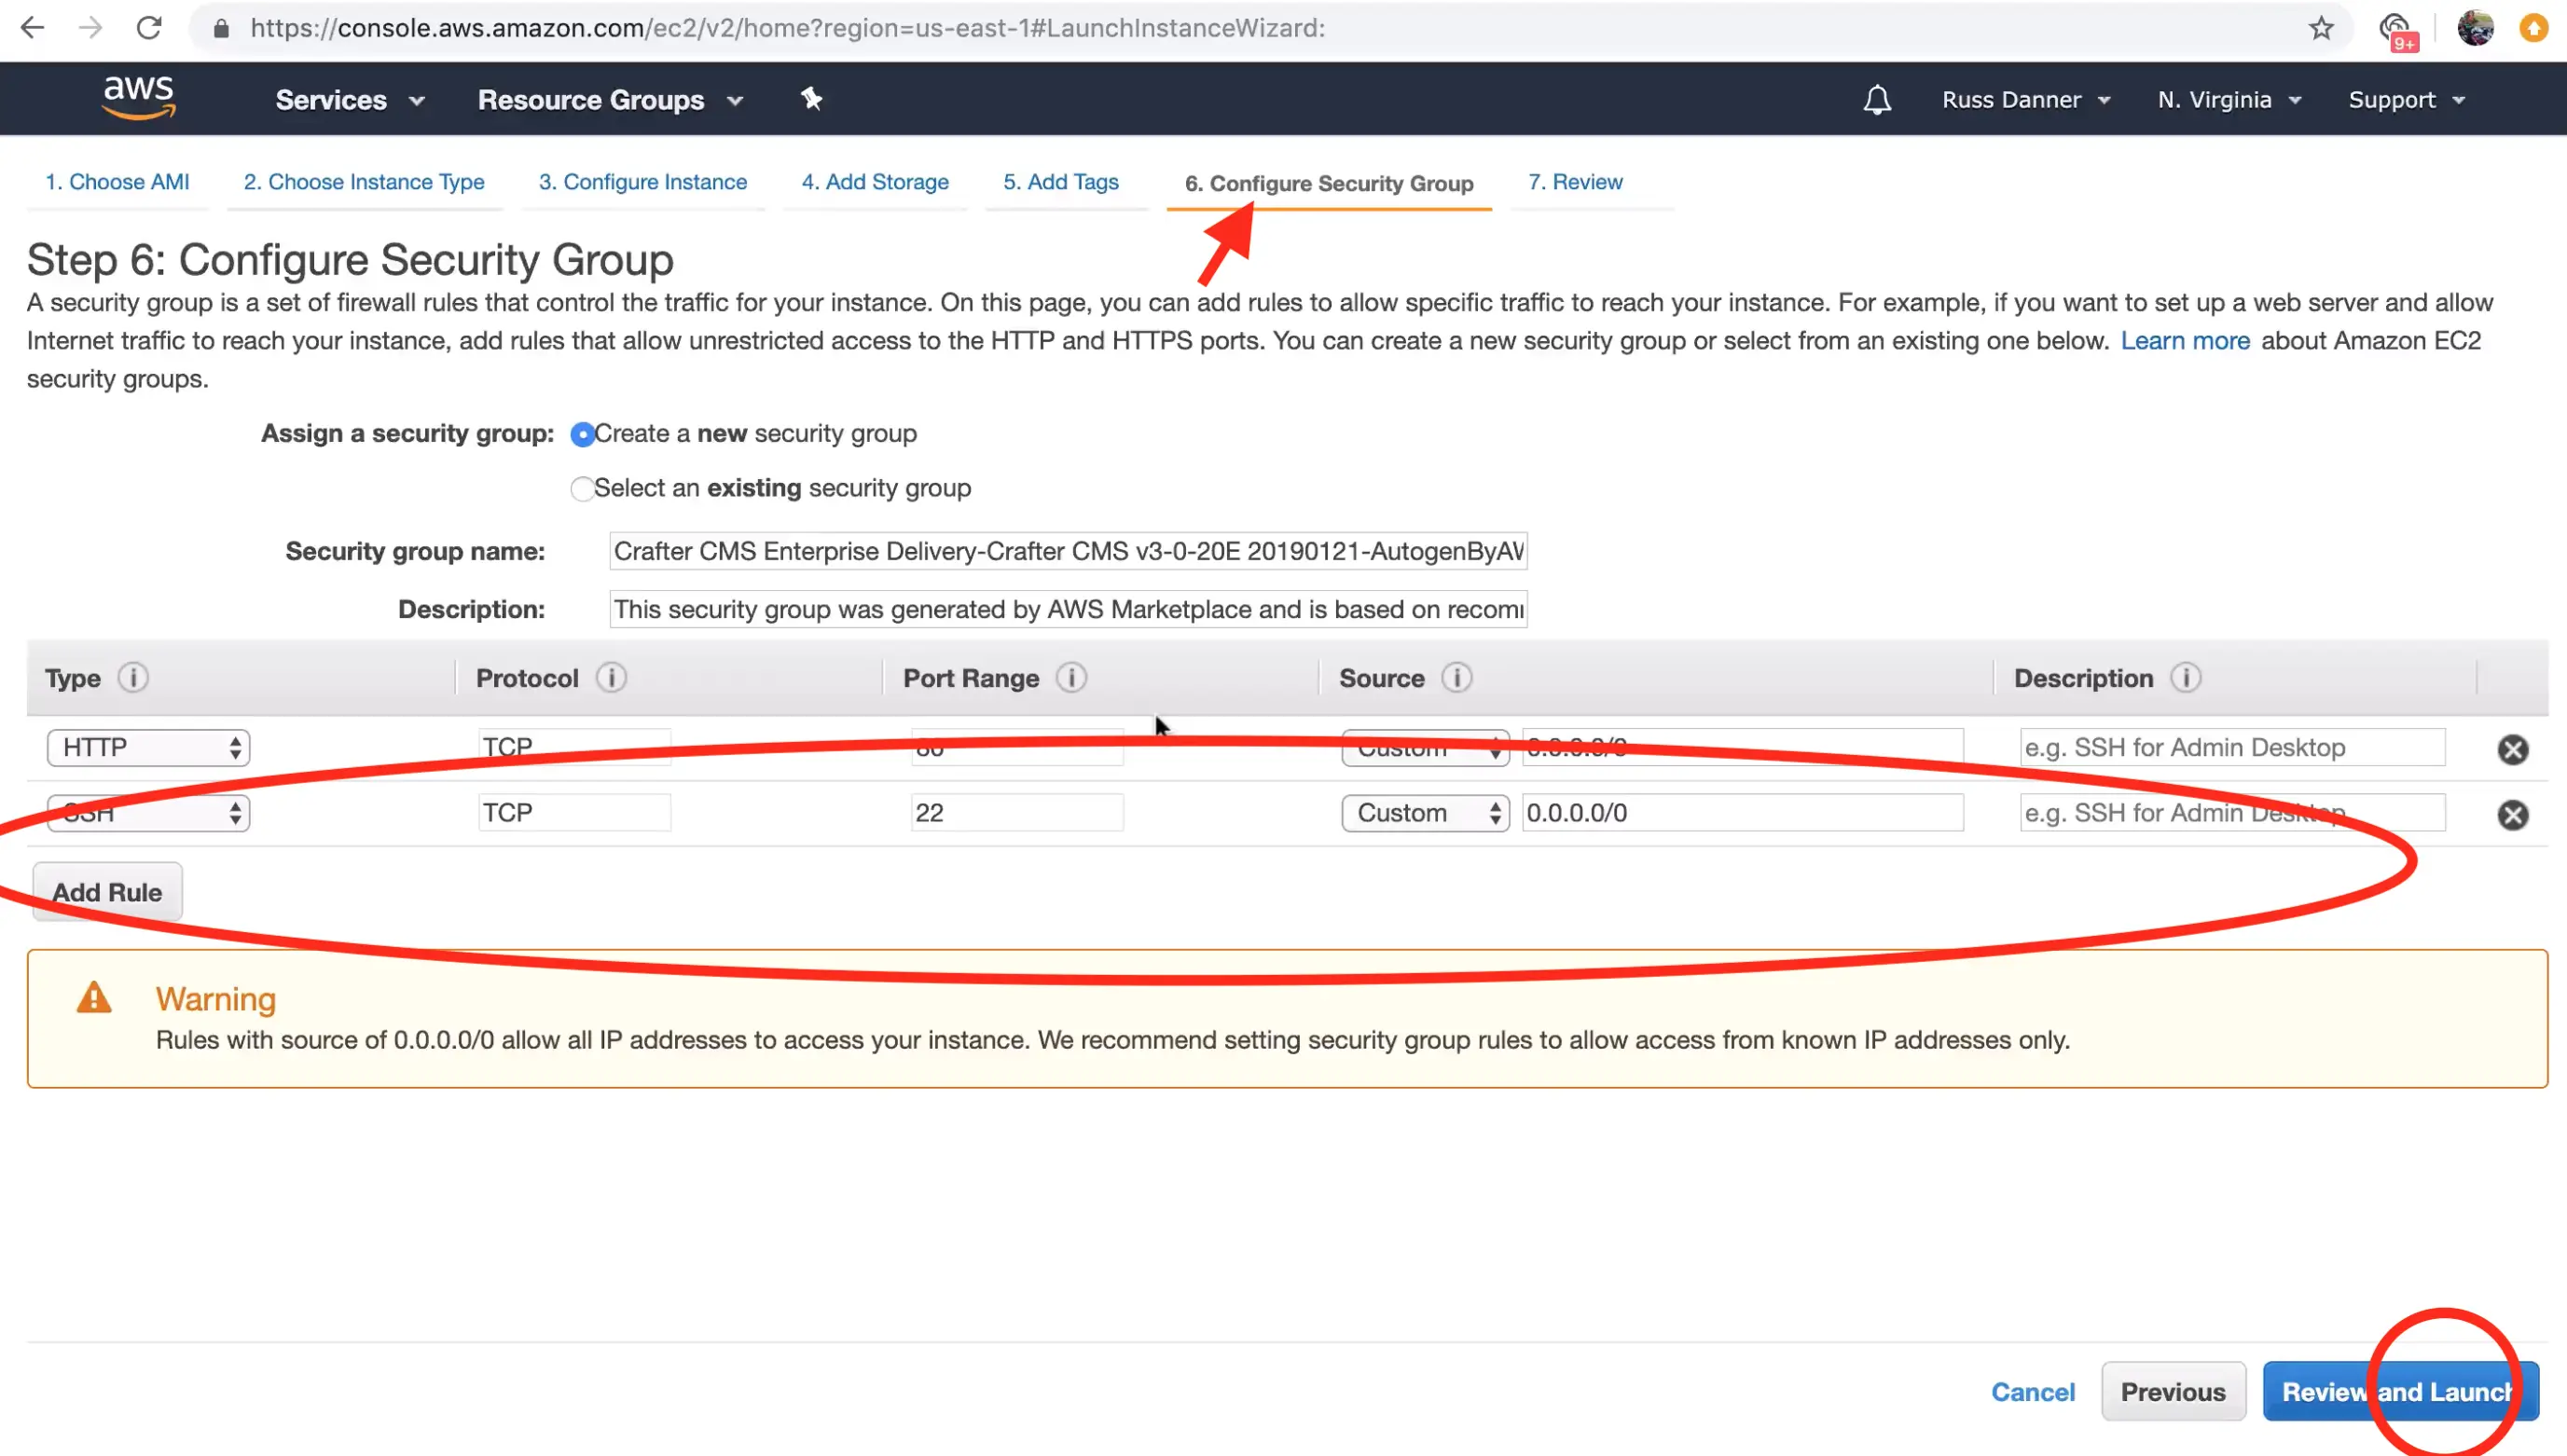
Once your have added SSH access and made any other tweaks you feel are necessary to your instance's configuration, click the "Review" tab and then click the "Launch." button.
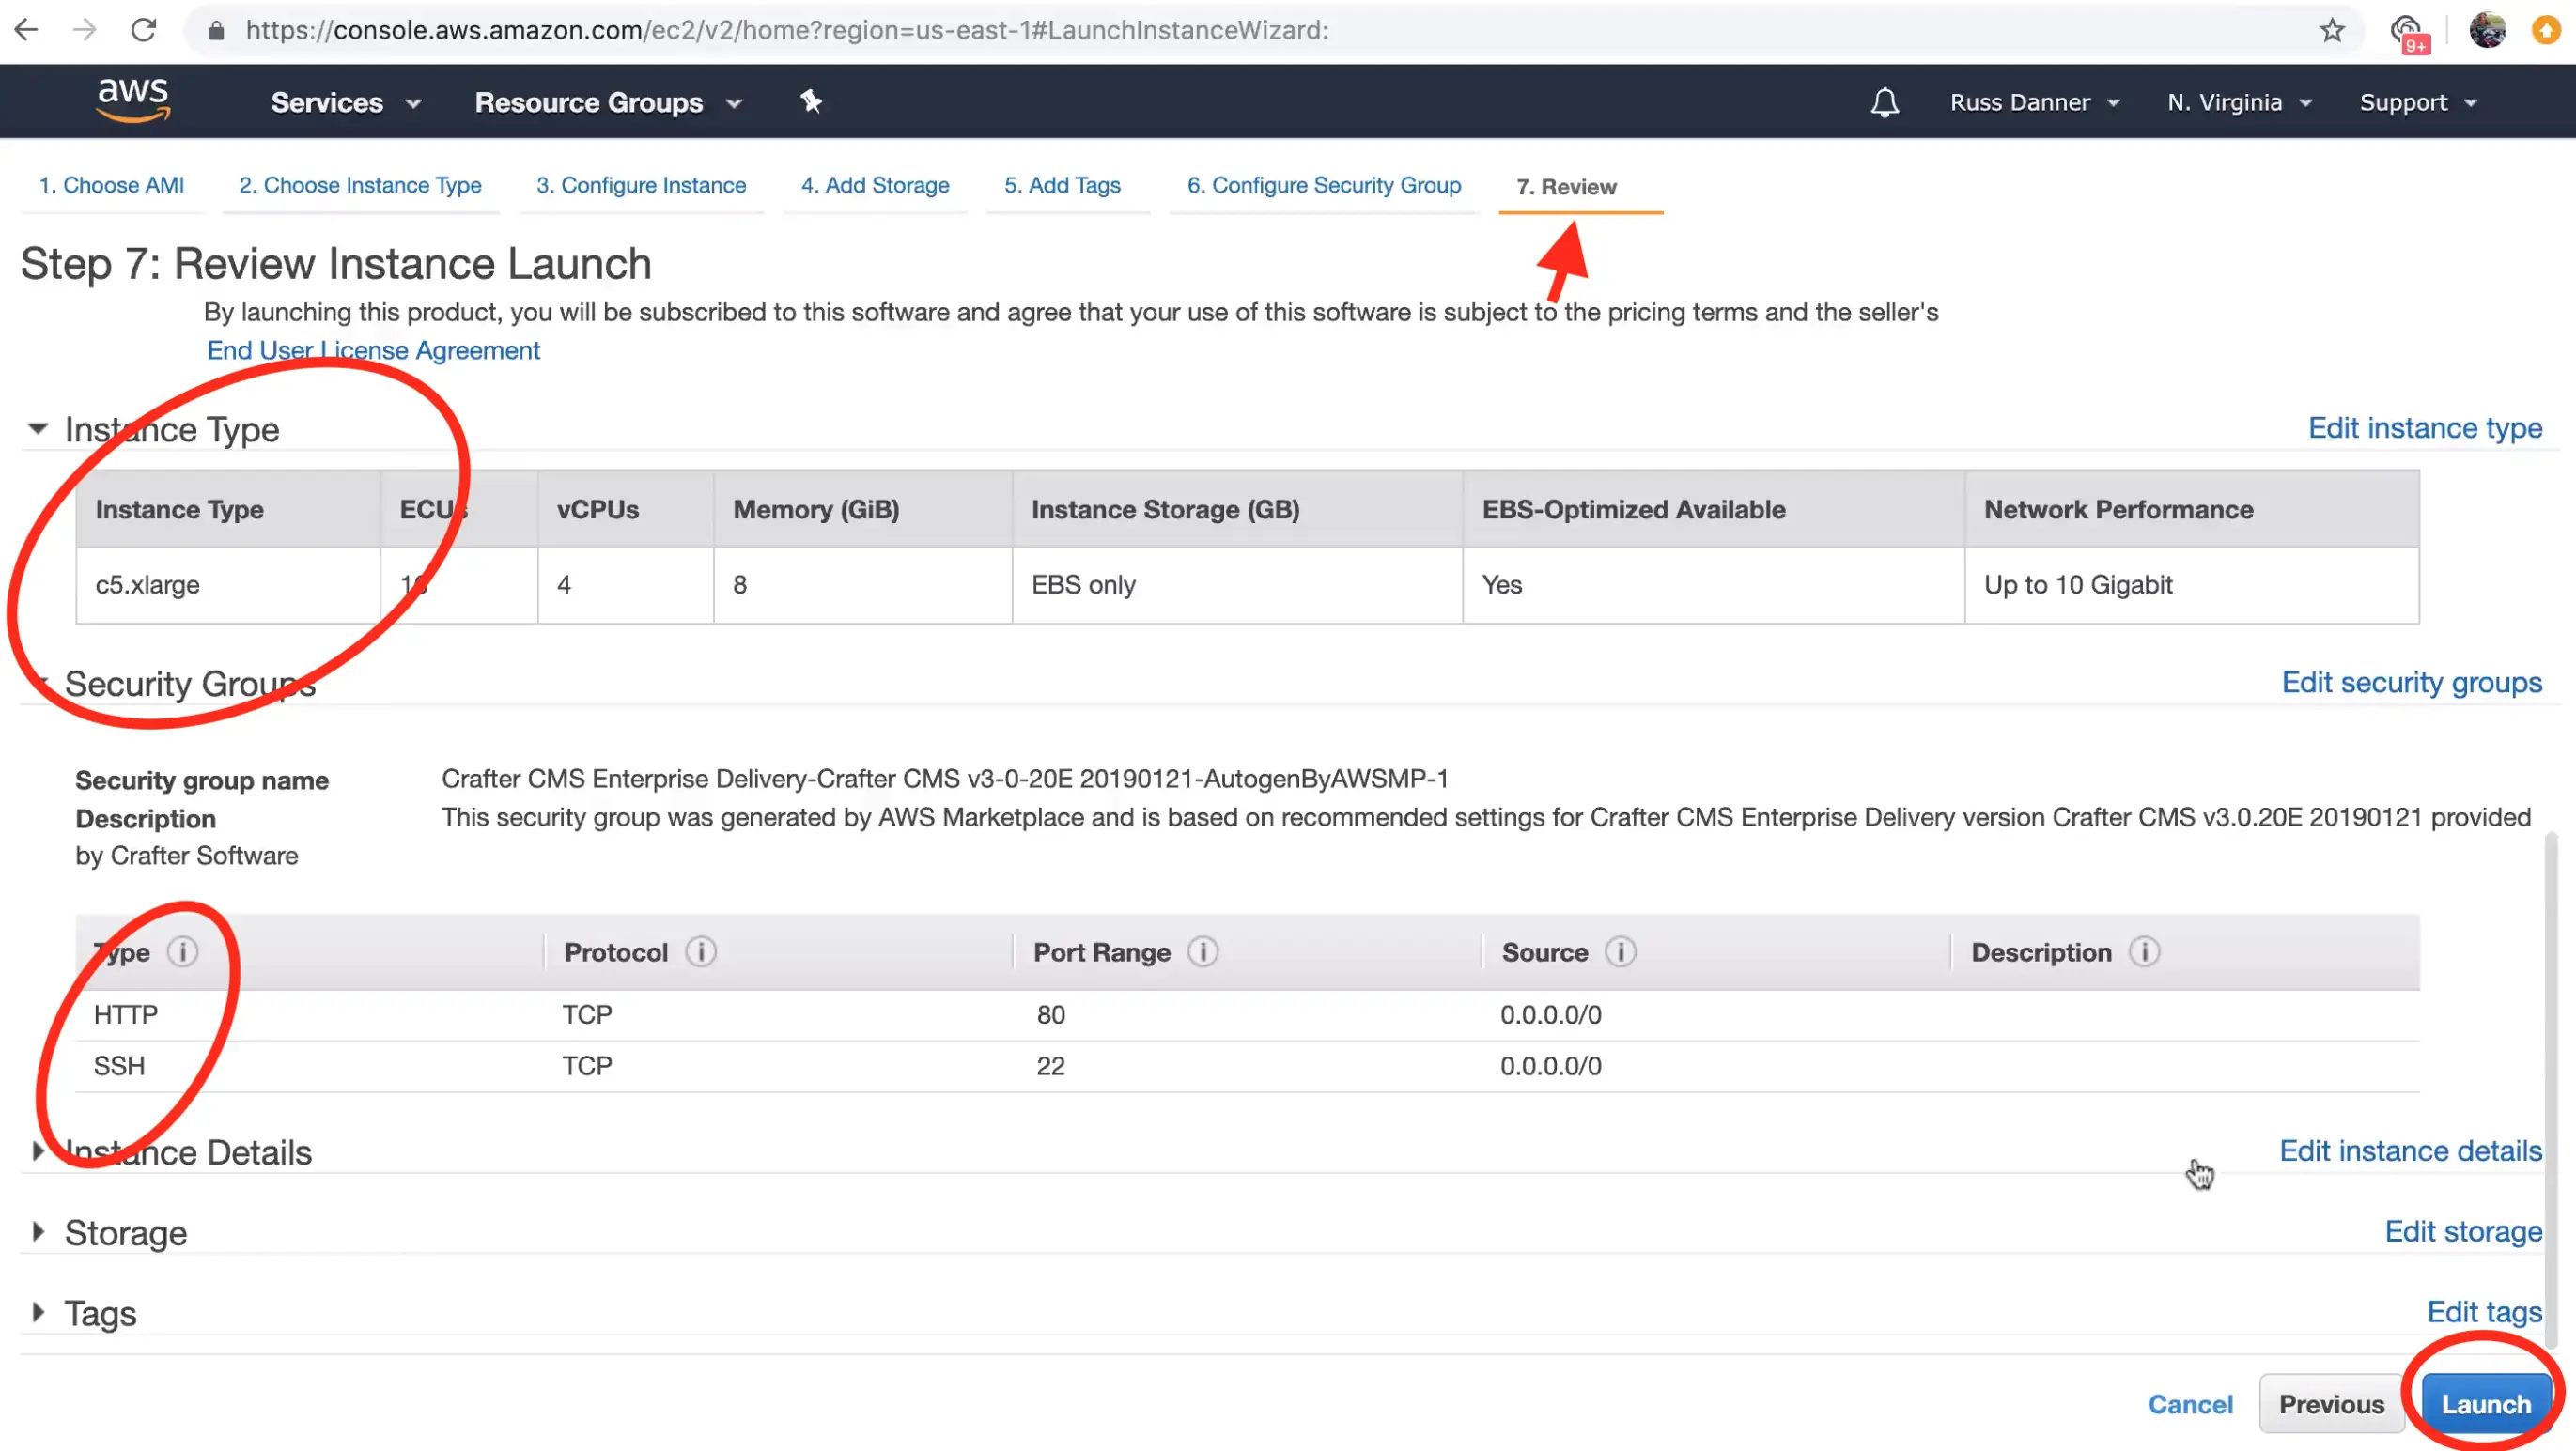
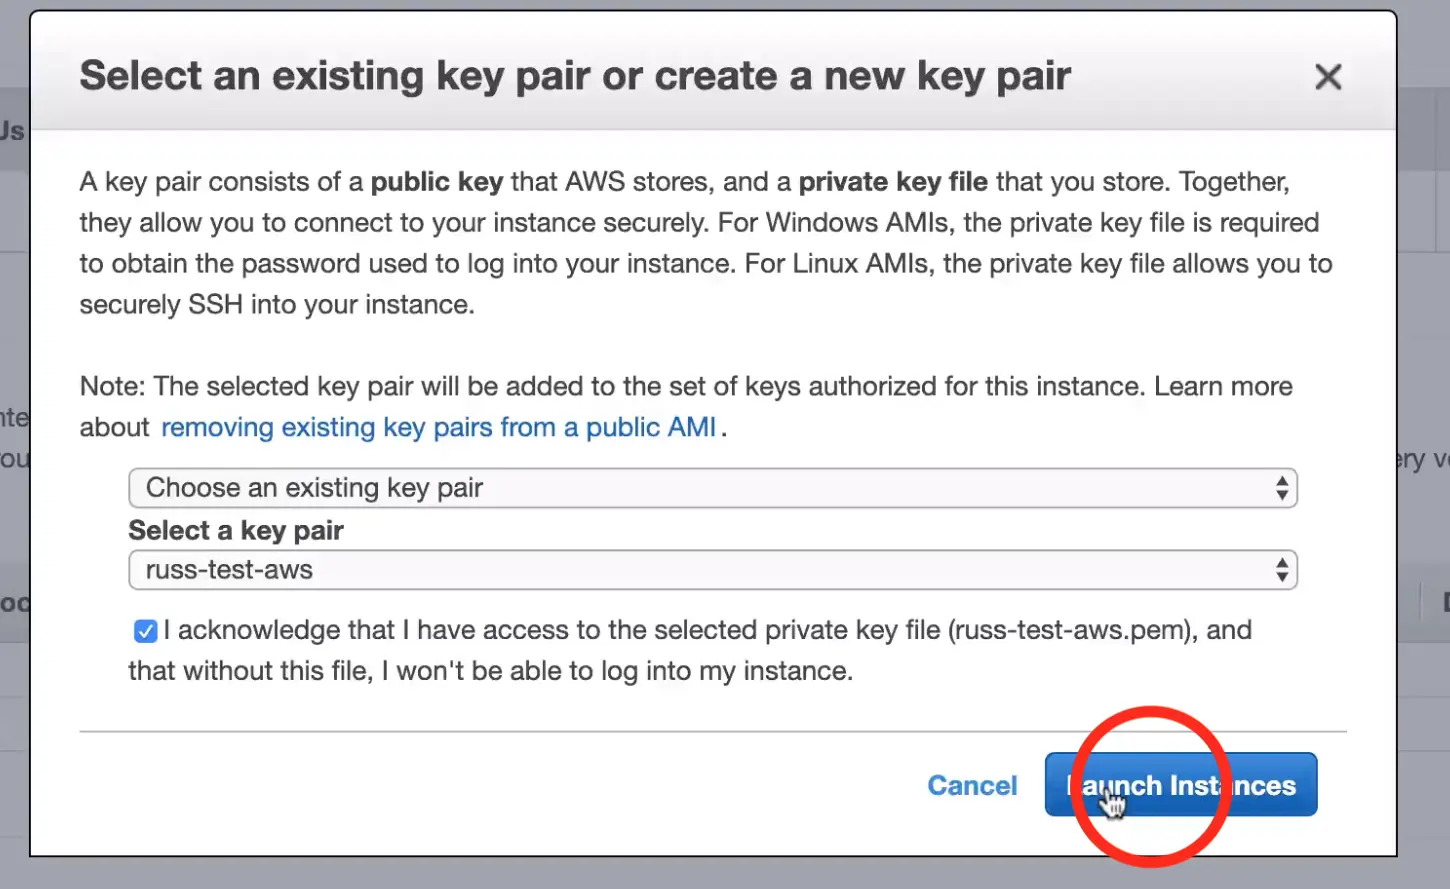
After clicking "Launch", AWS will request that you select a public key for administrative console access to the machine. You will need access to this key in the next step in order to retrieve the administrator's password for Crafter Studio. Create or choose an existing key and click "Launch Instances"
Once you click "Launch instances" AWS will start and initialize the instance. This may take a minute or two.
Step 2: Access the Crafter Engine via the Web
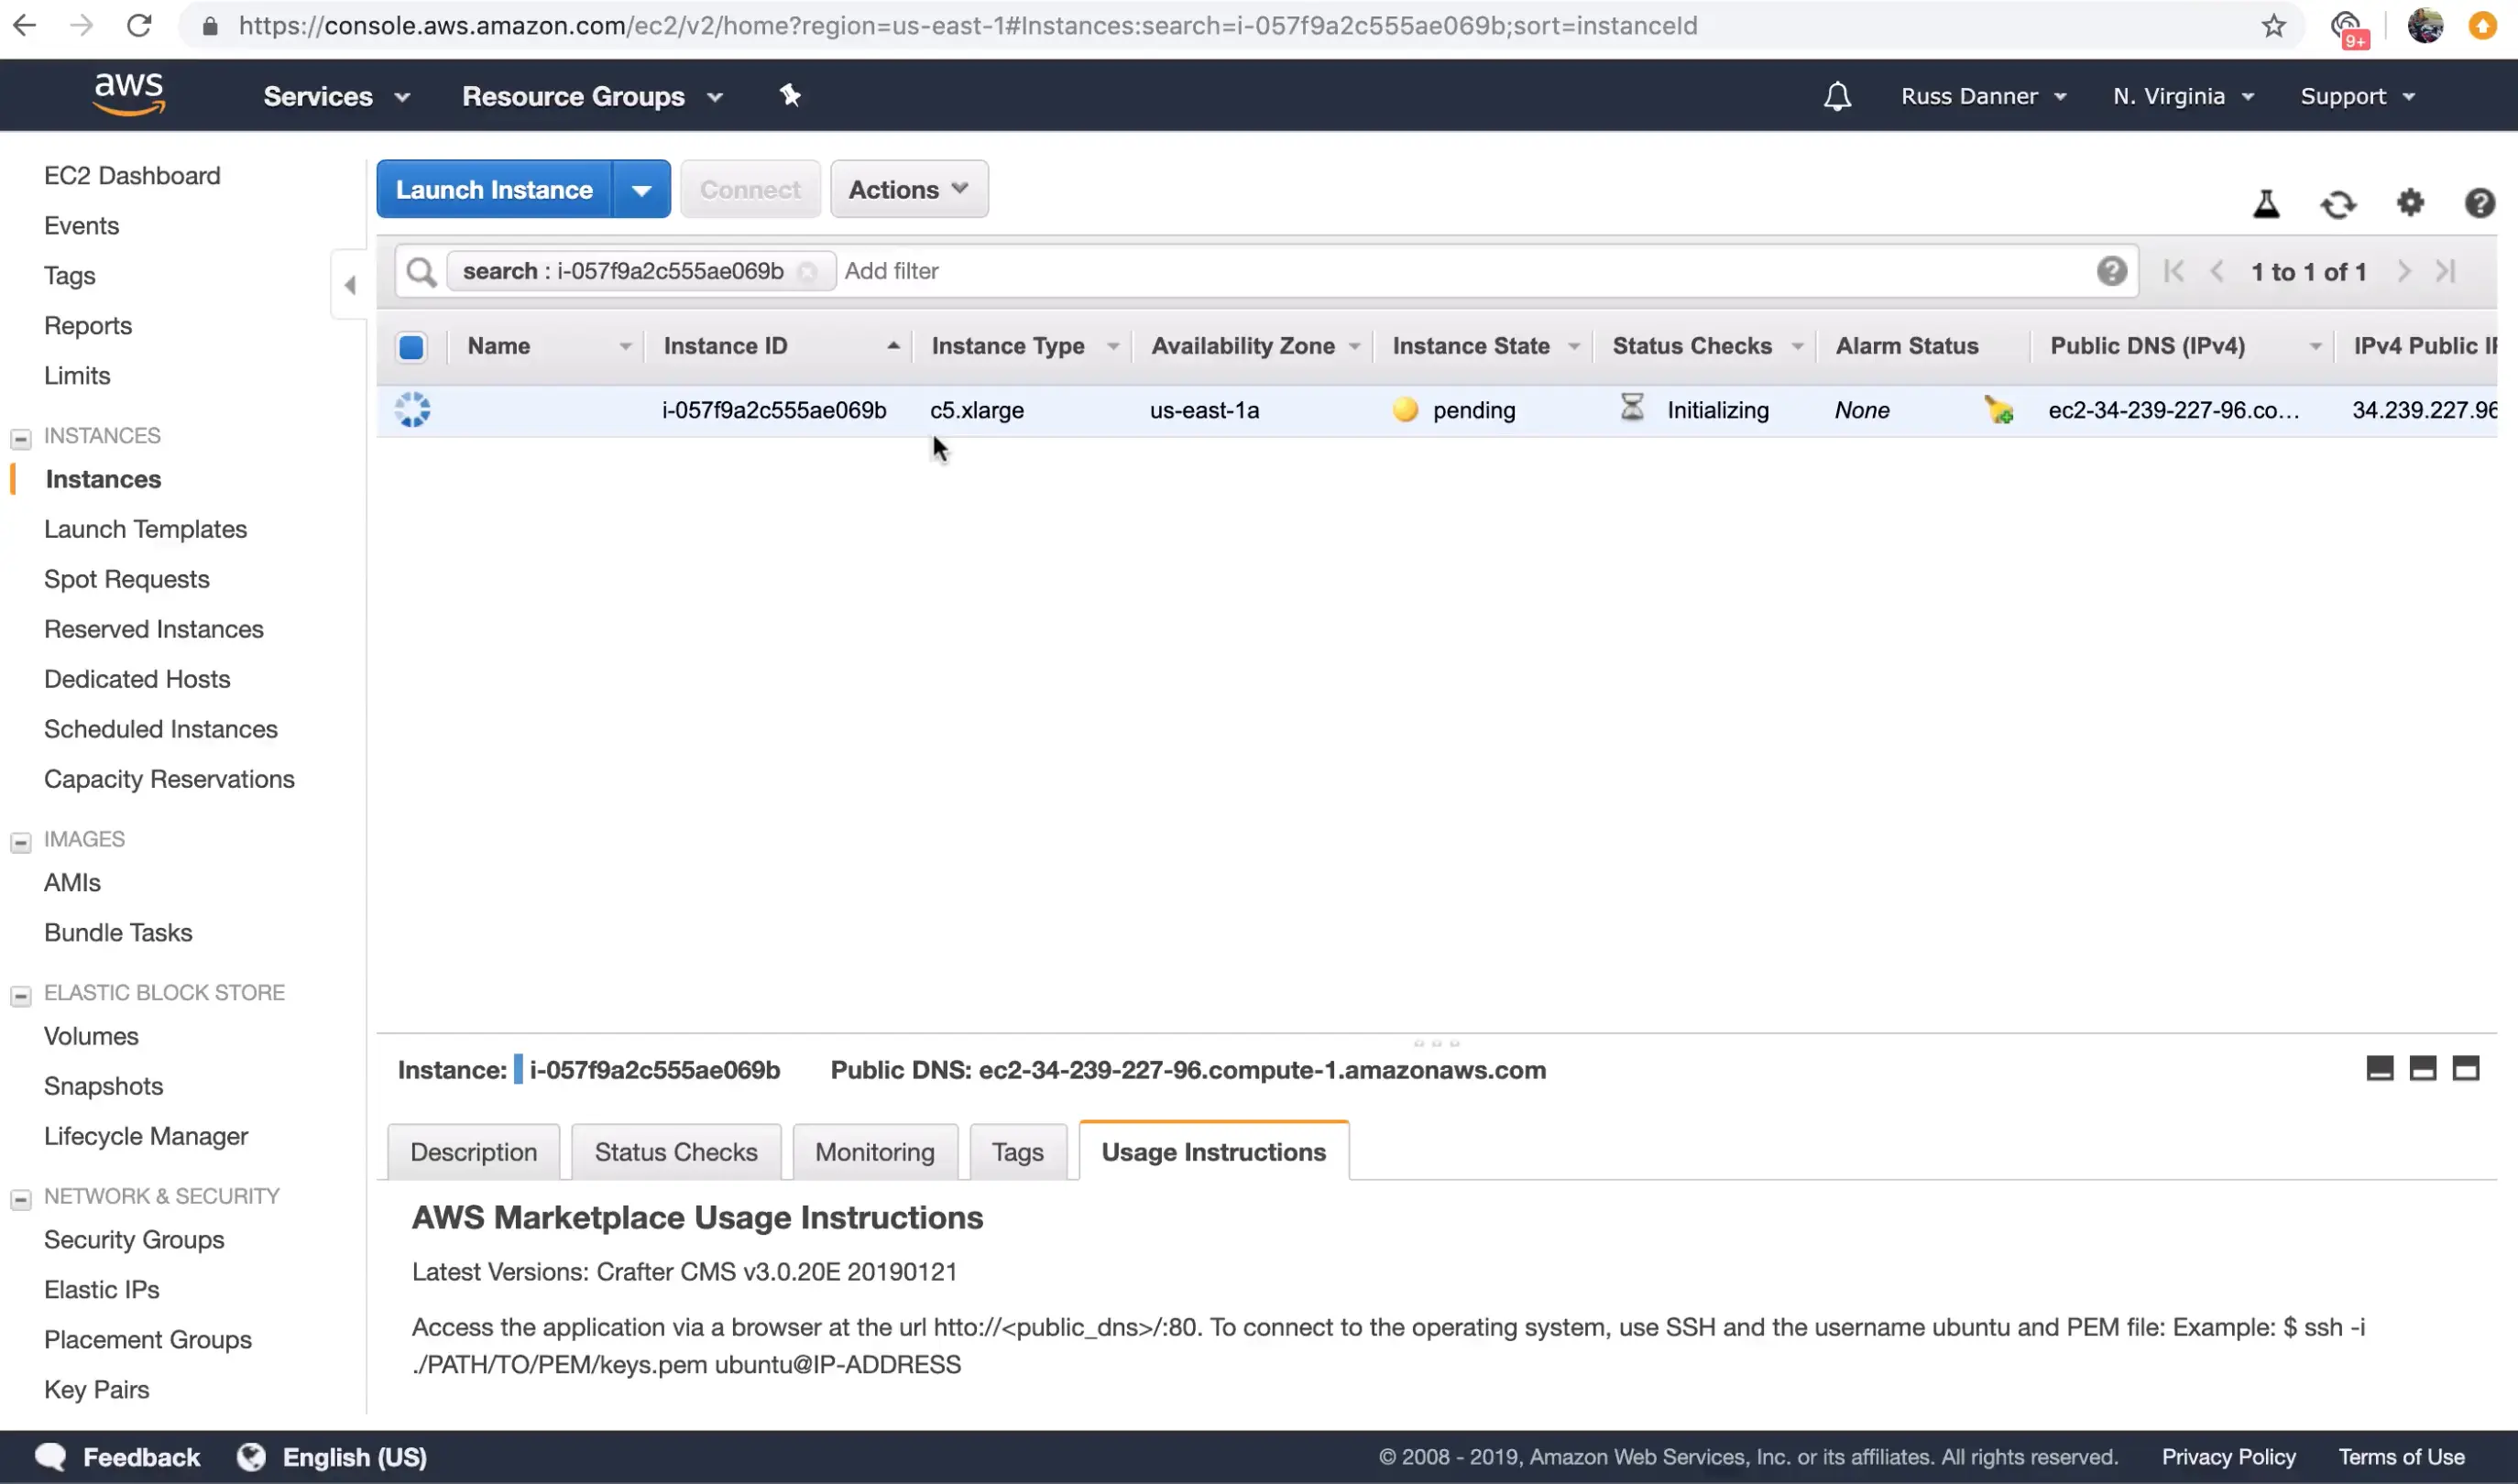
In this step we want to prove that the application is up and running now that our instance has started and initialized fully. To do this, we're simply going to check that the application login screen shows up when we access it via a web browser.
To access the login screen open a web browser and navigate to http://DNS_NAME_OR_IP_ADDRESS. 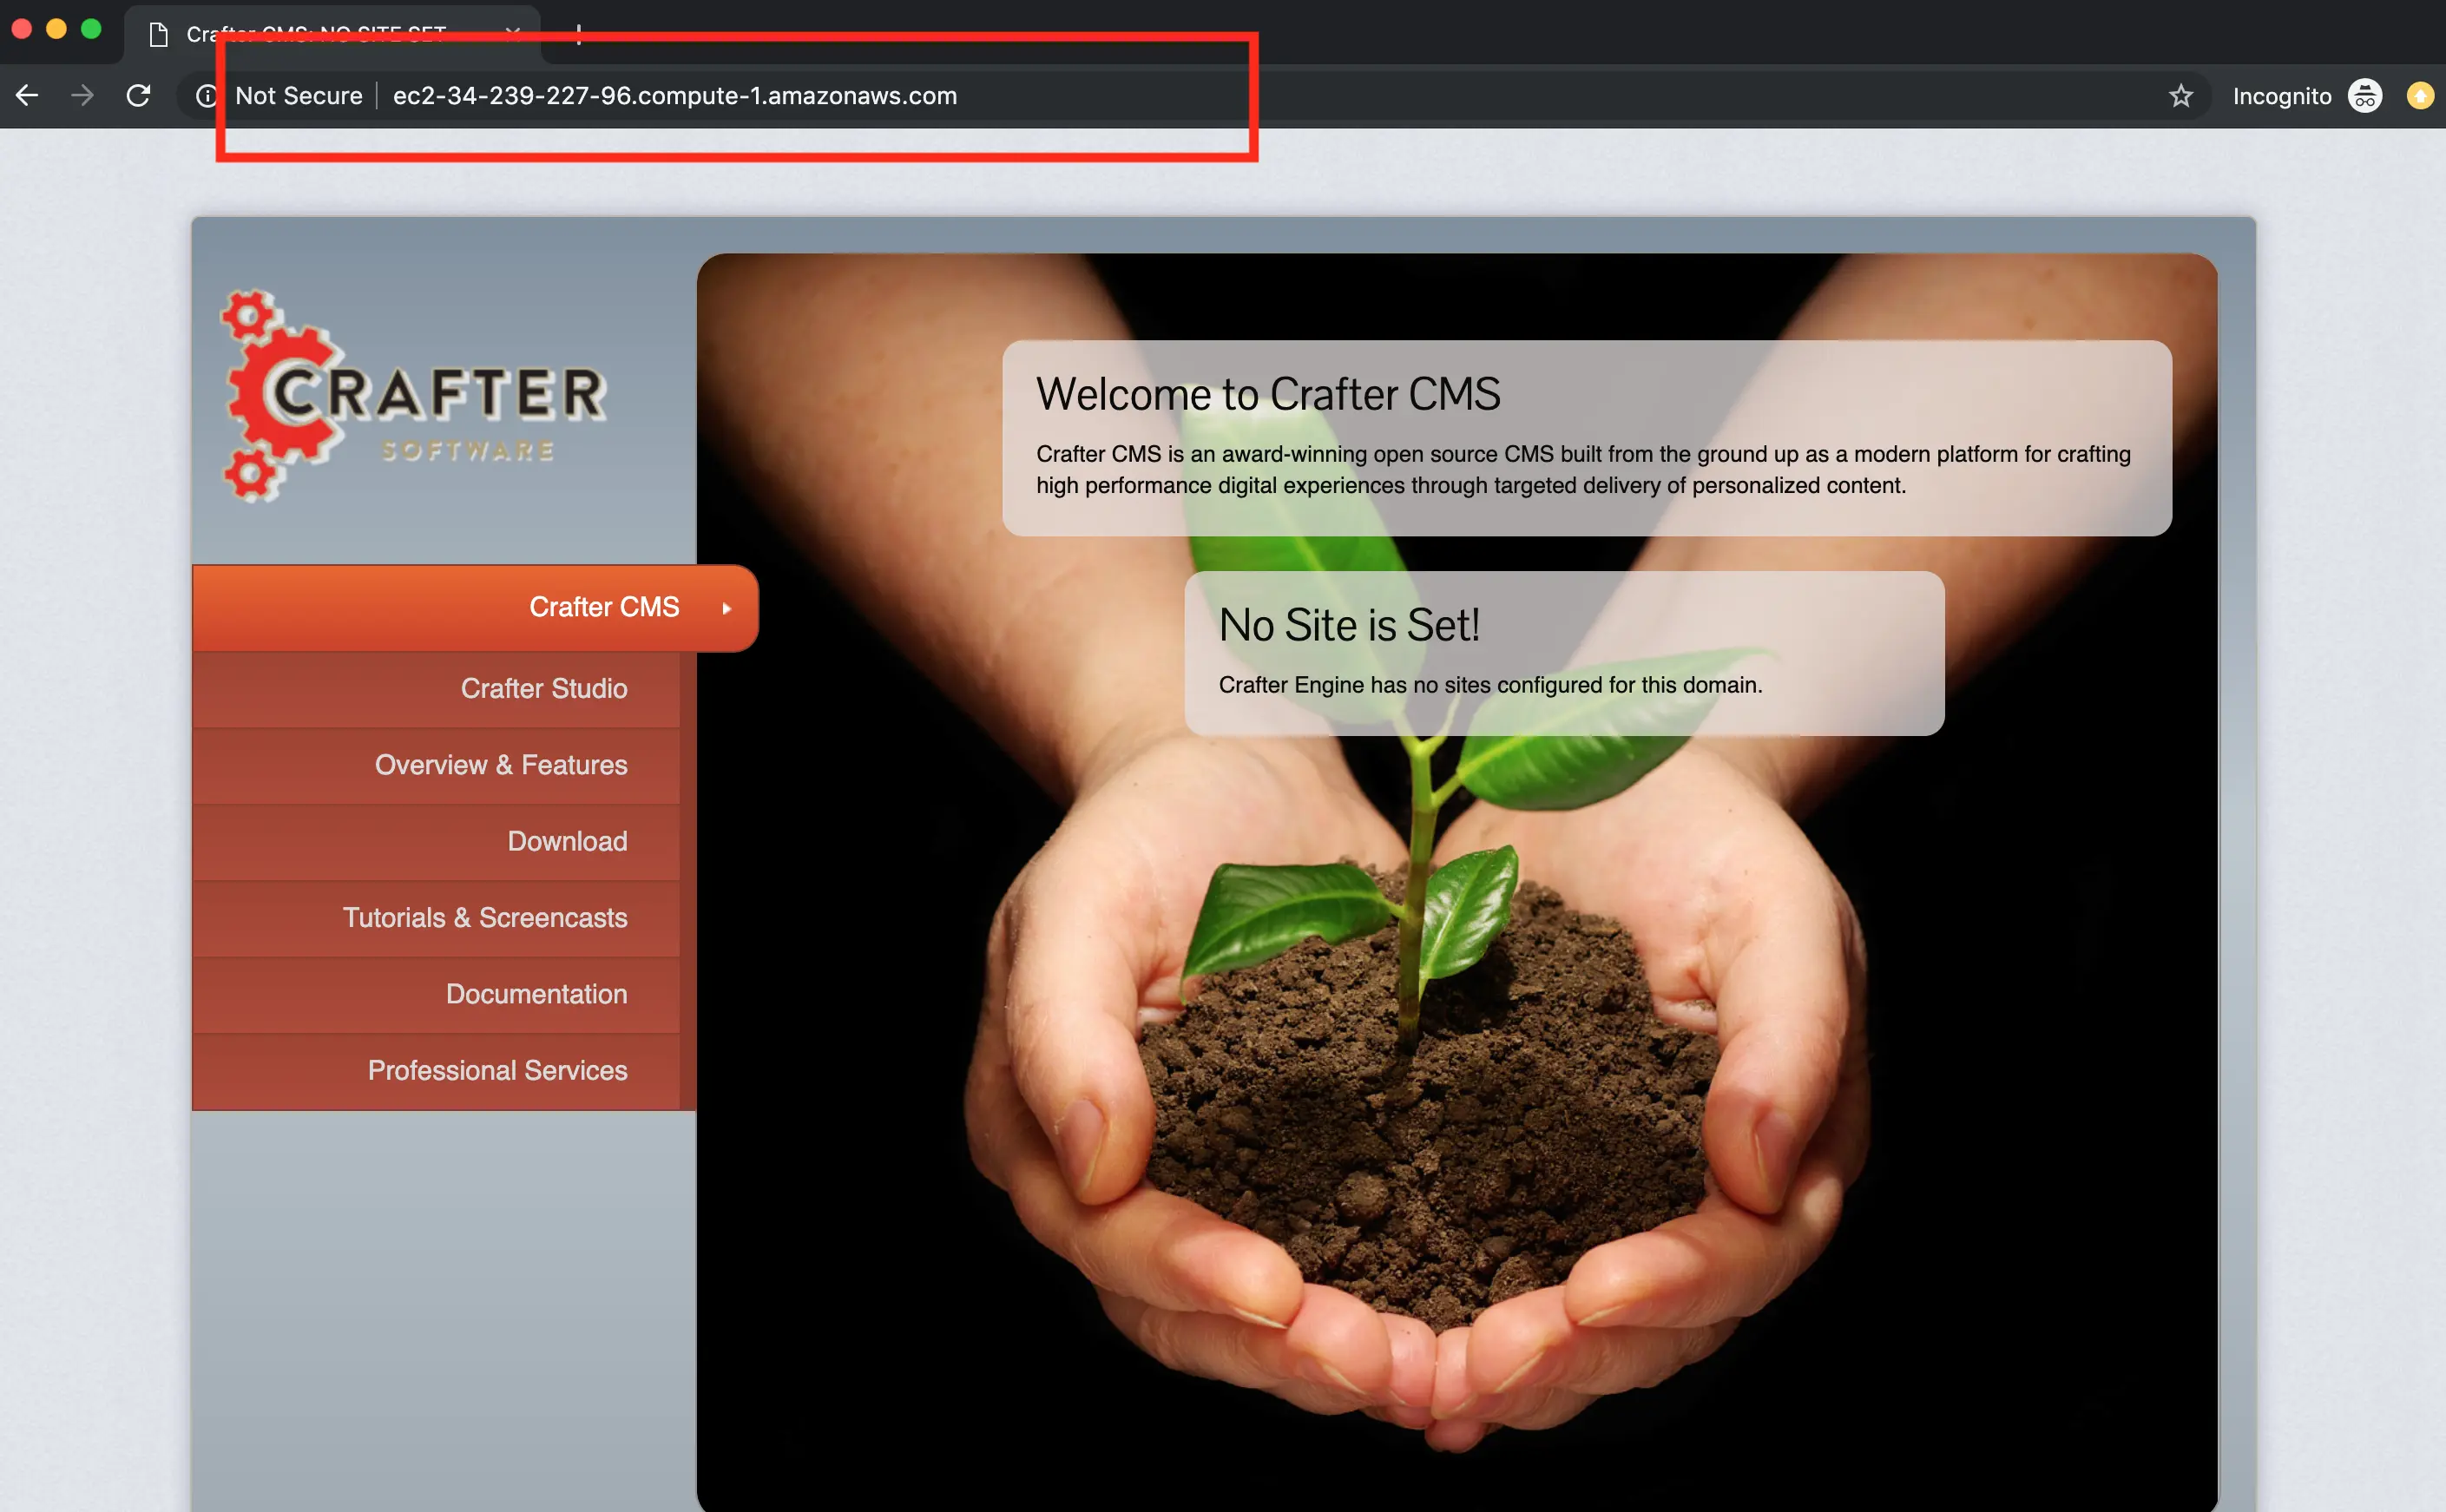
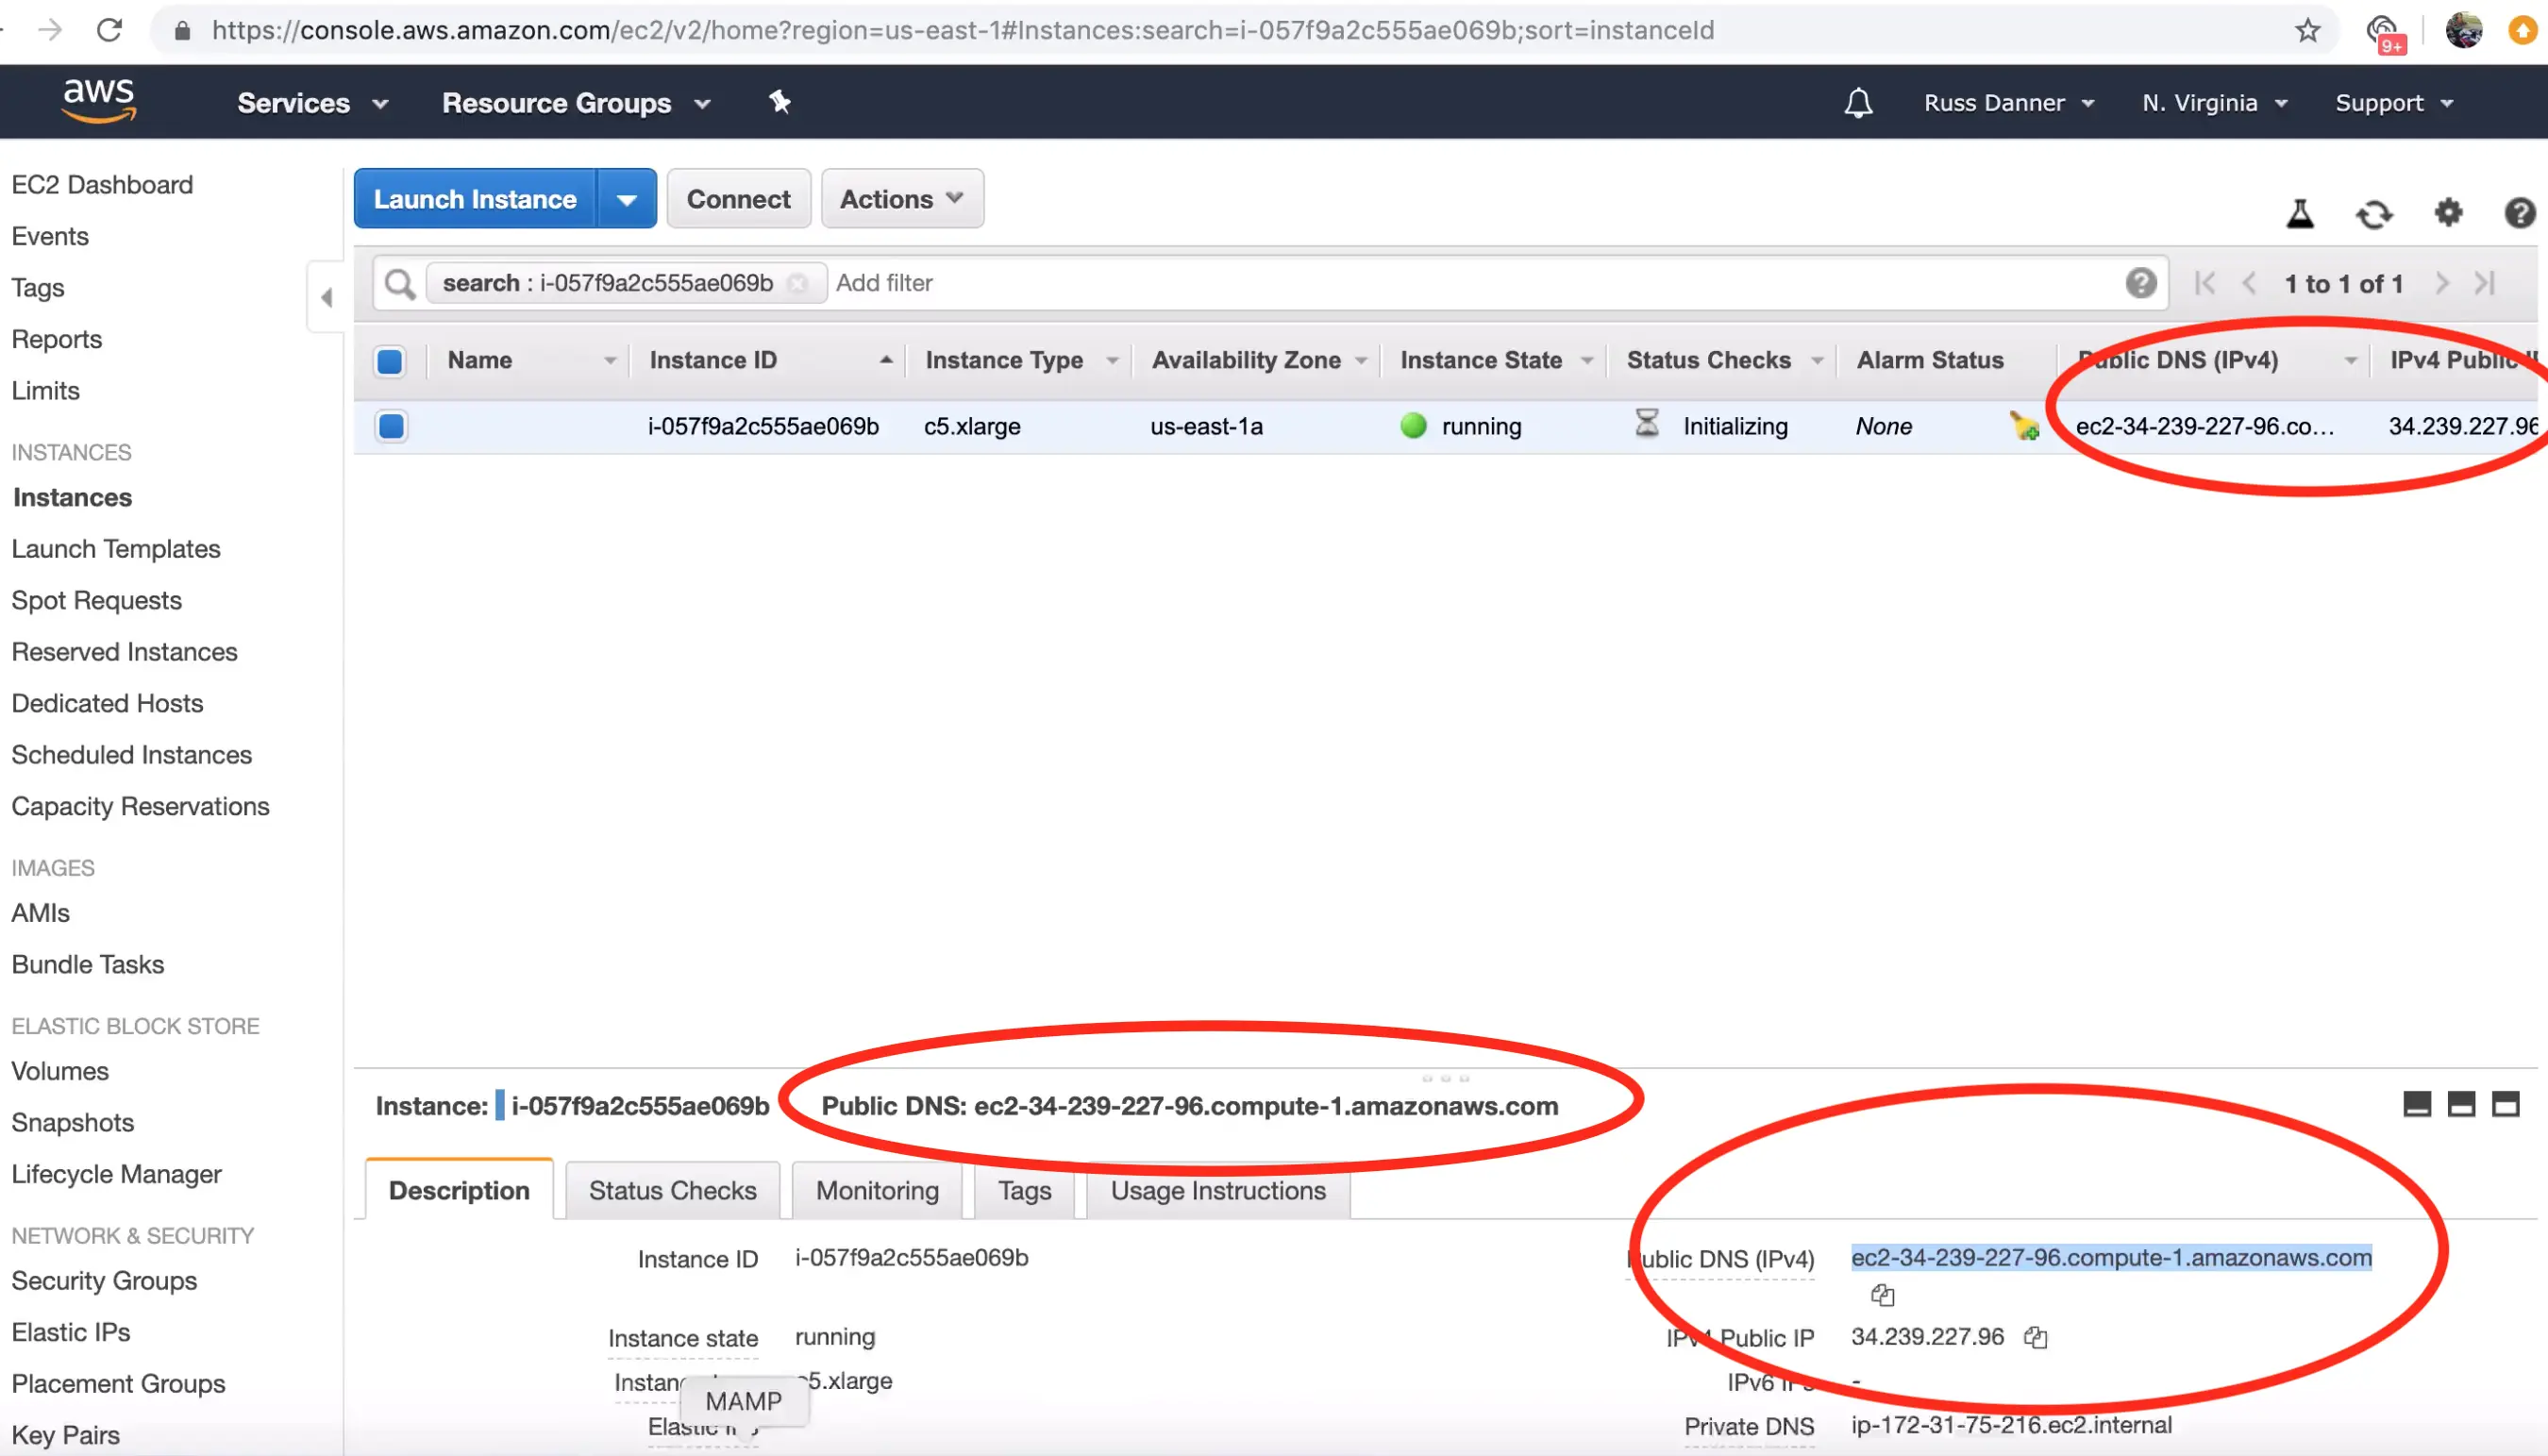
You can find the IP address and/or DNS name in several locations on your AWS administration console shown here:
Step 3: Configure Crafter Engine to deliver published sites
Crafter Engine is now up and running. However, in order to deliver content, its deployer must be configured to monitor a published repository for one or more sites. A delivery engine is multi-tenant and can deliver many sites. Each site must be configured or "initialized" such that the deployer monitors a Git repository for published updates. CrafterCMS's delivery tier has a decoupled, shared-nothing architecture that makes it cloud native and elastically scalable. You can read more about this architecture here: https://docs.craftercms.org/en/3.0/developers/architecture.html
In this section we'll show you how to configure a Crafter Delivery instance to monitor a published Git repository and delivery content for a given site. The simplest topology for this is to directly monitor the published repository of a project on the authoring instance. This is what we will configure. Let's get started.
Step 3.1: Configure authoring instance
In order to complete step 3, you must have an CrafterCMS authoring instance running. If you do not, please follow these instructions to set an instance:
https://craftercms.org/blog/2019/04/setup-crafter-cms-authoring-using-crafters-aws-ami
After your authoring instance is set up and configured, follow this guide to create a simple site.
https://docs.craftercms.org/en/3.0/getting-started/your-first-website.html
Crafter will automatically "publish" the initial state of the site for youfor you which will give you the prerequisites for the rest of step 3.
Step 3.2: Establish SSH-based communication between the delivery instance and the authoring instance
The delivery instance's deployer can use any git protocol to communicate with the published repository. SSH is a secure method that is available with no additional set up. We'll use this approach. SSH requires authentication and the cleanest way to authenticate is via public / private keys. You may use existing key pairs but they must be RSA type keys. For completeness we'll generate and install keys from scratch.
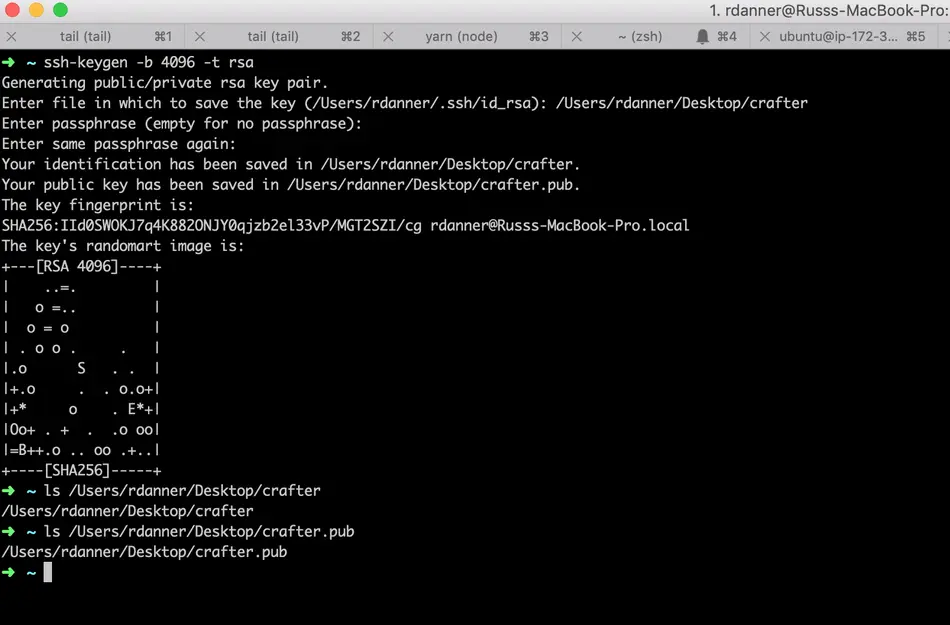
3.2.1: Create a public / private key pair
On your local machine, generate a public / private key pair. On a terminal/console execute the following command:
ssh-keygen -b 4096 -t rsa
You will be prompted for the file name and a passphrase. Since Crafter will use this key as part of an automated process, do not enter a passphase (just hit enter when prompted.)
Once the keygen process completes you should find a file at the location you specified. This is your private key. You will find another file at the same location with a .pub extension. This is your public key.
3.2.2: Install the public key on the authoring server
The next step is to upload and install our public key onto the authoring instance.
Upload the public key to the authoring server
You can upload the public key from your local machine to the authoring server by executing a file transfer via the scp command in a terminal window.
The command takes the following form: scp -i [PATH_TO_UBUNTU_USERS_PIVATE_KEY] [PATH_TO_GENERATED_PUBLIC_KEY] ubuntu@[DNS_NAME_OF_DELIVERY_INSTNCE]:~/crafter.pub
Example:
scp -i ~/russ-test-aws.pem ~/Desktop/crafter.pub ubuntu@ec2-3-93-34-40.compute-1.amazonaws.com:~/crafter.pub
Install the public key on the authoring server
The next step is to log in to the authoring server and install the public key into the crafter user's account.
To do this, SSH on to the authoring server as the ubuntu user and execute the following commands:
sudo mkdir -p /home/crafter/.ssh
sudo touch /home/crafter/.ssh/authorized_keys
sudo chown -R crafter:crafter /home/crafter/.ssh
sudo su -
cd /home/ubuntu/
cat crafter.pub >> /home/crafter/.ssh/authorized_keys
sudo chown -R crafter:crafter /home/crafter/.ssh
sudo ls -al /home/crafter/.ssh
exit
The ls command will help you verify that the key has been added to the authorized_keys file and that crafter is the owner of the file. The output should look similar to the following:
total 12
drwxr-xr-x 2 crafter crafter 4096 Apr 17 21:06 .
drwxr-xr-x 3 crafter crafter 4096 Apr 17 21:06 ..
-rw-r--r-- 1 crafter crafter 757 Apr 17 21:09 authorized_keys
3.2.3: Install the private key on the delivery server(s)
The next step is to upload and install our private key onto the delivery instance.
Upload the private key to the delivery server
You can upload the private key from your local machine to the delivery server by executing a file transfer via the scp command in a terminal window.
The command takes the following form: scp -i [PATH_TO_UBUNTU_USERS_PIVATE_KEY] [PATH_TO_GENERATED_PRIVATE_KEY] ubuntu@[DNS_NAME_OF_DELIVERY_INSTNCE]:~/crafter
Example:
scp -i ~/russ-test-aws.pem ~/Desktop/crafter ubuntu@ec2-34-293-227-96.compute-1.amazonaws.com:~/crafter
Install the private key on the delivery server
The next step is to log in to the delivery server and install the private key into the crafter user's account.
To do this, SSH on to the delivery server as the ubuntu user and execute the following commands:
sudo cp crafter /home/crafter/.ssh/id_rsa
sudo chown crafter:crafter /home/crafter/.ssh/id_rsa
3.2.4 Log in to the authoring server from the delivery server(s) using SSH
Now that both our public and private keys are installed on their respective servers we're going to test that they work properly and establish a fingerprint for the authoring server on the delivery server. To do this:
SSH on to the delivery server as the ubuntu user and execute the following commands:
sudo su crafter
ssh -o HostKeyAlgorithms=ssh-rsa crafter@ec2-3-93-34-40.compute-1.amazonaws.com
It's important that you include the -o HostKeyAlgorithms=ssh-rsa parameter in the initial SSH connection to the authoring server. Crafter expects the fingerprint to be stored in an RSA format. Once you execute the SSH command to log in to the authoring machine from the delivery machine as the crafter user. You will be prompted to verify the auhtenticity of the authoring server. Type yes to confirm. After this you will be logged in to the authoring server. No further action is required. Type exit in to the command line of the authoring server to terminate the SSH session.
The authenticity of host 'ec2-3-93-34-40.compute-1.amazonaws.com (172.31.79.17)' can't be established.
RSA key fingerprint is SHA256:OWVEsHafTLRPlmAO/J/RtvXoCrsx2oMKm4qMooIm+WE.
Are you sure you want to continue connecting (yes/no)? yes

Warning: Permanently added 'ec2-3-93-34-40.compute-1.amazonaws.com,172.31.79.17' (RSA) to the list of known hosts.
Welcome to Ubuntu 18.04.1 LTS (GNU/Linux 4.15.0-1031-aws x86_64)

....

exit
Step 4: Intitialize the site on the delivery server
Now that secure communication is established between the authoring and delivery instances, we can initialize any number of sites to be delivered by the delivery instance. It's verys simple to initialize a site on the delivery instance. To do so:
SSH to the delivery server and execute the following command in the /opt/crafter/bin directory as the crafter user:
init-site.sh
When the init-site.sh command is executed without any parameters, parameter documentation will be presented. We'll use the following parameters in our example based on our public/private key setup that we did in the previous steps:
init-site.sh -b live [SITE_ID] ssh://crafter@[DNS_NAME_OF_AUTHORING_SERVER]:/opt/crafter/data/repos/sites/[SITE_ID]/published
The SITE_ID parameter can be acquired from the authoring server. Log in to Crafter Studio and "Preview" the site you wish to initialize and you will find the SITE_ID in the URL.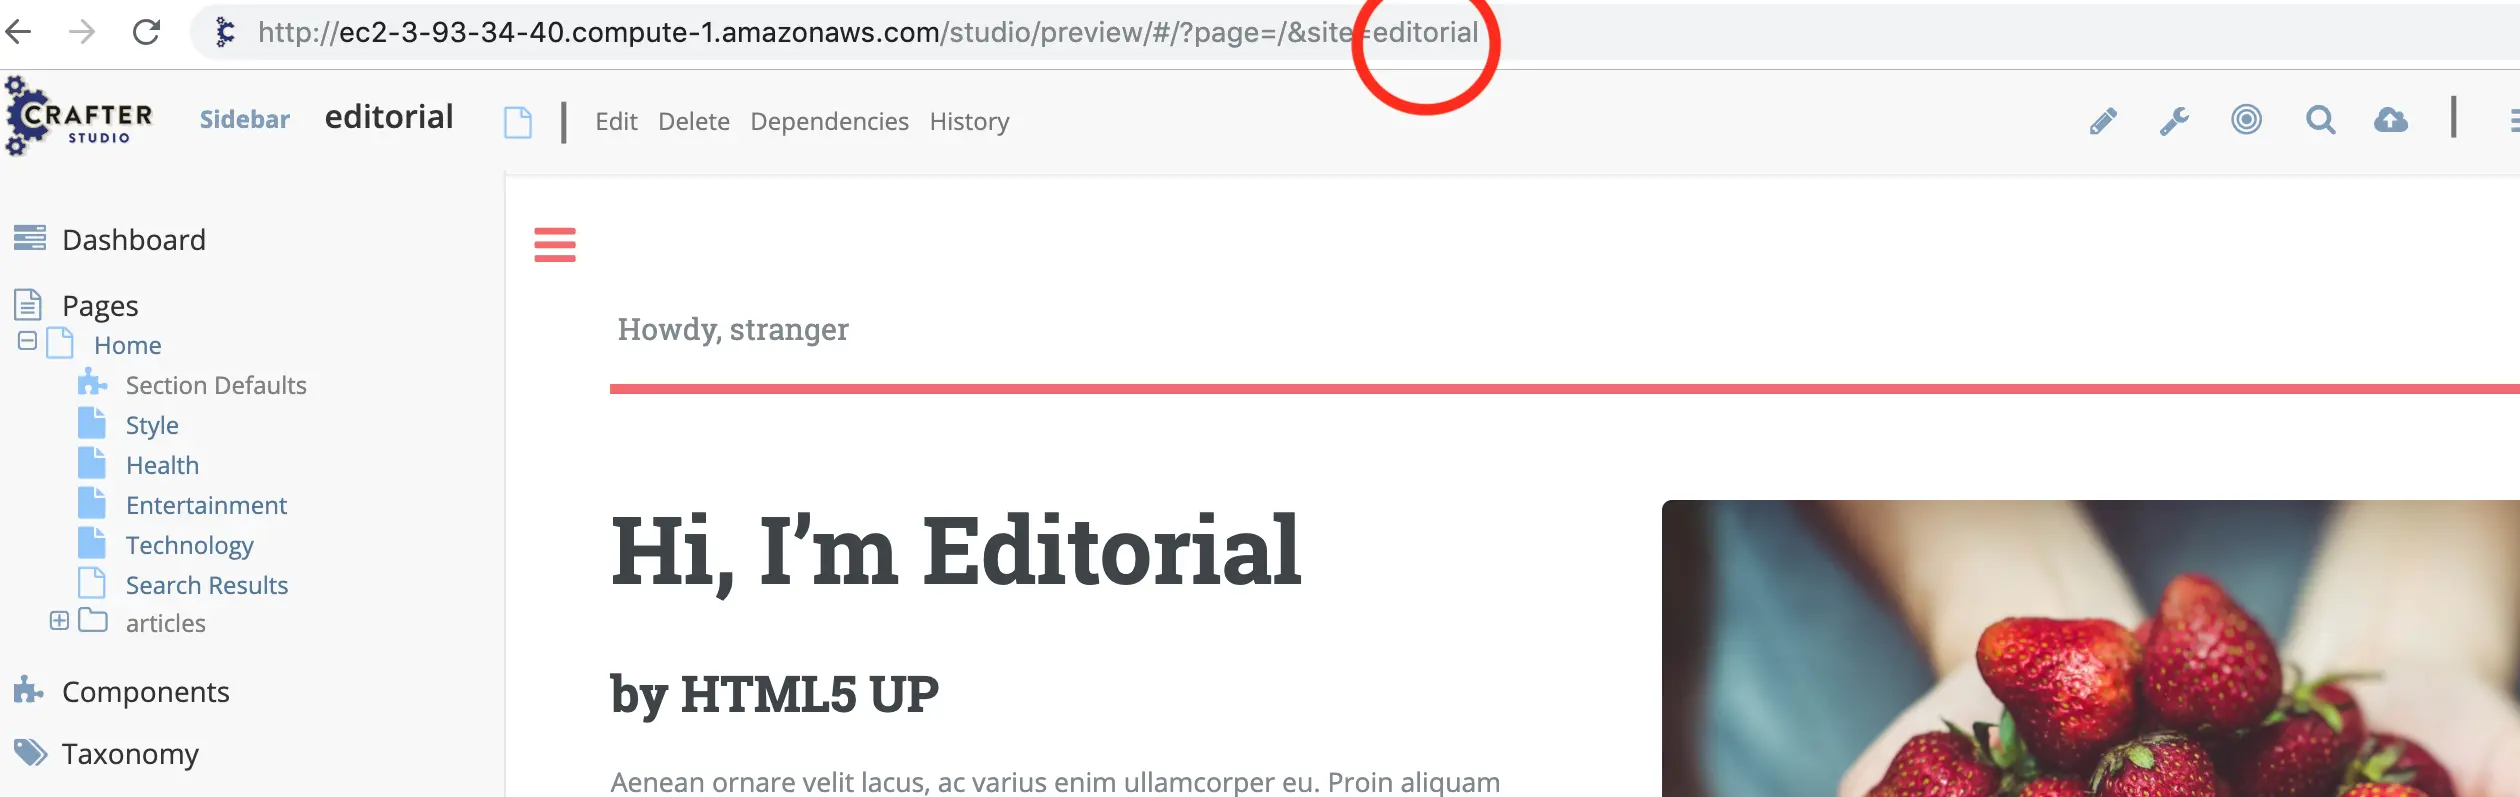
Successful execution of this command will produce output similar to the following:
Creating Solr Core...
Core created successfully
Creating Deployer Target...
Target created successfully
Example:
init-site.sh -b live editorial ssh://crafter@ec2-3-93-34-40.compute-1.amazonaws.com:/opt/crafter/data/repos/sites/editorial/published

You can further verify that the deployment is working by watching the logs. To watch the logs use the following command:
tail -n 1000 -f /opt/crafter/logs/deployer/crafter-deployer.out
Look for output that is similar to the following:
2019-04-17 21:39:00.001 INFO 4389 --- [pool-5-thread-1] o.c.d.impl.processors.GitPullProcessor : Cloning Git remote repository ssh://crafter@ec2-3-93-34-40.compute-1.amazonaws.com:/opt/crafter/data/repos/sites/editorial/published into /opt/crafter/data/repos/sites/editorial
2019-04-17 21:39:00.806 INFO 4389 --- [pool-5-thread-1] o.c.d.impl.processors.GitPullProcessor : Successfully cloned Git remote repository ssh://crafter@ec2-3-93-34-40.compute-1.amazonaws.com:/opt/crafter/data/repos/sites/editorial/published into /opt/crafter/data/repos/sites/editorial
Step 5: View the site on the delivery server from a web browser
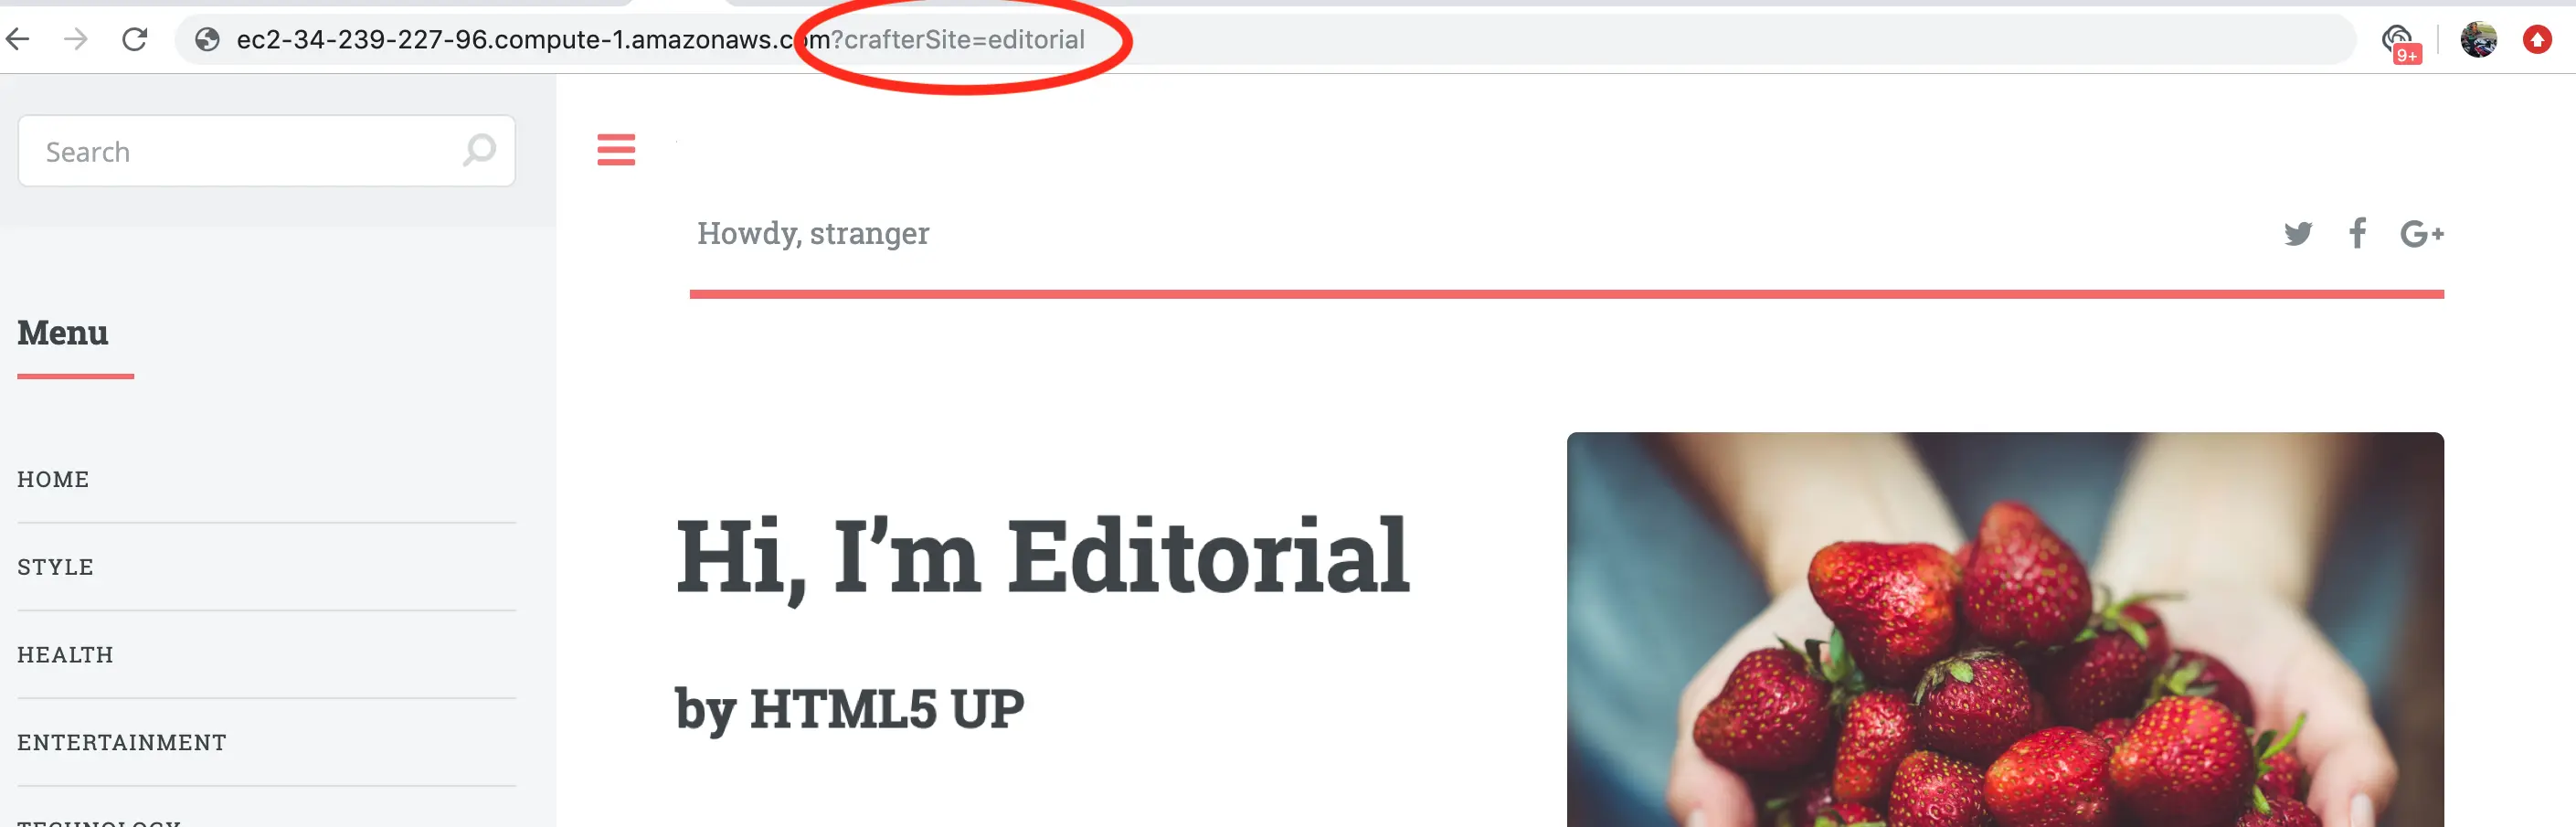
Now that site has deployed it can be viewied via web browser. As previously mentioned, Crafter's delivery tier is multi-tenant. A SITE_ID is used on the URL to indicate which tenant is to be displayed. To preview the site you initialized, open a browser and navigate to the following URL:
http://[DELIVERY_DNS_NAME]?crafterSite=[SITE_ID]
Example:
http://ec2-34-239-227-96.compute-1.amazonaws.com?crafterSite=editorial
NOTE: The SITE_ID parameter is typically added automatically to all requests for a given site by a webserver "virtual host" configured for each site/tenant that sits in front of Crafter Engine. You can learn more about this here:
https://docs.craftercms.org/en/3.0/system-administrators/activities/delivery/configure-apache-vhost.html
This configuration and other advanced topology topics such as load balancing are outside the scope of a basic installation.
Step 6: Make an update in authoring and see it published on the delivery server
To further test publishing, log in to Crafter Studio for the given site, make an edit and then approve the edit for publish. In a few moments you will see your updates in the web browser on the delivery server. You can find step by step instructions on editing and publishing here:
https://docs.craftercms.org/en/3.0/getting-started/your-first-website.html

Step 7: Setup complete!
Your setup and configuration of your CrafterCMS Delivery on AWS is now complete!