Using NextJS with CrafterCMS 3.1
Next.js is a React JavaScript framework that enables you to develop fast, user-friendly applications by combining server-side rendering with statically created pages. Some reasons for using Next.js include speed, performance, and scalability. These factors play a large part in delivering highly performant, scalable, successful applications.
CrafterCMS is both full-featured and fully supports headless CMS capabilities. That’s pretty unique. In this tutorial, you will learn how to create a content-rich, NextJS-based web application with in-context editing and other full-featured authoring capabilities.
Prerequisites
For this tutorial, you will need:
- A CrafterCMS Studio 3.1 stable version (3.1.18 or later) run in port 8080 on your local machine
- NodeJS version 16 or later installed in your machine
CrafterCMS sites with NextJS integration
For convenience, we have created an example CrafterCMS site blueprint with NextJS integration. You can easily create a new site with these blueprints and check out how CrafterCMS works with NextJS. https://github.com/phuongnq/wordify-blueprint
We will demonstrate how to use the Wordify blueprint with NextJS. Wordify is an easy-to-use writer website template for bloggers, journalists, authors, editors, and other general purposes. Within CrafterCMS, you can also have the capability to use in-context editing within this blueprint.
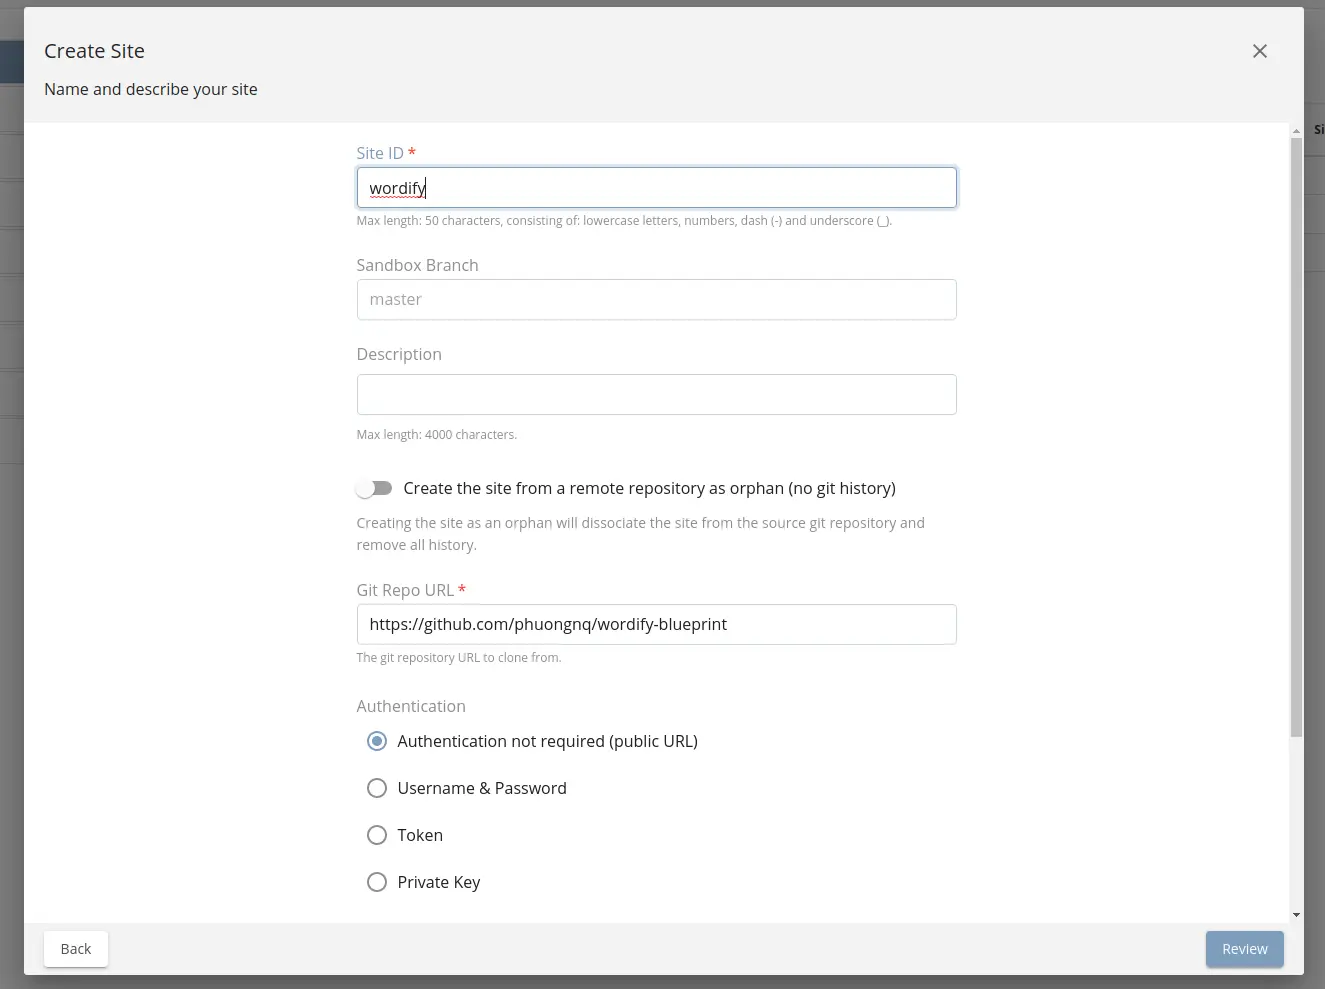
To create a new site, go to Global Menu > Create Site > Select Remote Git Repository and then input as follows:
- Site ID: wordify
- Git Repo URL: https://github.com/phuongnq/wordify-blueprint
After site creation, you may see an error message about the preview is not working. This is due to the fact that we set up the preview to port 3000 and currently, there is no such server running in port 3000. Review that setting here:
Go to Site Config > Configuration > Select Proxy Config from the dropdown. Notice that the server preview URL is set to http://localhost:3000. The proxy configuration file contains the configuration for the preview proxy servers. In that, all your requests will be sent to the proxy server.
Note: If you are using docker, you may need to change the value to http://host.docker.internal:3000. Check the manual here.
Next step, we need to run our NextJS application on port 3000.
From your terminal, go to {YOUR_AUTHORING_DIR}/data/repos/sites/wordify/sandbox/sources/nextjs-app.
Make sure NodeJS version is 16 or above and you also have yarn installed. Run the following commands to get started:
|
$ node --version # to check node version |
With yarn dev command, your NextJS server will be up and running in development mode. The application gets environment variables from file .env.development.
Open your browser with Studio opened Wordify site, then access in another tab to http://localhost:3000. Verify that the application is up and running.
Now back to your Studio at http://localhost:8080/studio/site-dashboard, click Home from site explorer in the left menu. You will see a similar application running. If you click to enable the In-Context Editing pencil, it will turn in yellow color and you can do in-contexting editing within the site. Learn more about In-Context Editing here.
Play around with the site and navigate to other pages. You will notice that it is pre-fetched and there is no need to reload the browser while navigating.
To build for production, run the following commands:
|
$ yarn build |
Production build will use .env.production for environment variables.
How this works
Let’s look in more detail at the source code to understand how NextJS works with CrafterCMS.
For convenience, we put NextJS source code in the following location:
|
wordify-blueprint/sources/nextjs-app |
In a production environment, the NextJS application should be hosted in a different node and get content from Crafter Engine.
Let’s look at more detail inside nextjs-app folder.
The folder structure is similar to a basic NextJS application which is created by Create Next App.
To create a new NextJS project from scratch, use the following command:
|
yarn create next-app |
- pages: In NextJS, a page is a React Component that is associated with a route based on its file name. We also use Dynamic Routes for pages with routes containing more information such as posts or categories with an ID.
- _document.js: A customized document to store HTML tags such as <html>, <body>.
- _app.js: A custom App. We use this to initialize pages and control how pages are rendered.
- next.config.js: We used this file to add configuration on the NextJS build phases. In this case, used for proxying to Crafter Studio.
|
module.exports = { |
- Other folders such as components or shared are just named React Component structures for readability.
How CrafterCMS works with NextJS
Similar to how CrafterCMS works with React, CrafterCMS works as the headless CMS for NextJS web applications.
CrafterCMS provides craftercms/craftercms-sdk-js with built-in libraries to work with content, including In-Context Editing features. This library is tested works well with NextJS.
An example of how to use In-Context Editing is as below for the footer of wordify blueprint:
// Footer.js
import { useFooter, usePencil } from '../shared/hooks';
export default function Footer({ socialLinks }) {
const footer = useFooter();
const ice =  usePencil({ model: footer });
return (
<footer className="site-footer" {...ice}> … </footer>
);
}
With above ice component, whenever a user clicks on the pencil in footer, there will be a popup to update the content of footer while in Crafter Studio preview mode.
Check the below section on how to migrate a Create-React-App to NextJS within CrafterCMS.
Migrate from React App
There is a chance that you want to migrate to use NextJS from a previously created CrafterCMS site based on Create-React-App.
Thanks to NextJS documentation, the migration is quite straightforward. You can find the manual here from NextJS documentation. The official document from NextJS is always a good place to start with.
Here are some lessons we have learned while migrating the Wordify and Video Center applications from Create-React-App to NextJS:
- Configure proxy: Some APIs call should be pointed to Studio at port 8080, in that case, configure your next.config.js file to whatever APIs are needed for proxying:
// next.config.js
module.exports = {
  reactStrictMode: true,
  async rewrites() {
    return [{
      source: '/static-assets/:path*',
      destination: 'http://localhost:8080/static-assets/:path*',
     }, {
       source: '/api/:path*',
       destination: 'http://localhost:8080/api/:path*'
    }]},
   }
- Global CSS: Must put in _app.js file
- Migrate React Router to next/link, next/route. Check the documentation here
- For Pages, use Dynamic Route (as of version 12, you cannot use react-router-dom with NextJS). For dynamic data, you can use the following method to get initial properties:
 export async function getServerSideProps() {  ……
   // Your code to get props
   return { props };
}
Note: getServerSideProps (or getInitialProps) are only needed when there are dynamic data such as API call responses. If the page is a static one, you should not put the method on a page. By this, NextJS know which one should be cached for better performance and which one should be rendered from the server-side. Learn more about this topic here.
- Use suppressHydrationWarning={true} for components that are only able to render in client-site such as slider, animation effect, etc.
 <div suppressHydrationWarning={true} className="col-md-12" key={index}>
   {process.browser && (<Slider model={slider} parentModelId={path} />)}
</div>
- When using external libraries, make sure they work well with Server-Side Rendering or use Dynamic Import with no SSR:
dynamic(() => import('dashjs/dist/dash.all.min'),{ ssr: false });
- CrafterCMS related API: Use craftercms/craftercms-sdk-js library. This library is tested working fine with Server-Side Rendering.
- Use ESLint latest version for suggestions and recommendations.
- Browsing our blueprints source code to learn more on how to make CrafterCMS work with NextJS.
Conclusion
NextJS is a fast-growing React framework. NextJS helps developers to create high-performance web applications with all features you will need for a highly optimized web application in production, including Server-Side Rendering, a hybrid of static and dynamic rendering, smart bundle, pre-fetching, and more. In this tutorial, we have introduced how NextJS works with CrafterCMS.
Are you interested in building Next.js applications on a headless CMS platform? Get started by reading about the Crafter Engine APIs. And check out the Crafter Studio APIs to customize your content authoring experience.
To learn more check out CrafterCMS at https://craftercms.com and https://craftercms.org.