CMS for SPAs: Building React Apps with CrafterCMS 4.0.x

Traditional (legacy) CMS platforms are not designed to handle headless content, while most headless CMS platforms aren’t full-featured and have only basic content authoring support.
CrafterCMS provides a full-featured content authoring toolset combined with comprehensive headless CMS capabilities for developers, and this combination is quite unique. In this tutorial, you will learn how to create a content-rich, React-based Single Page Application (SPA) with in-context editing and other easy to use content authoring capabilities.
Note: This tutorial is required to use CrafterCMS version 4. For version 3.1, check out this tutorial
Our React Application
We need an application to base our tutorial on. For our example, we have the following criteria:
-
An existing, open-source application that serves a content-rich use case where the content in the application is likely to be updated regularly by non-developers.
-
The application is sophisticated enough to be interesting but not too complex to be understood.
-
The application looks good and is responsive.
-
The application is based on React.
With these criteria in mind, we found this terrific open source React-based shopping cart application by Jefferson Ribeiro: https://github.com/jeffersonRibeiro/react-shopping-cart, Thanks, Jefferson!
We are going to use this open-source shopping cart for this tutorial with some modifications. A clone that is tested to work with CrafterCMS v4 is here: https://github.com/phuongnq/react-shopping-cart. This tutorial will use phuongnq/react-shopping-cart clone.

We’re going to break our tutorial down into a number of broad steps:
Step 1: Download and run the application locally. First, thing’s first let’s get our local application development environment (React and NodeJS) up and running. Here we’ll see that the application already relies on a RESTful service to acquire its content.
Step 2: Create a project in CrafterCMS and set it up to preview our React application running in Node JS. Now that our application is running let’s get the CMS set up and preview our application.
Step 3: Model a product in CrafterCMS. We have an application and we have a CMS. It’s time to connect them. Here we’ll learn how to model content and we’ll do some minor configurations along the way to customize the Studio UI for the use case.
Step 4: Create a basic RESTful service. Now that we have content, we can create a RESTful service to return the content from the CMS as JSON. Once our service is in place we’ll modify the application to consume our service instead of the service it uses out of the box.
Step 5: Extend the service to include images managed by authors. The out of the box application uses statically managed images and conventions. We’ll add images to the CMS to demonstrate extending our content model and app.
Step 6: Add Experience Builder to the solution. Now that the app’s content is driven by the CMS we want to make it easier for the content authors to find and edit their content. Making content editable directly through the app is one of the best ways. In this step, we’ll make the modifications and configurations necessary to support this via Experience Builder.
Let’s get started!
Prerequisites for the Tutorial
-
NPM / Yarn installed
-
NPM will help you easily download the proper dependencies. You can also use NPM or Yarn to build and execute your application.
-
In our example, I will use Yarn to manage my package.json file and to assist me in building my application.
-
Access to a running Crafter Studio instance.
-
You will need access to create a site and modify its configuration.
You can find a complete version of this tutorial from the following git repositories:
-
A completed blueprint of what we are going to do in this tutorial: https://github.com/phuongnq/craftercms-react-cart-bp
-
An updated version of react-shopping-cart that is included Experience Builder: https://github.com/phuongnq/react-shopping-cart/tree/feature/craftercms-xb
For quick reference, you can create a site from the above blueprint and run react-shopping-cart SPA with branch feature/craftercms-xb to check the outcome.
To do this:
-
Create a new site from Remote Git Repository and use https://github.com/phuongnq/craftercms-react-cart-bp in the Git Repo URL and input Site Name with React Cart.
-
Clone https://github.com/phuongnq/react-shopping-cart/tree/feature/craftercms-xb and run locally with following commands:
|
yarn |
In this tutorial, we are going to create a project from scratch and do all the setup to achieve the goal instead.
Step 1: Download and run the application locally
The first step is to download the application and make sure we’ve got a local environment that will allow us to modify and run the application. This step does not involve the CMS. In many ways, it emulates a common real-world scenario in which the need for authors to modify content without the help of development is discovered late in the development process or even post-launch. Let’s begin.
-
On your local machine clone the react-shopping-cart project: https://github.com/phuongnq/react-shopping-cart

-
Change directory into the react-shopping-cart folder that was created and run yarn install
This will install the libraries necessary to run your application.

Note: This React application use node-sass. Refer to the following link to check what Node version we should use https://www.npmjs.com/package/node-sass. For node-sass ^6.0.1, we use Node version v16.8.0. After installing the correct Node version, we can install yarn with the command:
npm install -g yarn
-
Run the React application by executing yarn start.
This will start a NodeJS and run the react application.

-
Open your browser to http://localhost:3000

This application is pulling content for the product catalog in a JSON feed format from the following URL: https://react-shopping-cart-67954.firebaseio.com/products.json

Step 2: Create a project in CrafterCMS and set it up to preview our React application running in Node JS
Now that our application is running let’s get the CMS set up and previewing our application. The first thing that you need to accomplish is a running instance of Crafter Studio, the authoring component of CrafterCMS. You can learn how to get this set up here.
To run CrafterCMS version 4, which is still in the development phase as of the date this article is published:
-
Clone the git repository: https://github.com/craftercms/craftercms with develop branch
-
Make sure to have Java 11 installed on your computer
-
Run commands:
|
./gradlew build deploy |

Access http://localhost:8080/studio to use Crafter Studio.

-
Log in to Crafter Studio as an administrator and on Projects page, click the Create Project button.


Note: To learn more about how to create a project, refer to this documentation.
-
Following the picture above, populate the dialog. Select Use “Empty Blueprint” then give the site a name and then click the Review/Create Project button. Once complete, you will see your empty site previewed in the Crafter Studio application. Now we want to tell Crafter Studio that our application is not running in Crafter Engine, but instead on NodeJS @ port 3000.

-
Open the Project Tools by clicking the Project Tools button in the sidebar and then clicking Configuration.

-
A popup will appear with several configuration options. Scroll down the left sidebar and select Proxy Config.

-
Add the following tag (<url>http://localhost:3000</url>) to the configuration as shown above and then click the Save button.
Note: If you are using CrafterCMS with a docker environment, the localhost domain may not work. Refer to this documentation for more instructions.
-
Click reload icon, you should see the preview showing the website at http://localhost:3000.

At this point, we have both our application (running in NodeJS) and our CMS running with the ability to preview our application. That means we can continue to use our standard development tools and practices for the React application while integrating it into the CMS.
Step 3: Model a product in CrafterCMS
Now that the two main components (our app and our CMS) are up and running it’s time to connect them. To start we need to describe the structure of our content, in this case, a product. To understand what the app is looking for we can examine the UI or because we already know the application is reading a RESTful JSON API from Firebase we can look at that.
Step 3 A: model the content

It’s clear that each product has a title, a description, a style, a price, and so on. To model these in the CMS we must add a new content type.
-
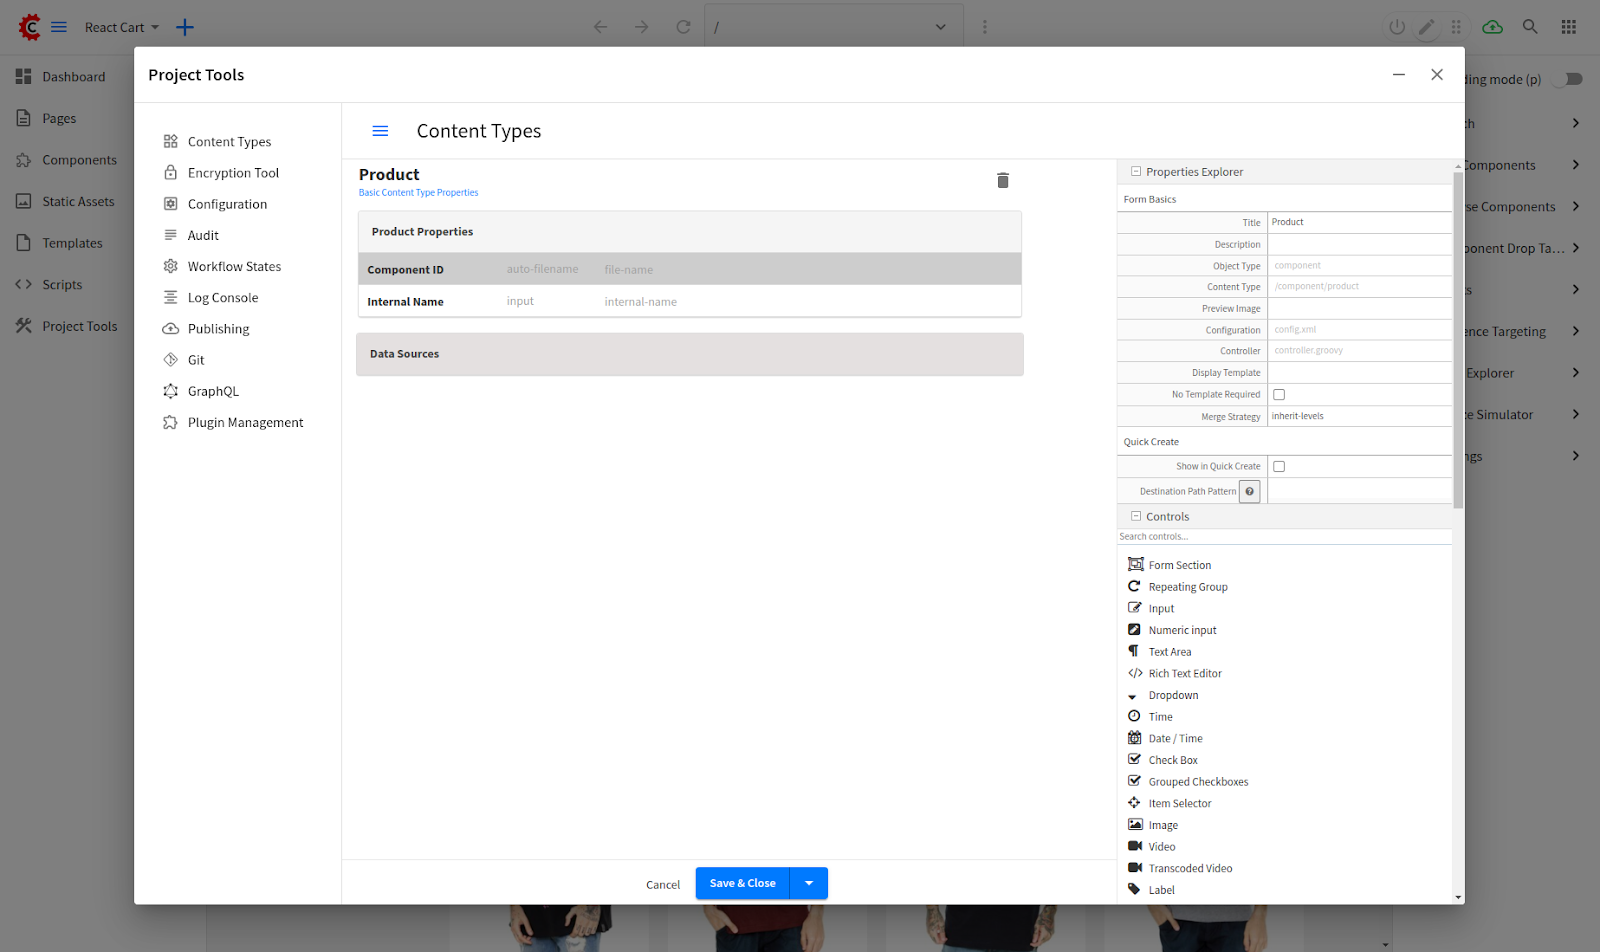
Open the Content Types administration tool by opening the Project Tools and clicking on the Content Types item in the sidebar then clicking Create New Type button

-
Fill out the dialog with the following values:
-
Display Label: Product
-
Content Type Name: product
-
Type: Component

Click “Create” to continue with content form creation:
-
Drag and drop the controls and from the Controls area to model the product.

-
Remember to set property values for each control including constraints. To configure a control: click on it and its properties will appear in the property sheet on the right.

-
Note that for our product sizes I chose to give the author a list of sizes to click on. Since a product may come in many sizes I’ve used a group checkbox control.

-
Group checkboxes require a data source. To keep things really simple let’s supply a static list of sizes with the key-value data source. Drag the data source from Data Sources and drop it on the form editor under the purple data sources region.

-
Click the Options property in the data source and then add a row for each option as shown above.

-
Remember to hook the data source to the control. To do this, click on the group checkbox control and find the Data Source property. Select your data source.
-
Once the model is complete, click the Save button at the bottom of the screen.
Step 3 B: Configure the UI for Products
Once you save your content type it will be available for content authors to use it. Studio does this automatically. That said, the more tailored the UI is for your content authors, the easier it will be for them to use it.
Note that this step is not necessary to complete the integration but it does make a difference for authors.
-
Select Pages > Home then right-click, there is an option to create New Content.

-
Click on the New Content option and you will see your new content type as shown below. A product doesn’t really map to any of the out-of-the-box content folders. It’s not a page and it’s not a component. What we want is a unique store just for products. Cancel the create operation and let’s set up a folder for products and then tie the product content type to it.

-
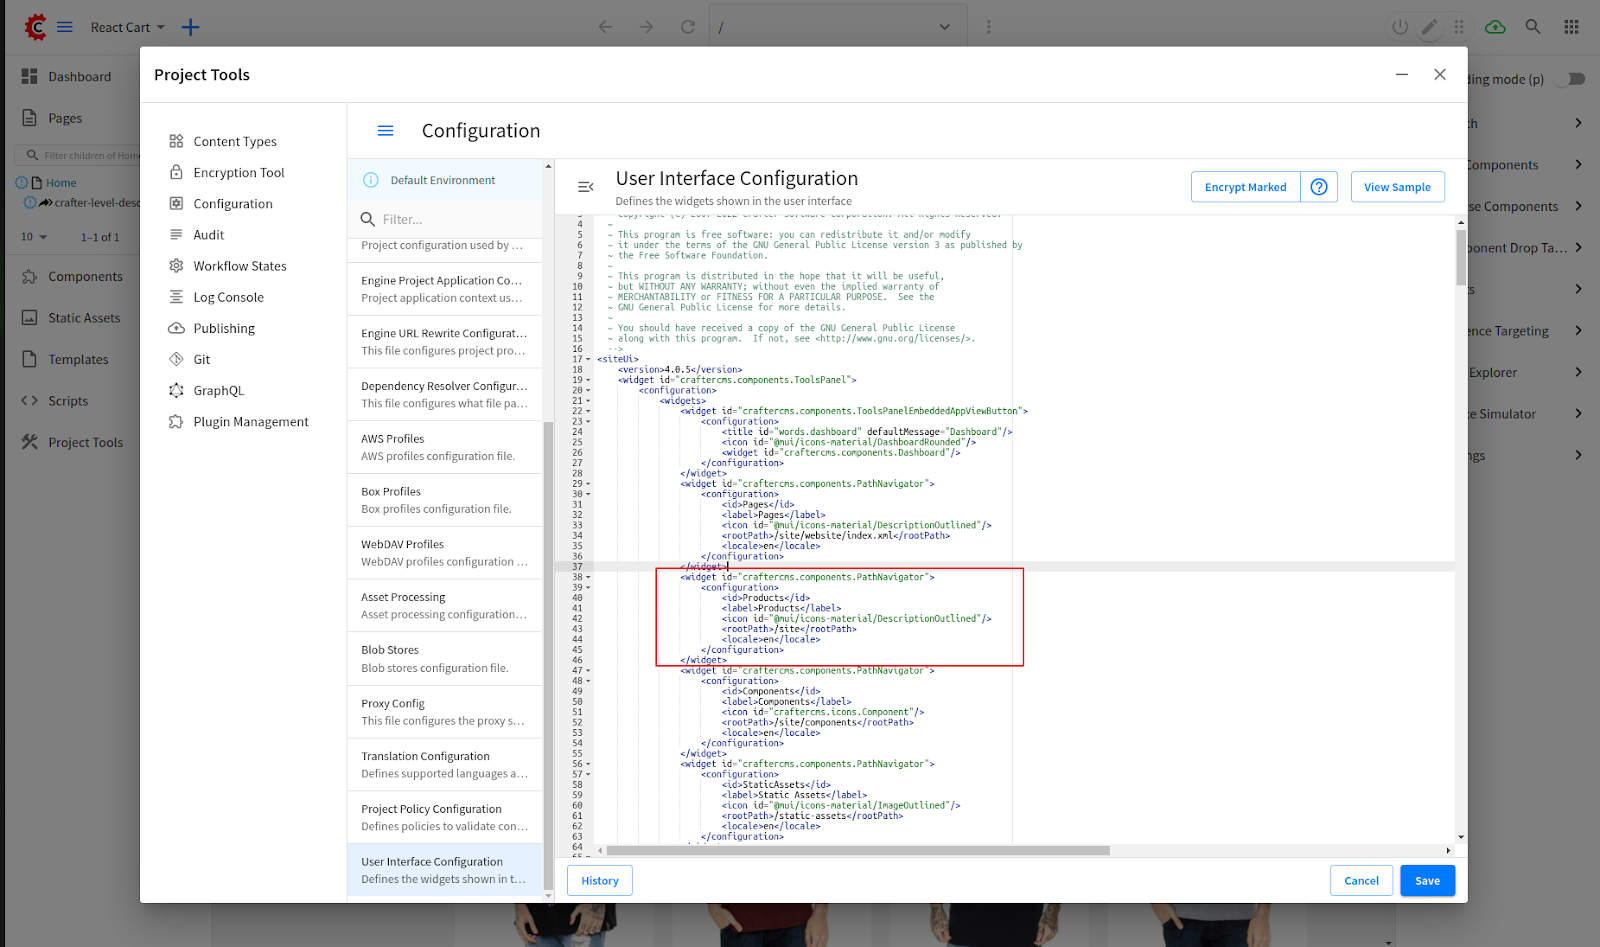
Click Project Tools and select Configuration.
Scroll the sidebar down and select the User Interface Configuration option.

-
In the configuration, you will note the various widgets shown in the Sidebar navigation. Add a new widget block as shown below for products. You’ll note that at first, we’ll “root” the folder at “/site.” We’re going to change this later but for now, setting it up this way will allow us to create an additional folder structure within the CMS. Add the widget configuration snippet and click the Save button.
|
<widget id="craftercms.components.PathNavigator"> <configuration> <id>Products</id> <label>Products</label> <icon id="@material-ui/icons/DescriptionOutlined" /> <rootPath>/site</rootPath> <locale>en</locale> </configuration> </widget> |
-
Once complete, you will find your new Products folder displayed.

-
Open the products folder, right-click the site folder and then click the New Folder option. When prompted for a name, enter products and click the Create button.

-
Now, return to the User Interface Configuration. Let’s update the folder so that it shows only the products. We do this by modifying the path parameter for the widget.

|
<widget id="craftercms.components.PathNavigator"> <configuration> <id>Products</id> <label>Products</label> <icon id="@material-ui/icons/DescriptionOutlined" /> <rootPath>/site/products</rootPath> <locale>en</locale> </configuration> </widget> |
-
Now let’s update the Project Configuration so that Studio better understands the content found under the /site/products path. In the Configuration tool open Project Configuration
Add configuration under folders and patterns as shown below:

|
<folders> |
-
Once you save this file and close the configuration popup, you will notice that when opening Products folder, it is specifically rooted in the products folder in the repository.

-
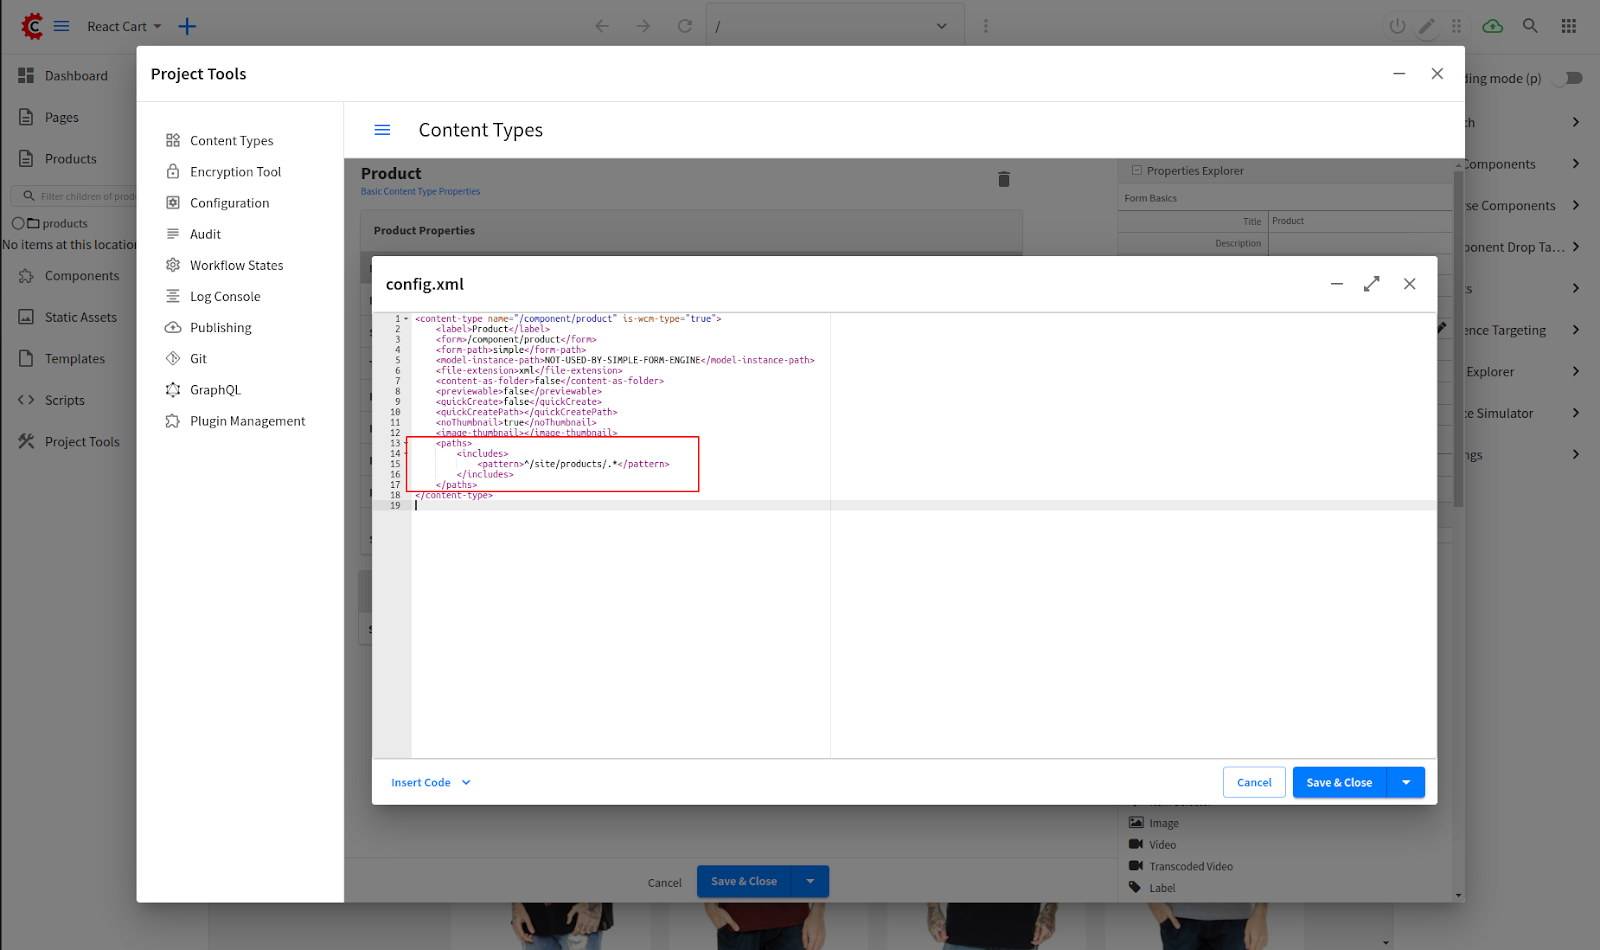
Modify the content types to tie them to the IA. An author should not be able to create a product anywhere except under products. Other content types may also be tied to specific folders. Let’s look at how we can configure this. In the content type editor for a product, under the Basic Properties for the type, find the Configuration Property. Click the pencil to open the editor for the configuration.

Add the following XML snippet to the content type configuration:
|
<paths> |
Open the other 2 content types and add the following snippet. This snippet hides these types because it does not make sense for authors to be able to create new objects of these types.

|
<paths> |
-
Back to the main dashboard and try creating content in the products area. If the previous steps were performed correctly, only Products component can be selected. Studio understands (based on the configuration) that this is the only type that is allowed to be used here and thus defaults to it.

Click on the component:

Step 3 C: Create Product Content
Now that your authoring tools are set up to make it easy to add products it’s time to create some product content. Using the New content option, and following the content on the site (or in the JSON response) create at least two products by right-clicking on the product folder then filling out the product form and saving.

-
You can easily create new content by right-clicking on the products folder and selecting the New Content option.
-
Create as many products as you like by filling out the Product form and clicking the Save and Close button. You will need at least 2 products for the example to work well.
Note: Make sure to input similar product information as from API so that we have a preview image for each product.
Step 4: Create a basic RESTful service
Now that we have content, we can create a RESTful service to return the content from the CMS as JSON. Once our service is in place we’ll modify the application to consume our service instead of the service it uses out of the box.
Step 4-1: Create the Service
Crafter allows us to easily create RESTful services through scripting. By putting the Groovy script in the right location with the right naming convention we define a RESTful endpoint. https://docs.craftercms.org/en/4.0/developers/projects/engine/api/groovy-api.html
-
In the Sidebar, open the Scripts folder and then open the rest folder.
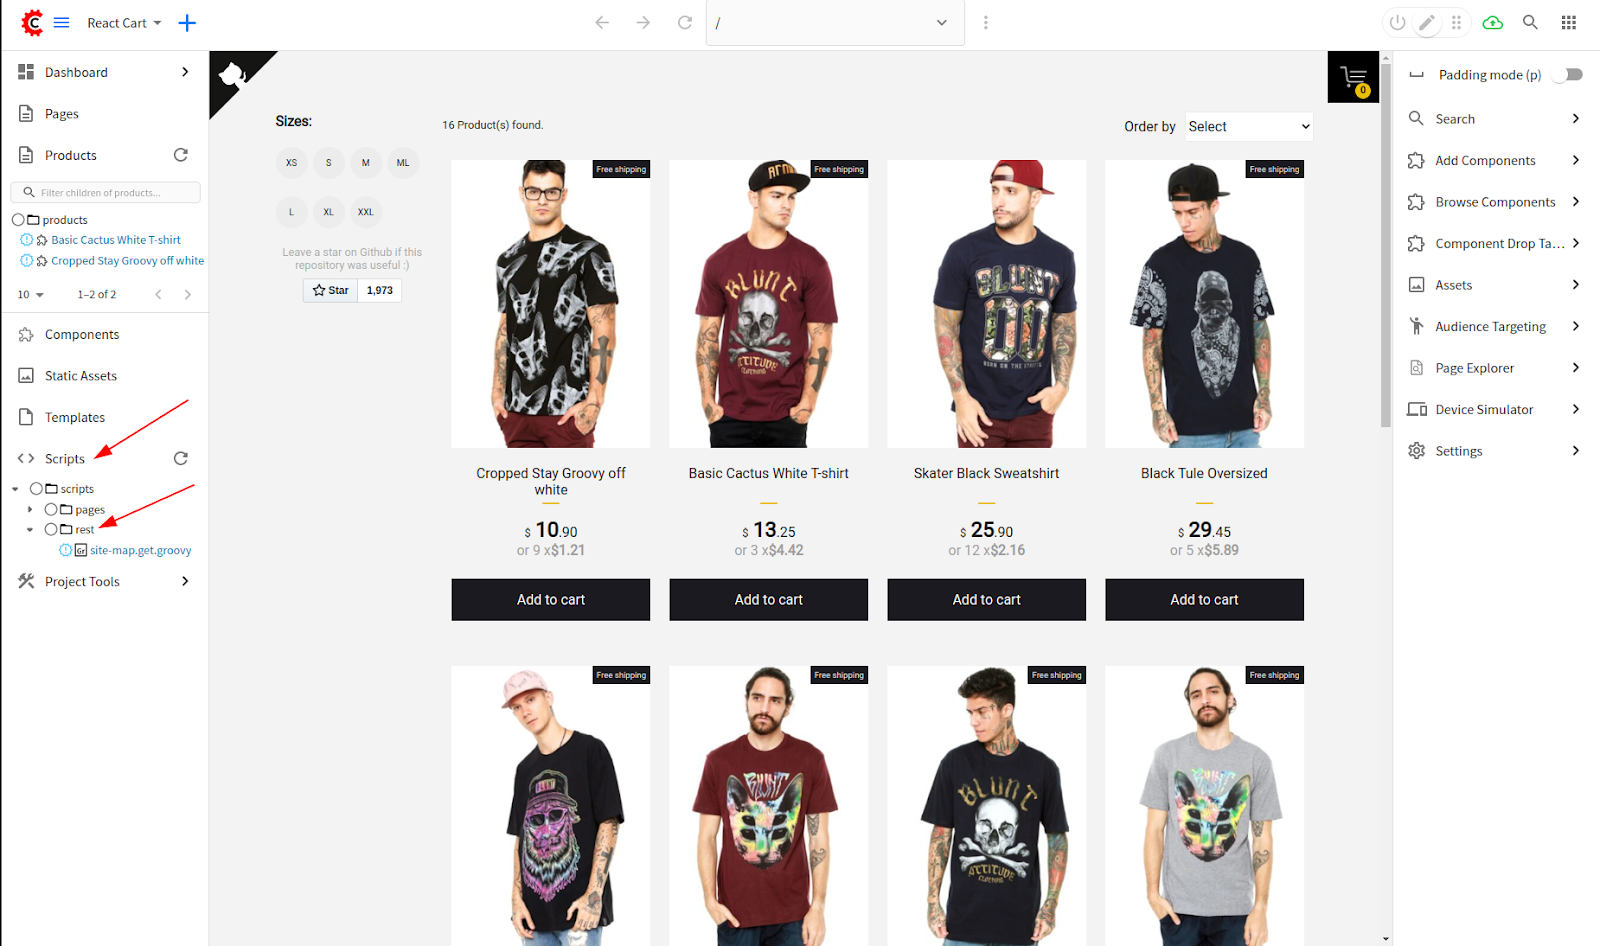
2. On the rest folder right click and choose Create Controller option.
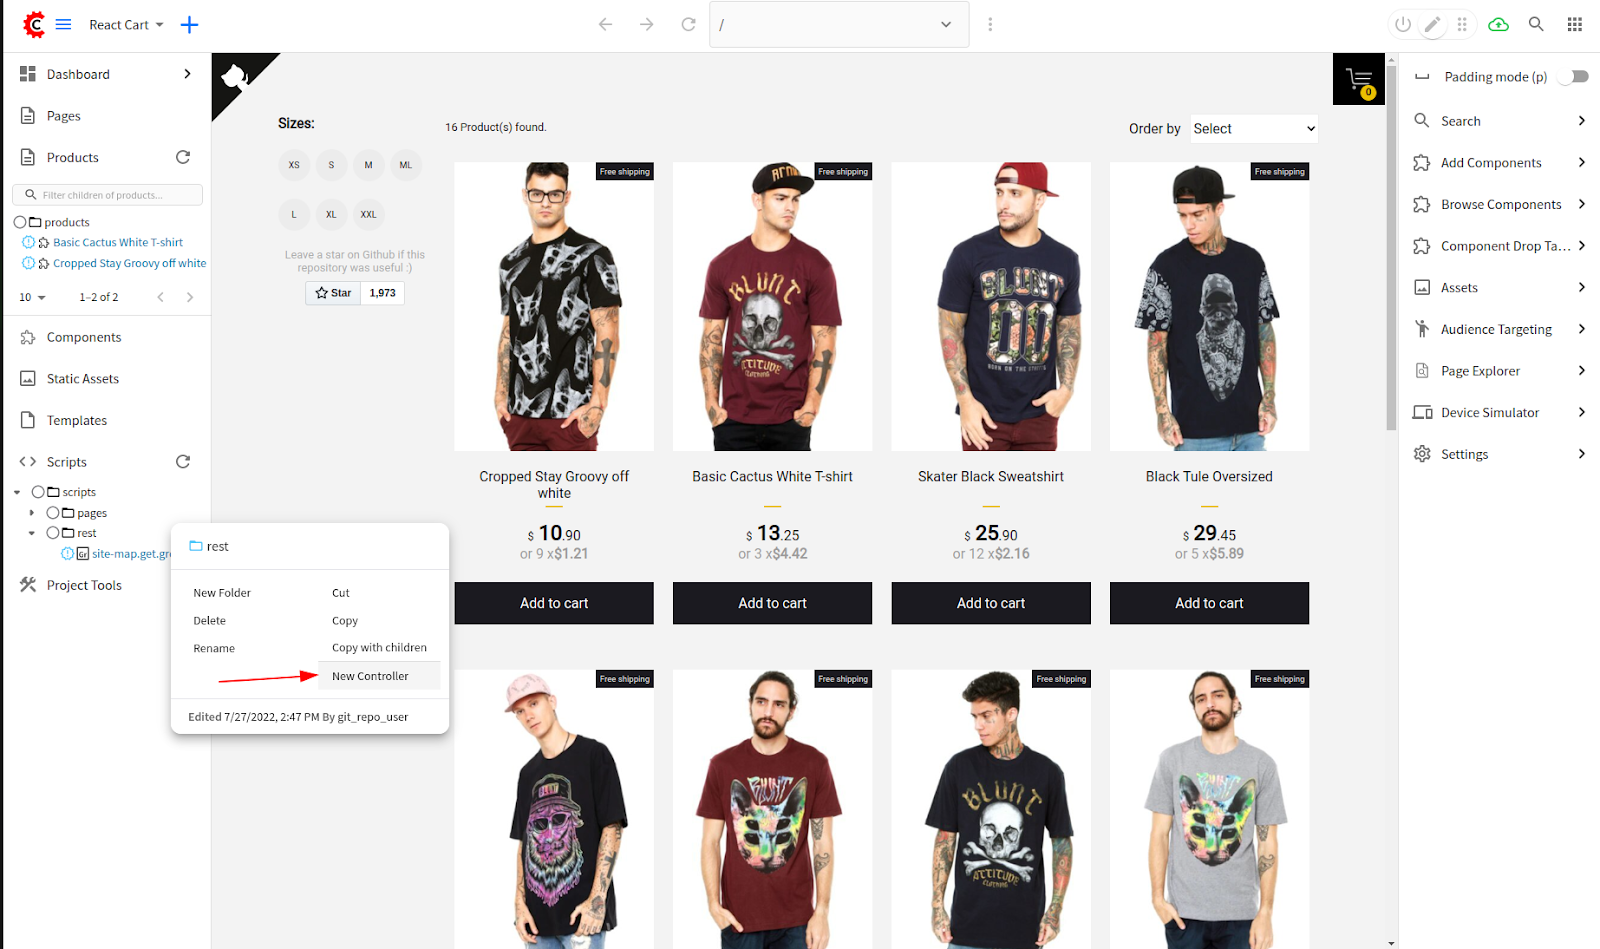
3. Provide the service name and HTTP method you want. In our case, our service is going to return products so our service name is “products” and the HTTP method the service will respond on is a GET so we append .get to the name.
-
This is a convention in Crafter CMS. Under the rest folder, we can create any number of subfolders and the file name of the RESTful endpoint is named by the script as NAME.HTTPD_METHOD.groovy.
-
all standard request methods are supported ex: get, post, put, delete,
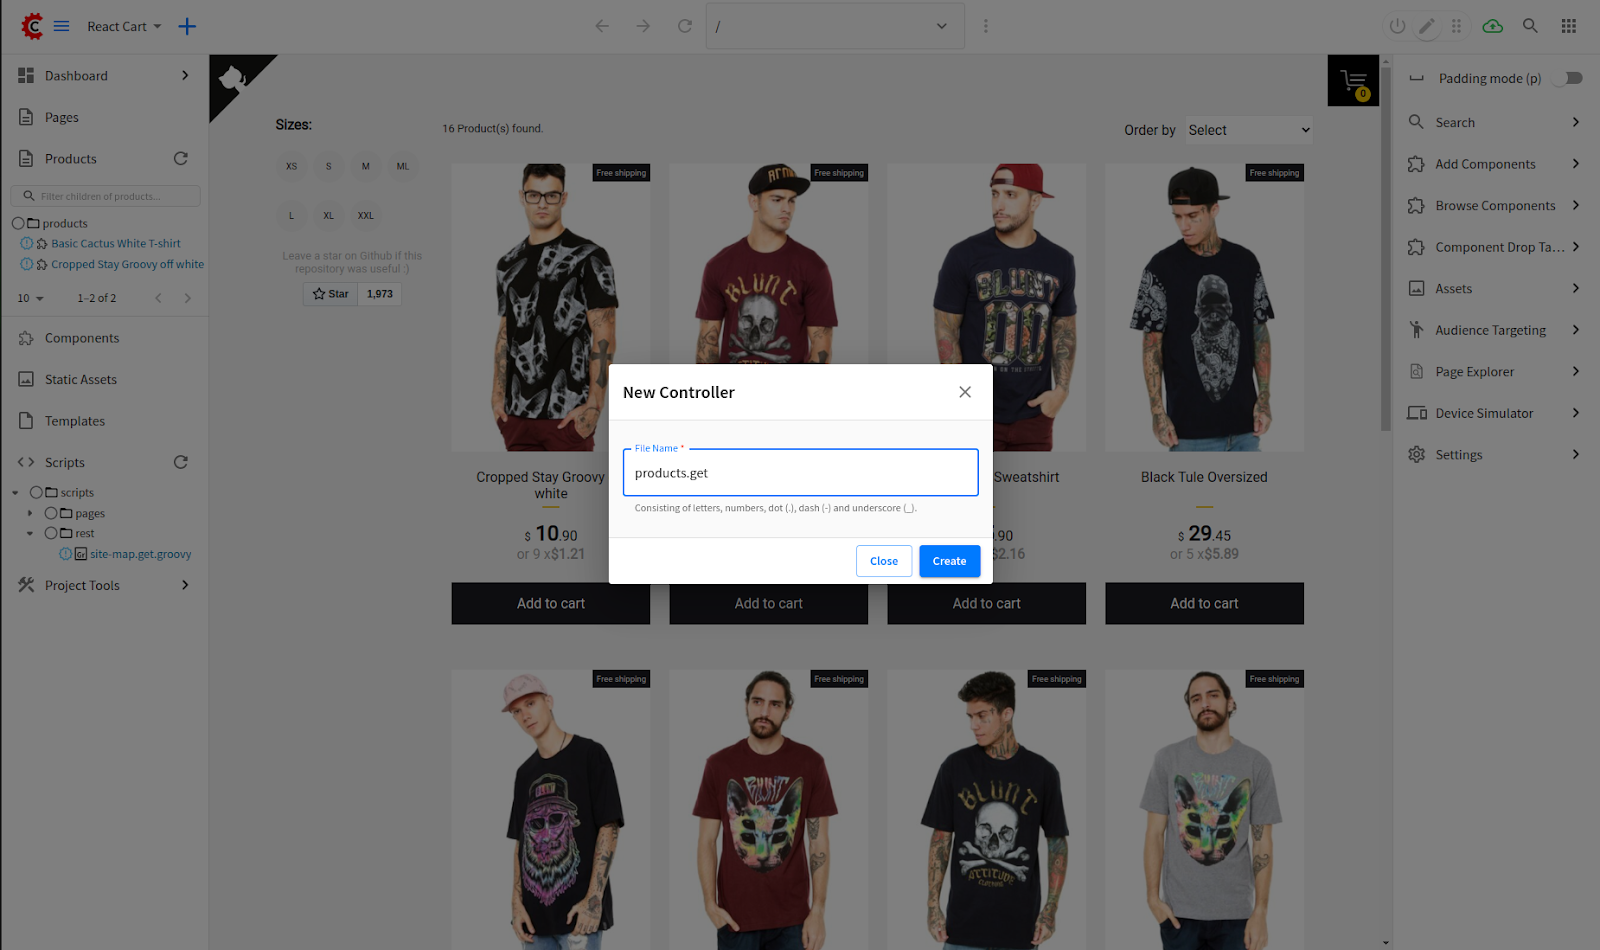
4. Click Create and then supply some basic code in your controller as shown below.
This code will result in an object with an empty products array. By returning the result value at the end of the script Crafter knows to marshal this object into JSON for us when the service is invoked via the URL.

5. Test the service.
-
Go to http://localhost:8080/api/products.json in your browser and you will see the JSON representation of the object returned by the script.

6. Now that we see our service working we can update it to return the content we want in the structure we want.
-
Right-click on the controller and then click Edit.
-
Update the code as shown below.
|
import org.elasticsearch.action.search.SearchRequest
|
Note: Make sure to update variables to map with your defined form variables.
The code above makes a query to Crafter Search / Elasticsearch and then iterates over the results to format, structure, and possibly embellish them with additional data. Note, that if there is no need to restructure or augment the results differently than the Elasticsearch response the results could be returned directly without any additional code. Simple field name mappings can be done with the fl query parameter.
7. Invoke the response and confirm it now meets the structure and contains the content that the application expects.
Go to http://localhost:8080/api/products.json in your browser and you will see the JSON representation of the object returned by the script.

Step 4-2: Modify the App to use the Service
Now that we have a service that dynamically provides the products that are created and edited/managed by the authors in the CMS we can update our React Application to use it.
To do this:
-
Change line 10 in src/services/util.js to
|
export const productsAPI = "/api/products.json"; |
-
Add the following to package.json
|
"proxy": "http://localhost:8080", |
-
Preview the application at http://localhost:3000
Note the content showing in the store is from the CMS

Step 5: Extend the service to include images managed by authors
The out of the box application uses statically managed images and conventions. We’ll add images to the CMS to demonstrate extending our content model and app. This step is optional and is simply meant to show how you can extend the functionality if choose.
-
In the product content model:
-
Add image pickers for both large and small images
-
Add a data source for picking images from the desktop.
-
Configure the data source to put images in /static-assets/images
-
Click on the image picker properties and connect the data sources to the image pickers

-
Test the forms by updating your products with image content.

-
Update your RESTful product service to return image values.
|
def product = [ id: idx, descriptor: [ component: document ] |
-
Update the application to pull the images from the service rather than assume their location in the application.
-
Update the file src/components/Shelf/ProductList/Product/index.js
|
<Thumb |
5. Preview the application at http://localhost:3000
Note the content showing in the store is from the CMS

Step 6: Add Experience Builder to the solution
Now that the app’s content is driven by the CMS we want to make it is easier for the content authors to find and edit their content. Making content editable directly through the app is one of the best ways. In this step, we’ll make the small modifications and configurations necessary to support this.
To achieve this, we will use Experience Builder feature of CrafterCMS. CrafterCMS’s Experience Builder (XB) provides a UI layer on top of your applications that enables authors with in-context editing (ICE) for all the model fields defined in the content types of pages and components.
To include XB, either use npm or yarn to add to your React application:
|
yarn add @craftercms/experience-builder |
or
|
npm install @craftercms/experience-builder |
You can check out branch feature/craftercms-xb from phuongnq/react-shopping-cart repository for a working version of this. You can also review this pull request to know more about what change is needed.
6.1 Experience Builder with React application
CrafterCMS provides React bindings for integrating with XB. Because XB itself is a React application, React presents the tightest, most native integration with XB as it will essentially run as part of your app instead of as a parallel application like when using other technologies.
In this project, we are going to use components provided by CrafterCMS within the package `@craftercms/experience-builder` to implement In-Context editing.
First of all, we need to initialize the Experience Builder when our application is loaded:
React.useEffect(() => {
// Check if we're in authoring
fetchIsAuthoring().then((isAuthoring) => {
// If we're in authoring, initialize XB
if (isAuthoring) {
initExperienceBuilder();
updateAuthoring(true);
}
});
}, []);
Then, we will use the components such as `ExperienceBuilder`, `Model`, `RenderField` to tell the application which fields we want to have the In-Context editing or drop & drag. Check this documentation for a full list of supporting components and learn about the usage.
Here is our `Product` component with XB enabled:
<ExperienceBuilder path={model.craftercms.path} isAuthoring={isAuthoring}>
<Model
model={model}
className="shelf-item"
>
<div
data-sku={product.sku}
>
{product.isFreeShipping && (
<div className="shelf-stopper">Free shipping</div>
)}
<RenderField
model={model}
fieldId="largeImage_s"
render={(value, fieldId) => {
return (
<Thumb classes="shelf-item__thumb" src={product.largeImage} alt={product.title} />
);
}}
/>
<RenderField
model={model}
fieldId="title_s"
component="p"
className="shelf-item__title"
>
{product.title}
</RenderField>
<div className="shelf-item__price">
<div className="val">
<small>{product.currencyFormat}</small>
<RenderField
model={model}
fieldId="price_s"
component="span"
render={(value, fieldId) => {
return (
<span>
<b>{formattedPrice.substr(0, formattedPrice.length - 3)}</b>
<span>{formattedPrice.substr(formattedPrice.length - 3, 3)}</span>
</span>
)
}}
/>
</div>
{productInstallment}
</div>
<div className="shelf-item__buy-btn" onClick={() => addProduct(product)}>Add to cart</div>
</div>
</Model>
</ExperienceBuilder>
On each field, we always need a model to let Crafter Studio know which page or component to be used for the In-Context Editing. A model could be retrieved by path with following React function:
import { getDescriptor, parseDescriptor } from '@craftercms/content';
import { firstValueFrom, map } from 'rxjs';
export async function getModel(path = '/site/website/index.xml') {
return await firstValueFrom(
getDescriptor(path, { flatten: true }).pipe(
map(parseDescriptor)
// Can use this for debugging purposes.
// tap(console.log)
)
);
}
In our application, we don’t want to call another API to get descriptor. Instead, we use the Product document itself as the descriptor and parse it to get the model:
import { parseDescriptor } from '@craftercms/content';
...
const Product = ({ product, addProduct, isAuthoring }) => {
const model = parseDescriptor(product.descriptor);
Make sure you review the whole pull request for the implementation: https://github.com/phuongnq/react-shopping-cart/pull/2
-
Preview the application at http://localhost:3000
Note the content showing in the store is from the CMS

-
Turn the XB on by clicking on the pencil in the main toolbar.

-
Hover over each product content item.
-
Click the pencils to edit and the user will get the form where they can edit the content.
-
Update the content.
-
Click the Save and Close button. On save, the preview will update to reflect the changes.
-
That’s it! The preview updates.

With the implementation, you could also perform inline editing for the title, price and installment. Just hover the mouse over each content and click to edit it.

XB has drag & drop feature for component or assets as well. We are going to use this to update the thumbnail image.
First, add a new source Image from Repository to the image of your content type Product:

Then update Large Image to include this source:

Save the content type then back to main Studio, preview Asset in right menu, and drag it to a thumbnail in the preview to update it.

Conclusion
React has become the de facto way to build highly usable web-based applications. React helps developers create Single Page Applications that are fast and extremely usable for end-users. When those applications need content that’s managed by business users, developers have turned to headless CMS solutions to supply the content. Unfortunately, most Headless CMS platforms do not provide full-featured editing tools like in-context editing, preview, and drag-and-drop. Content editors are used to these tools and when they are missing it can be frustrating.
With CrafterCMS, everybody wins. Content authors get the experience they require. Developers get the architecture and development frameworks and the process they want. Get started today by downloading the open source CrafterCMS project here.