Integrate the Stripe Online Payments Platform with CrafterCMS
Introduction
Stripe is a robust payment processing platform that can facilitate online payments. Using Stripe, you can quickly establish payment options on your website, process credit card payments, and manage transactions. Some of the salient features of the Stripe platform include support for a comprehensive range of payment methods, such as credit cards, Apple Pay, and Google Pay. By integrating Stripe with CrafterCMS, you can leverage all of these features and more to devise a powerful, flexible payment processing system for your website.
In this tutorial, we will illustrate how to integrate Stripe payment subscriptions with CrafterCMS and develop and install this integration as a plugin in your project. This plugin endows a payment plans page for your website in which you can freely modify its content, encompassing adding or removing payment plans via the Experience Builder. When your website’s users select a plan, they will be redirected to the Stripe payment gateway to subscribe with a credit card.
Prerequisites
Before beginning, make sure you have the following:
- Stripe account
- CrafterCMS instance (version 4.0.2 or later)
- Basic knowledge of CrafterCMS
- Basic knowledge of Stripe payment APIs
Getting Started with a Pre-Built Plugin
For convenience, we have developed a plugin that enables you to integrate a Stripe subscription with your CrafterCMS project seamlessly. This plugin is a modified version of stripe-samples/checkout-single-subscription and adapted for CrafterCMS. You can access the full version of this plugin at this link.
- Download and install CrafterCMS 4.0.2 or a later version.
- Create a new project from Empty Blueprint.
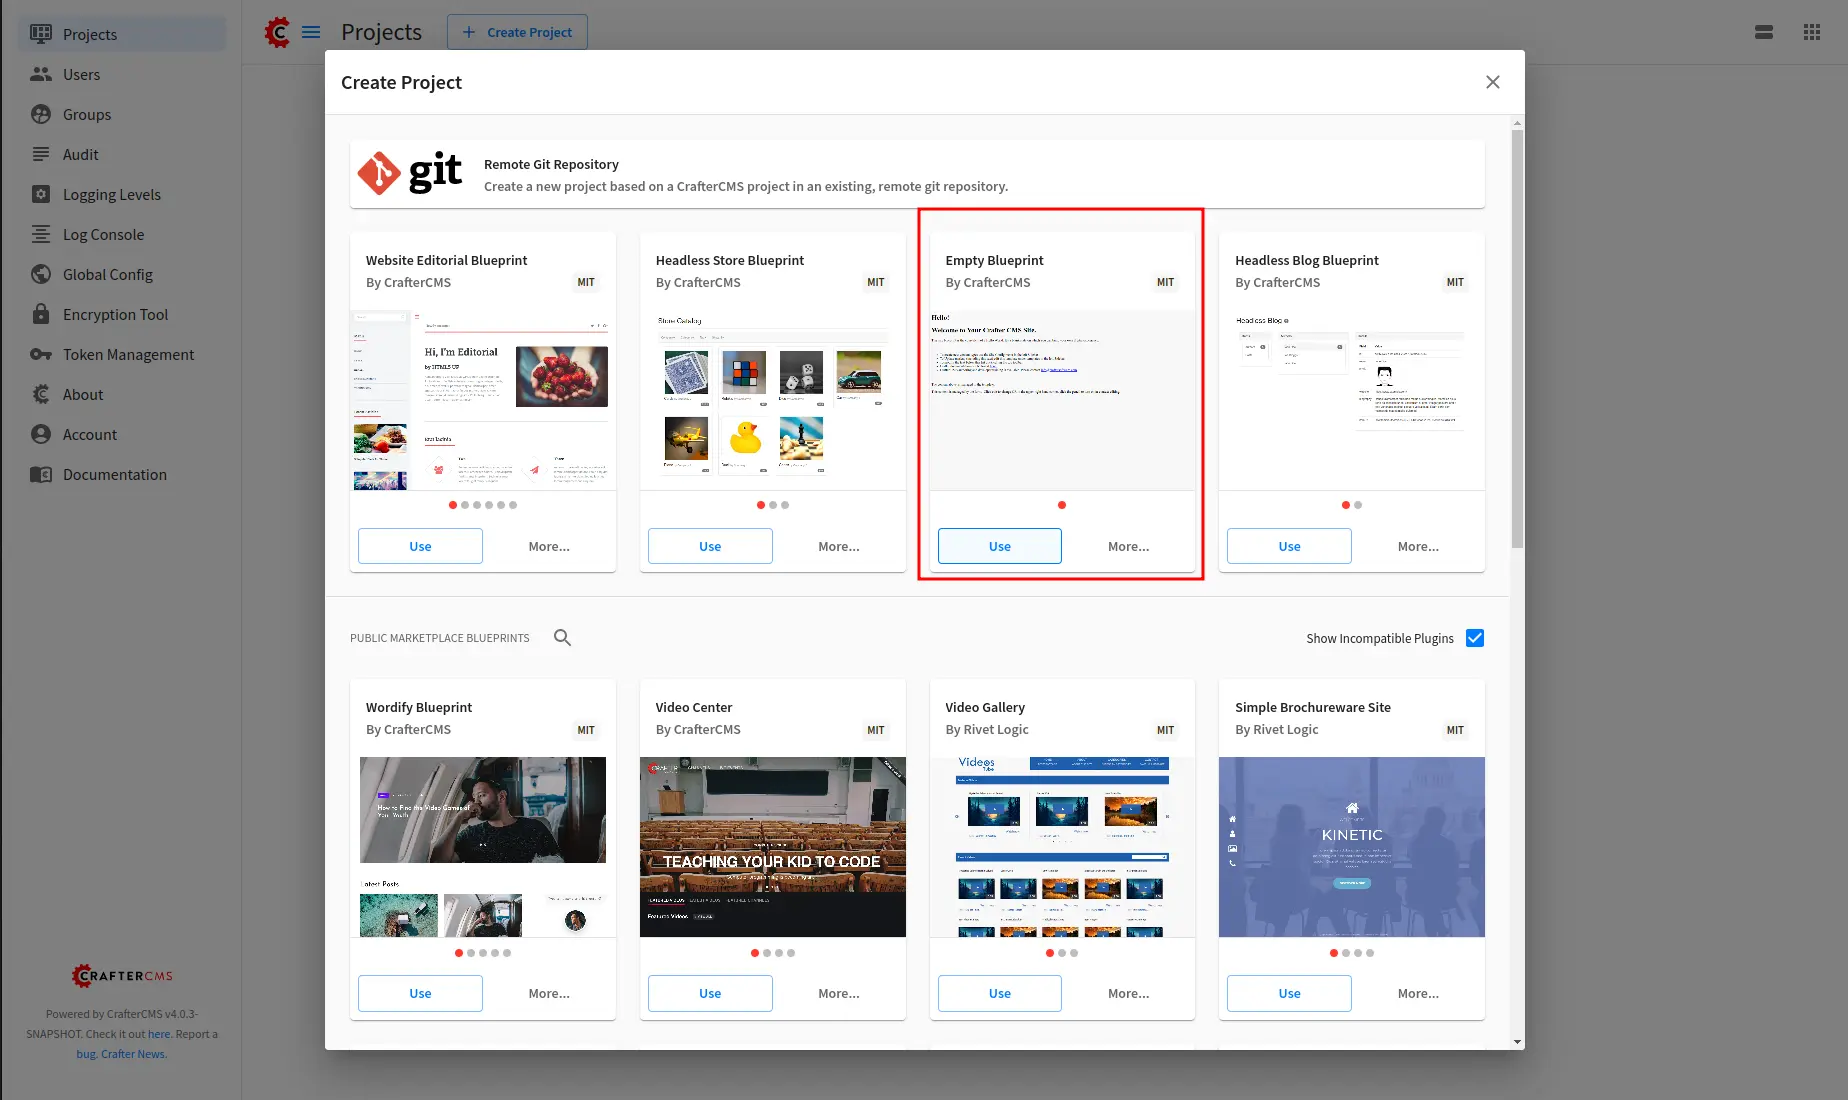
- Install the Stripe pre-built plugin
This tutorial will guide you through the steps of installing the plugin using CrafterCMS CLI Commands.
- Clone the plugin using Git
Using CLI commands to copy the plugin
In this case, the token is a JWT token created with Token Management Tool.
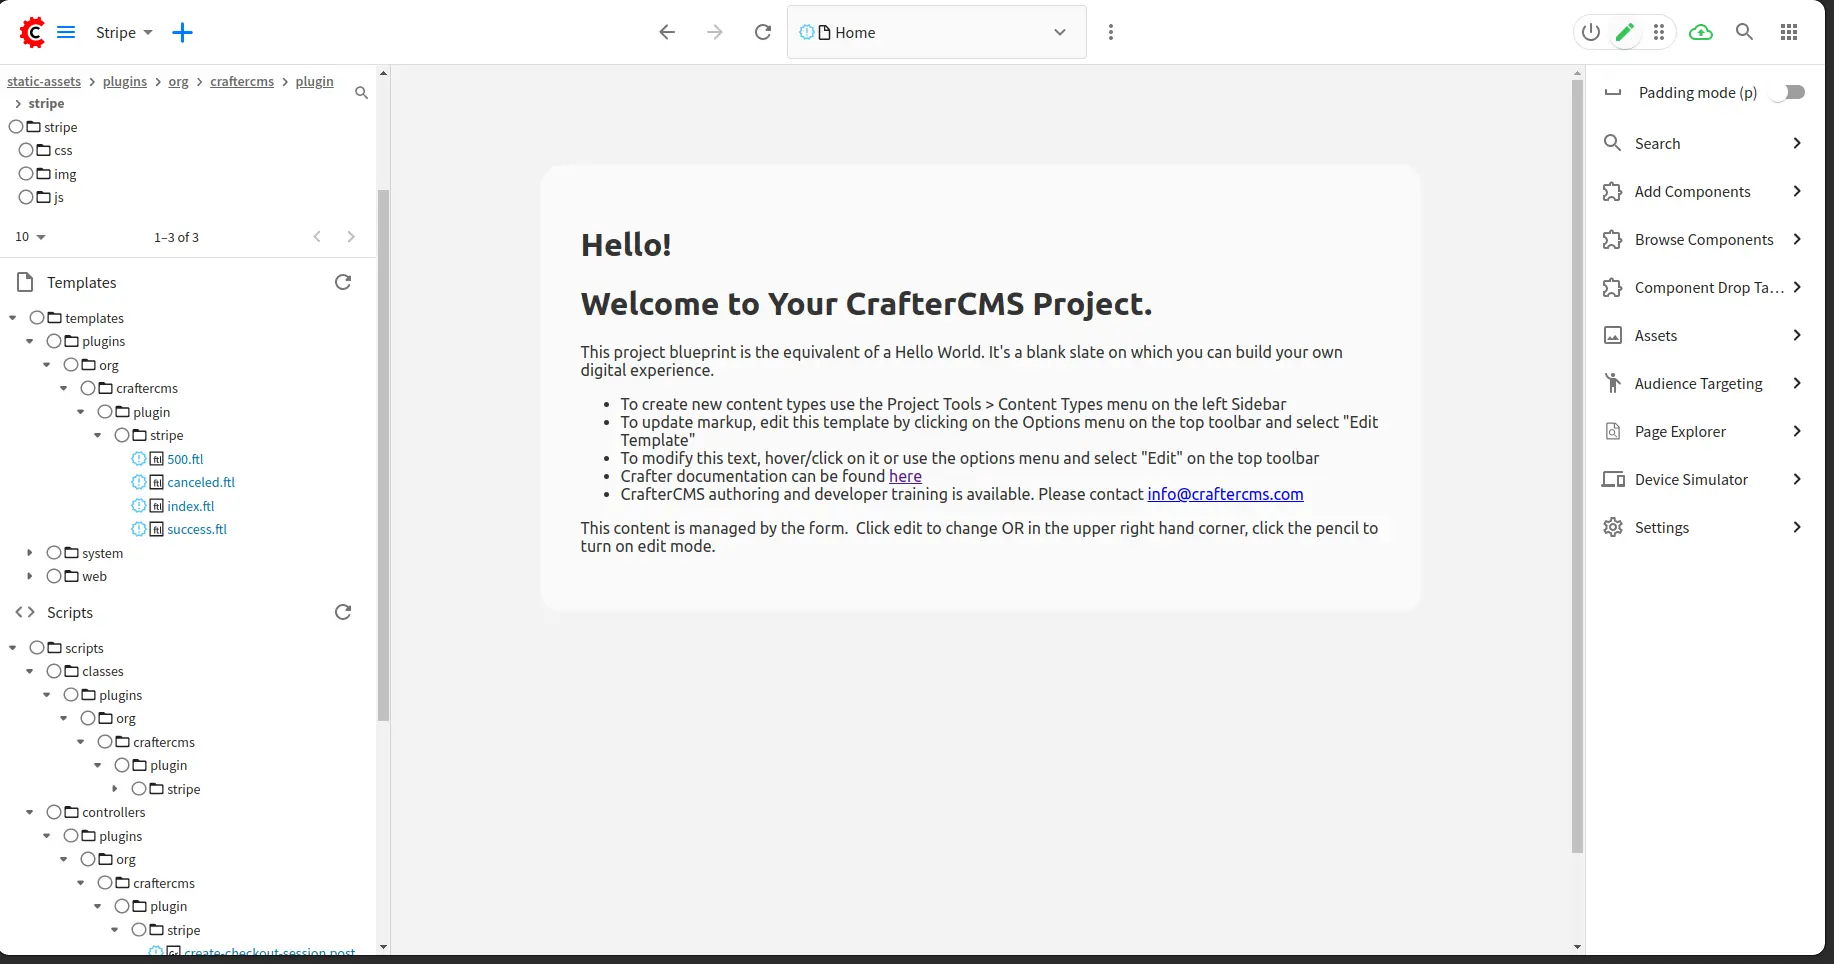
- Once the plugin is successfully installed, please verify that you have the items located in the following paths:
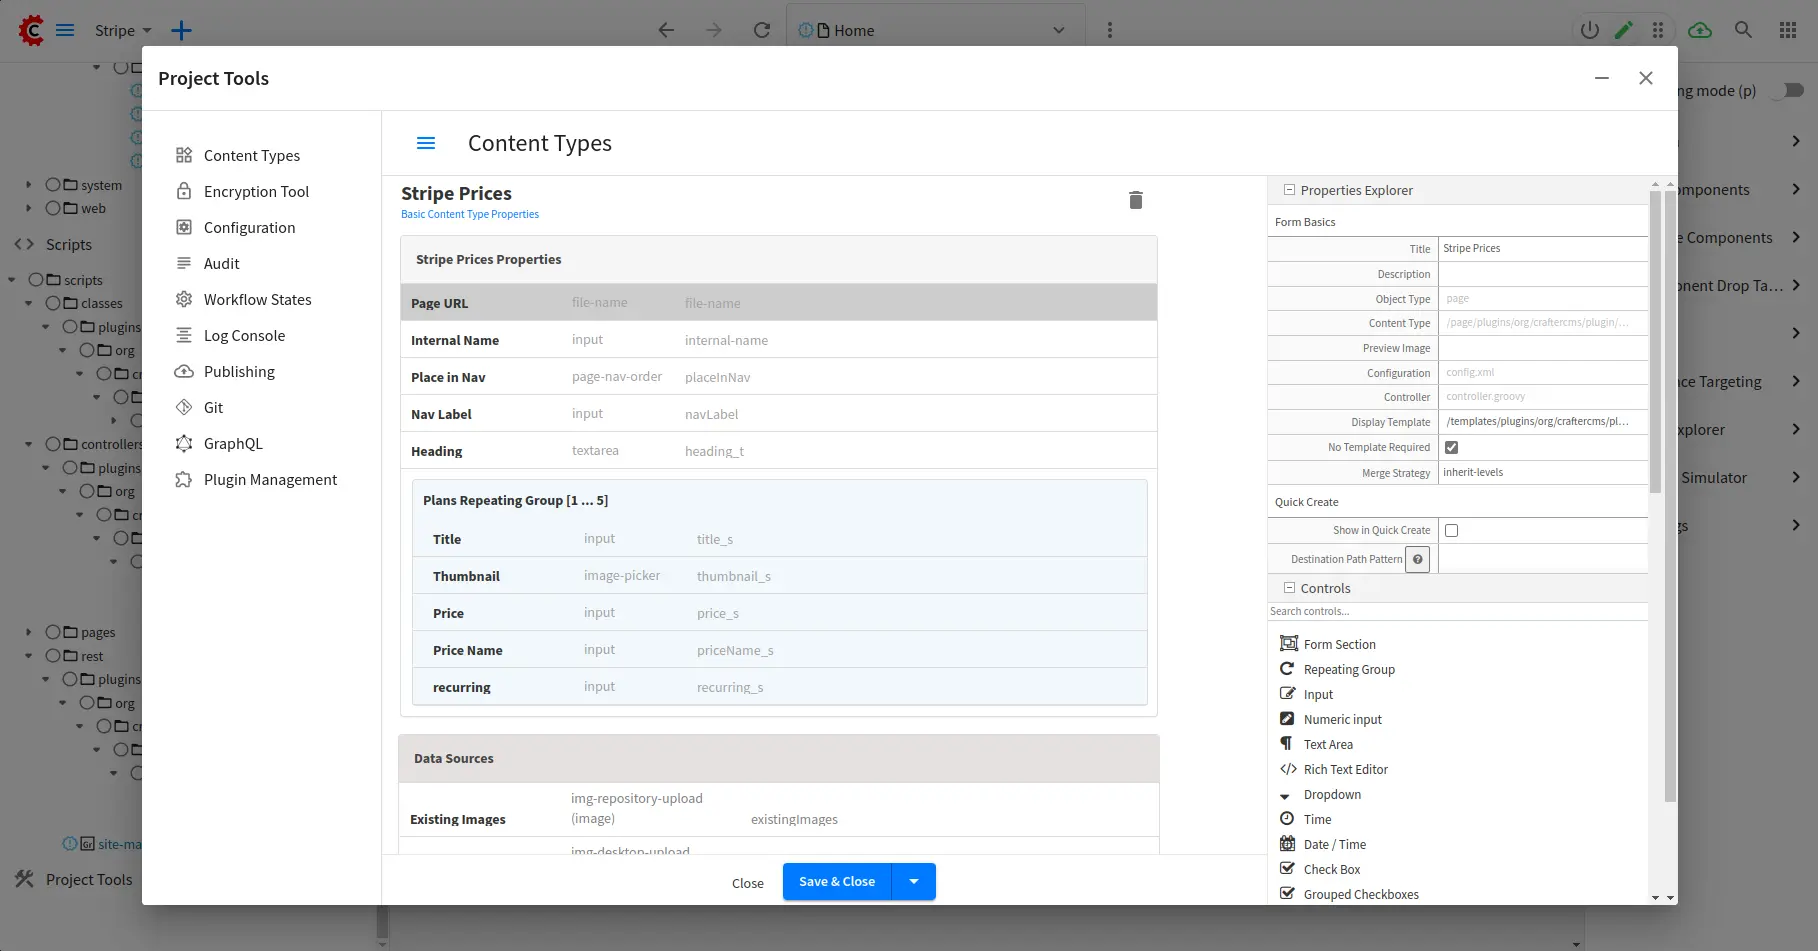
By navigating to the Content Types configuration, you will also discover the Stripe Prices page content type:
- For the next step, update the Engine Project Configuration with your Stripe credentials.
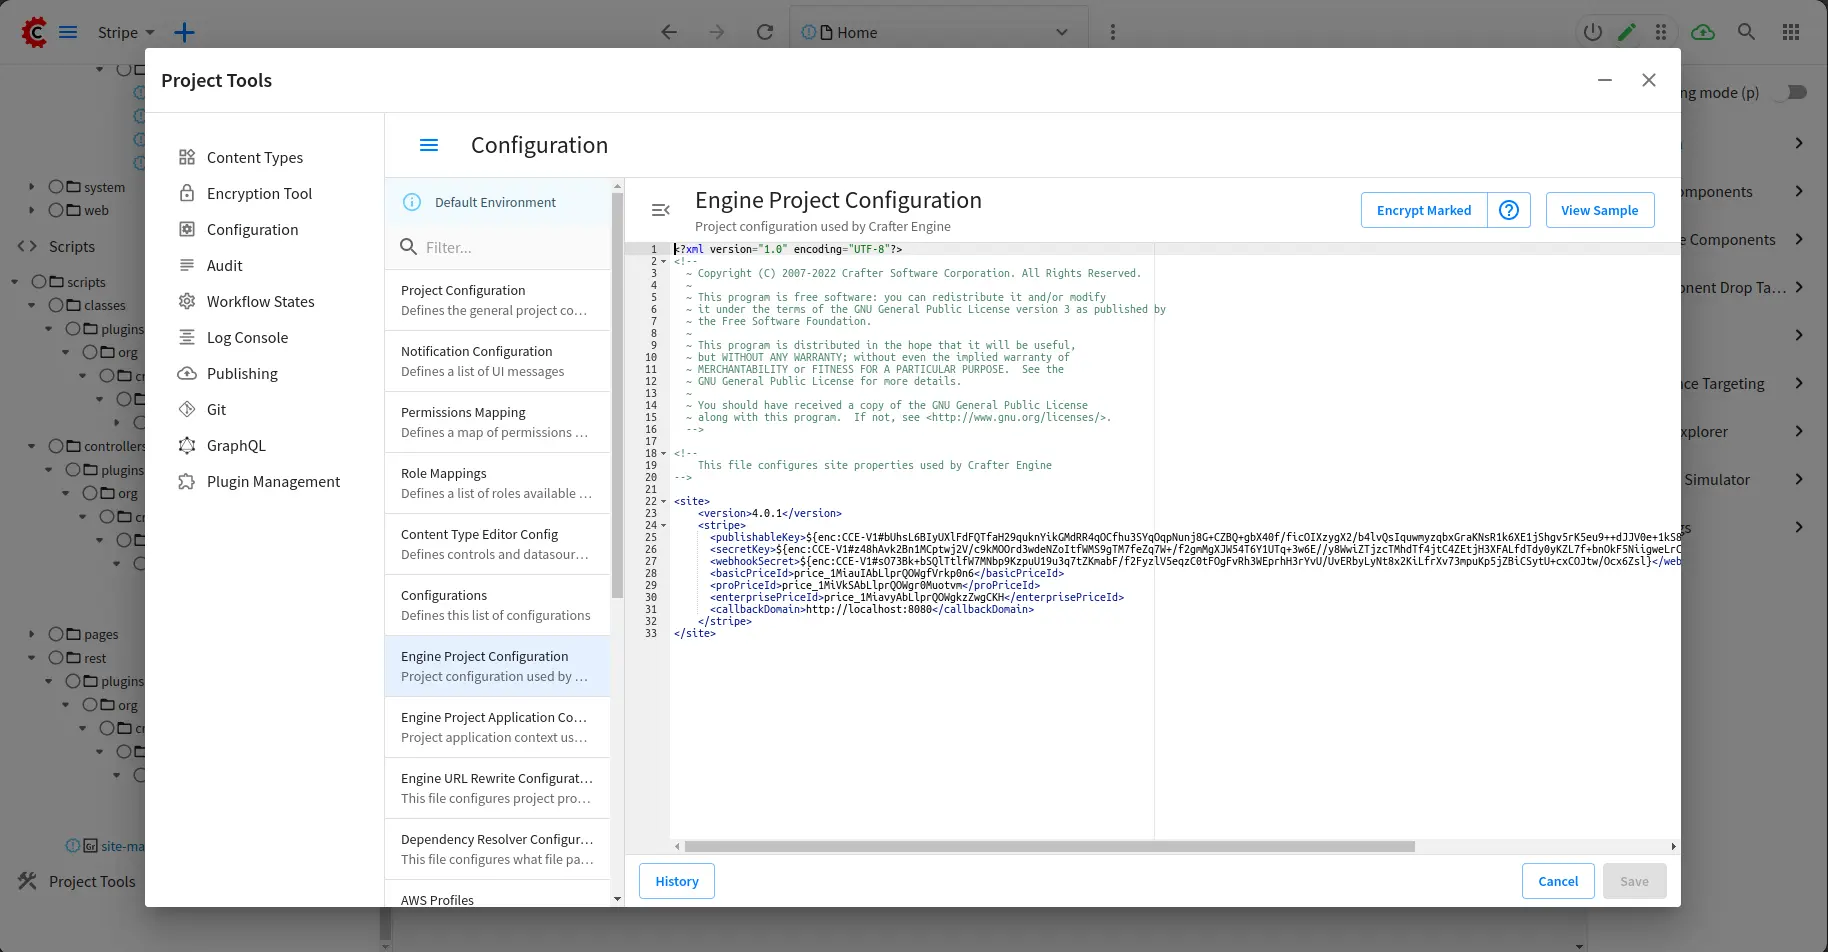
In the opening XML editor, please input the following:
Where:
- publishableKey: Stripe publishable key
- secretKey: Stripe secret key
- webhookSecret (optional): Webhook Secret
- basicPriceId: basicPrice ID (We can add this later when creating the Stripe price)
- proPriceId: proPrice ID (We can add this later when creating the Stripe price)
- enterprisePriceId: enterprisePrice ID (We can add this later when creating the Stripe price)
- callbackDomain: Callback domain of your application
Values starting with ${enc:...} are encrypted text using CrafterCMS Encryption Tool.
The document from Stripe on how to build a Stripe payment integration is available at this link.
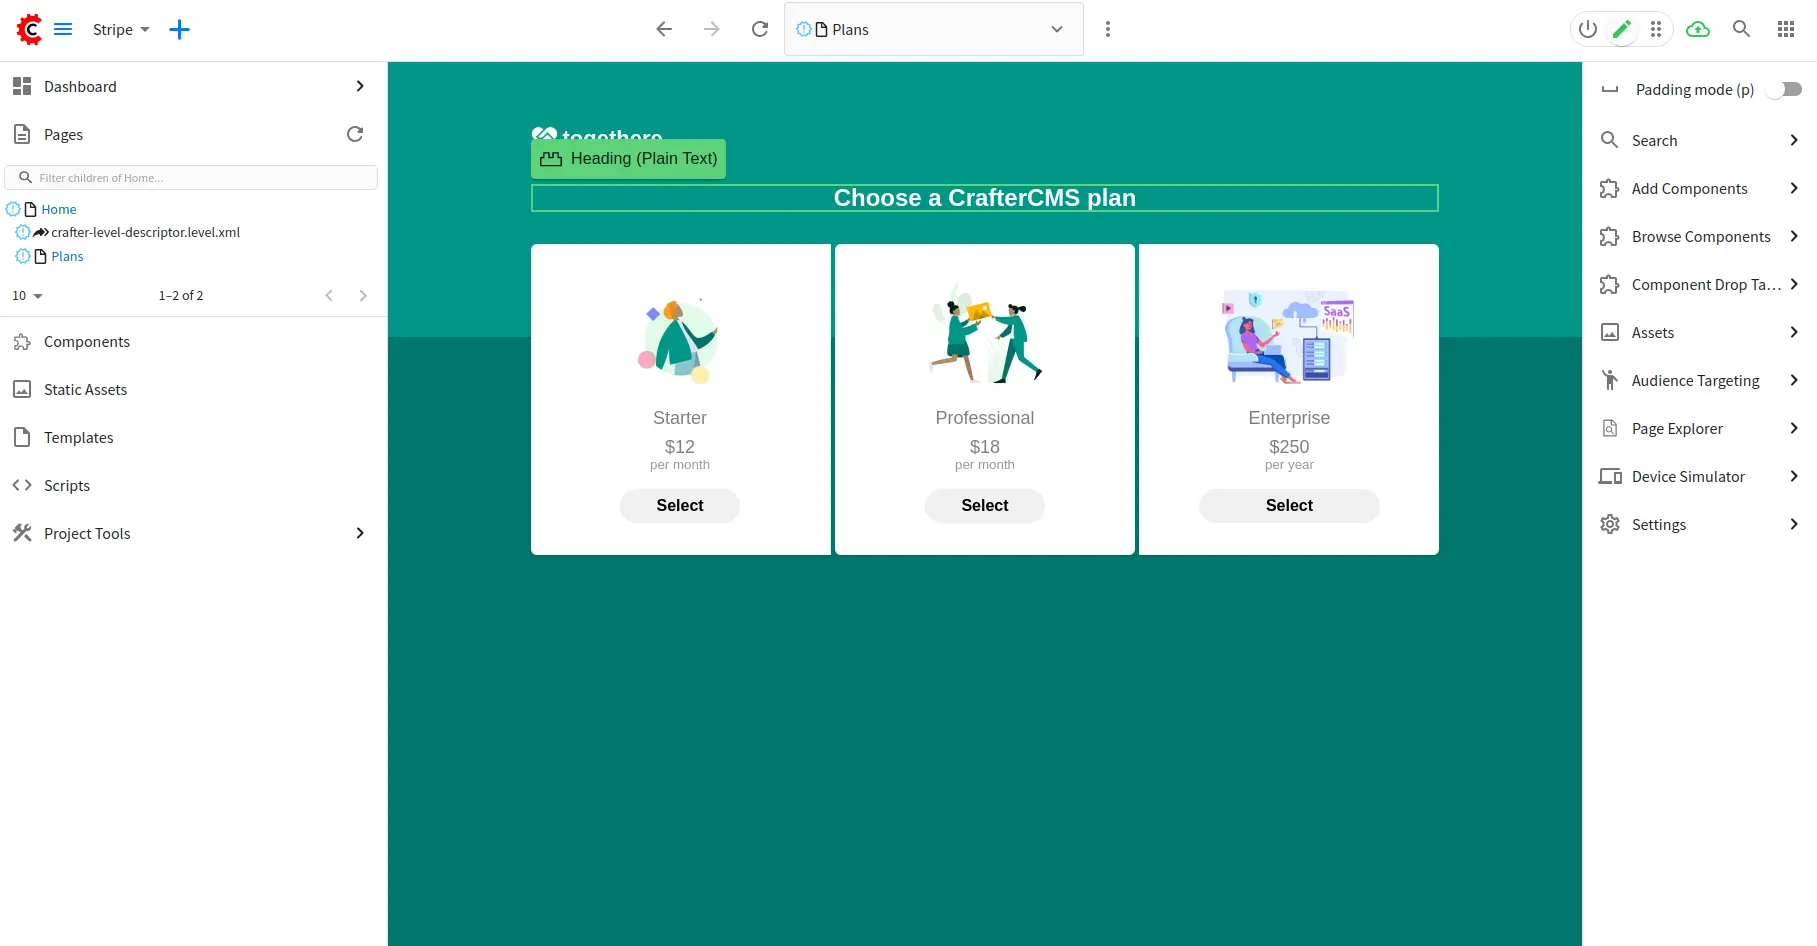
Create a Payment Plan Page
We will proceed with the integration by developing our own payment plans page.
- With the Studio left sidebar opening, right-click the Home page and create a new Stripe Prices page.
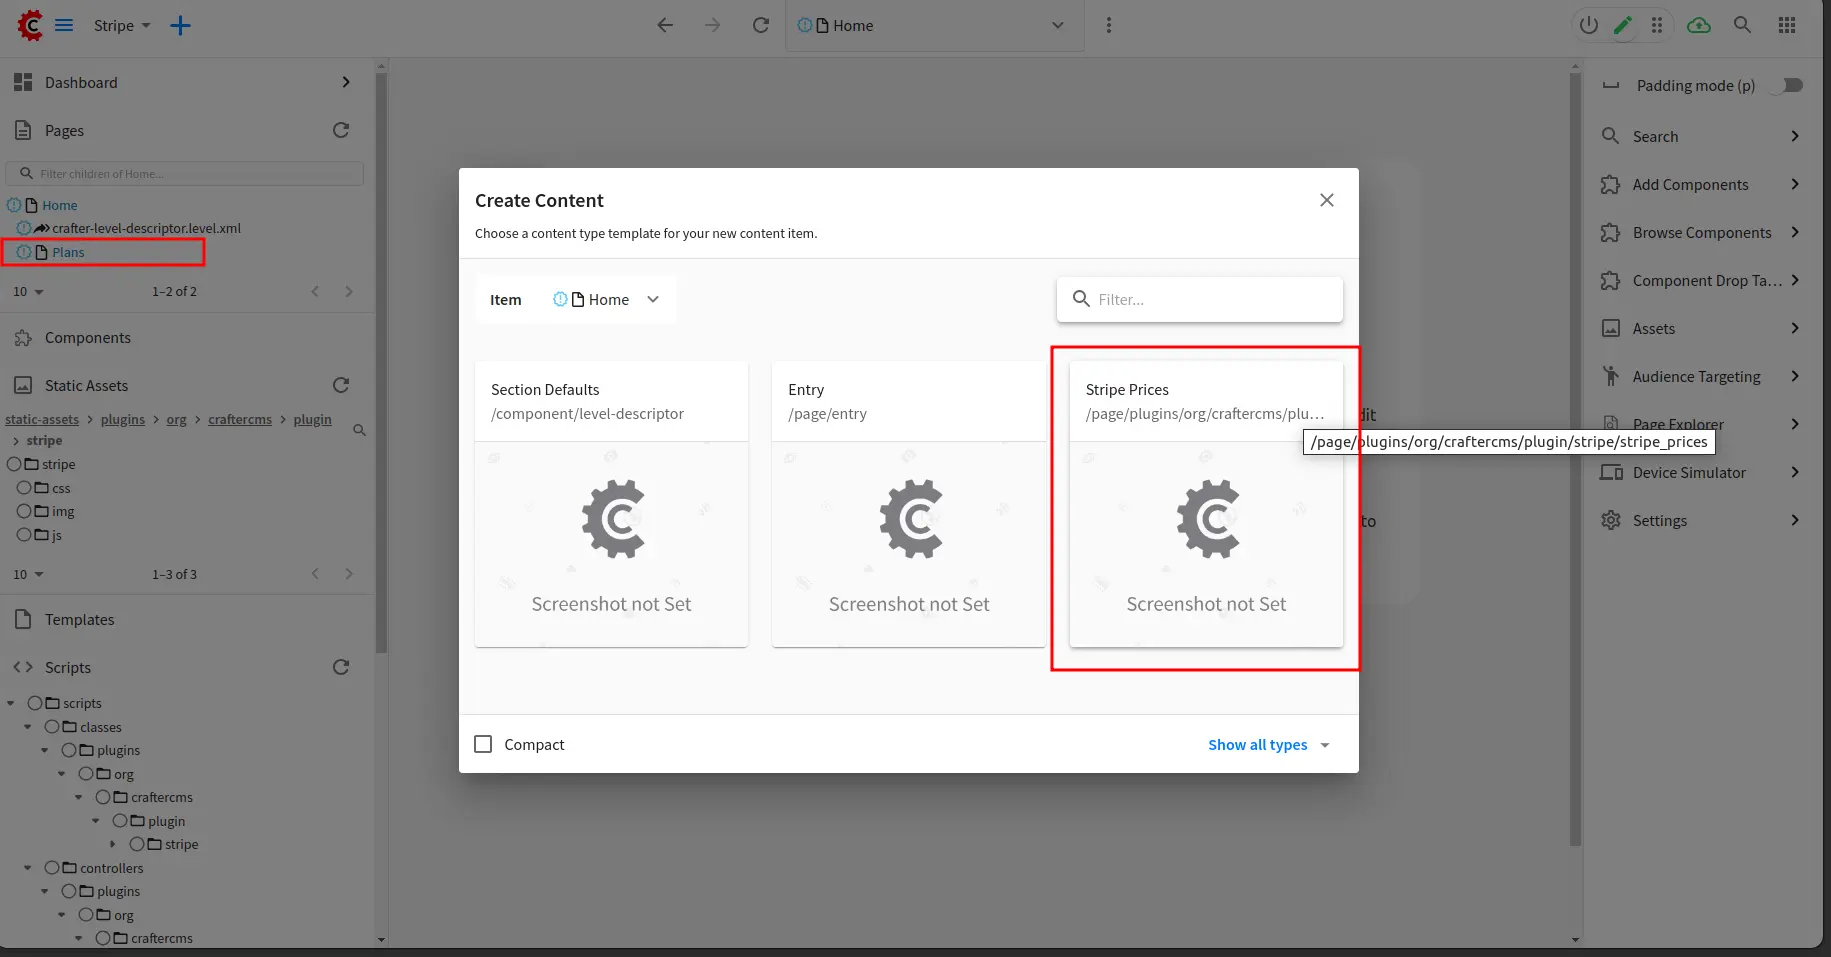
- Input basic form information:
- Page URL: /plans
- Internal Name: Plans
- Nav Label: Plans
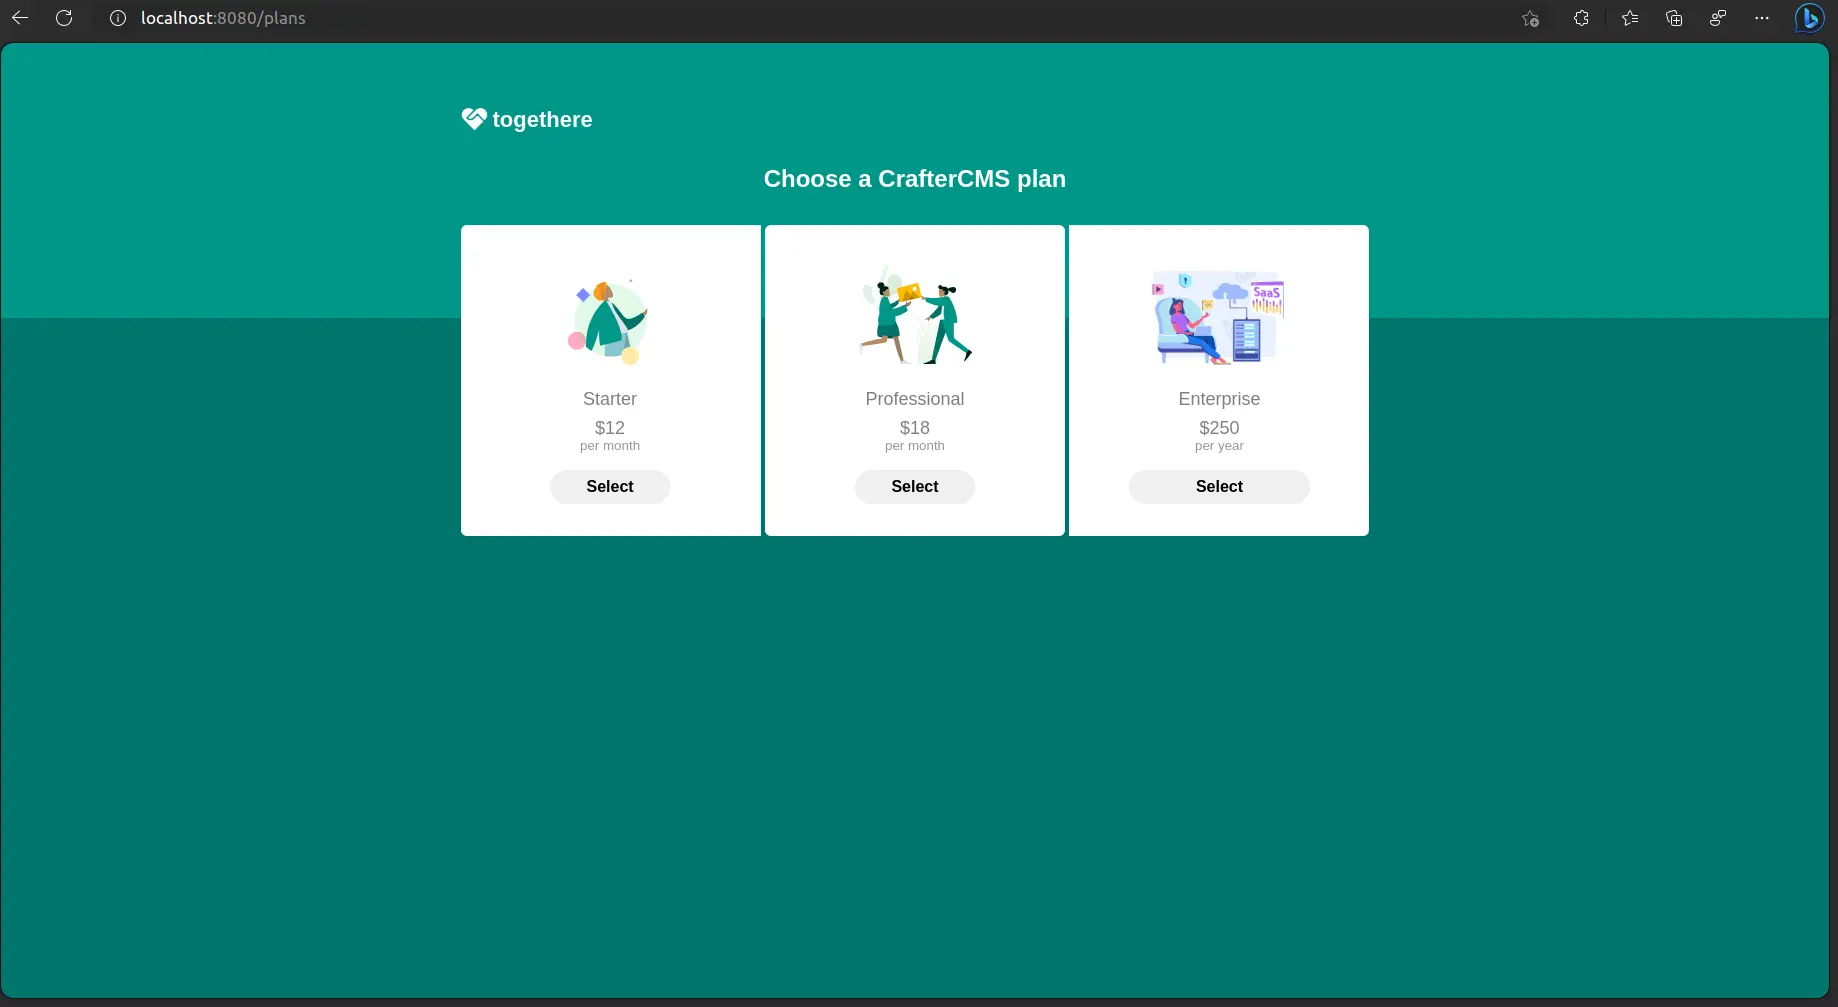
- Heading: Choose a CrafterCMS plan
- Input your designed plans. In this example, we will create 3 plans including basicPrice, proPrice, and enterprisePrice. These are some sample inputs:
- basicPrice:
- Title: Starter
- Thumbnail: /static-assets/plugins/org/craftercms/plugin/stripe/img/starter.png
- Price: $12
- Price Name: basicPrice (Note: Price name has a determined value to retrieve from server API /scripts/rest/plugins/org/craftercms/plugin/stripe/config.get.groovy)
- recurring: month
- proPrice:
- Title: Professional
- Thumbnail: /static-assets/plugins/org/craftercms/plugin/stripe/img/professional.png
- Price: $18
- Price Name: proPrice (Note: Price name has a determined value to retrieve from server API /scripts/rest/plugins/org/craftercms/plugin/stripe/config.get.groovy)
- recurring: month
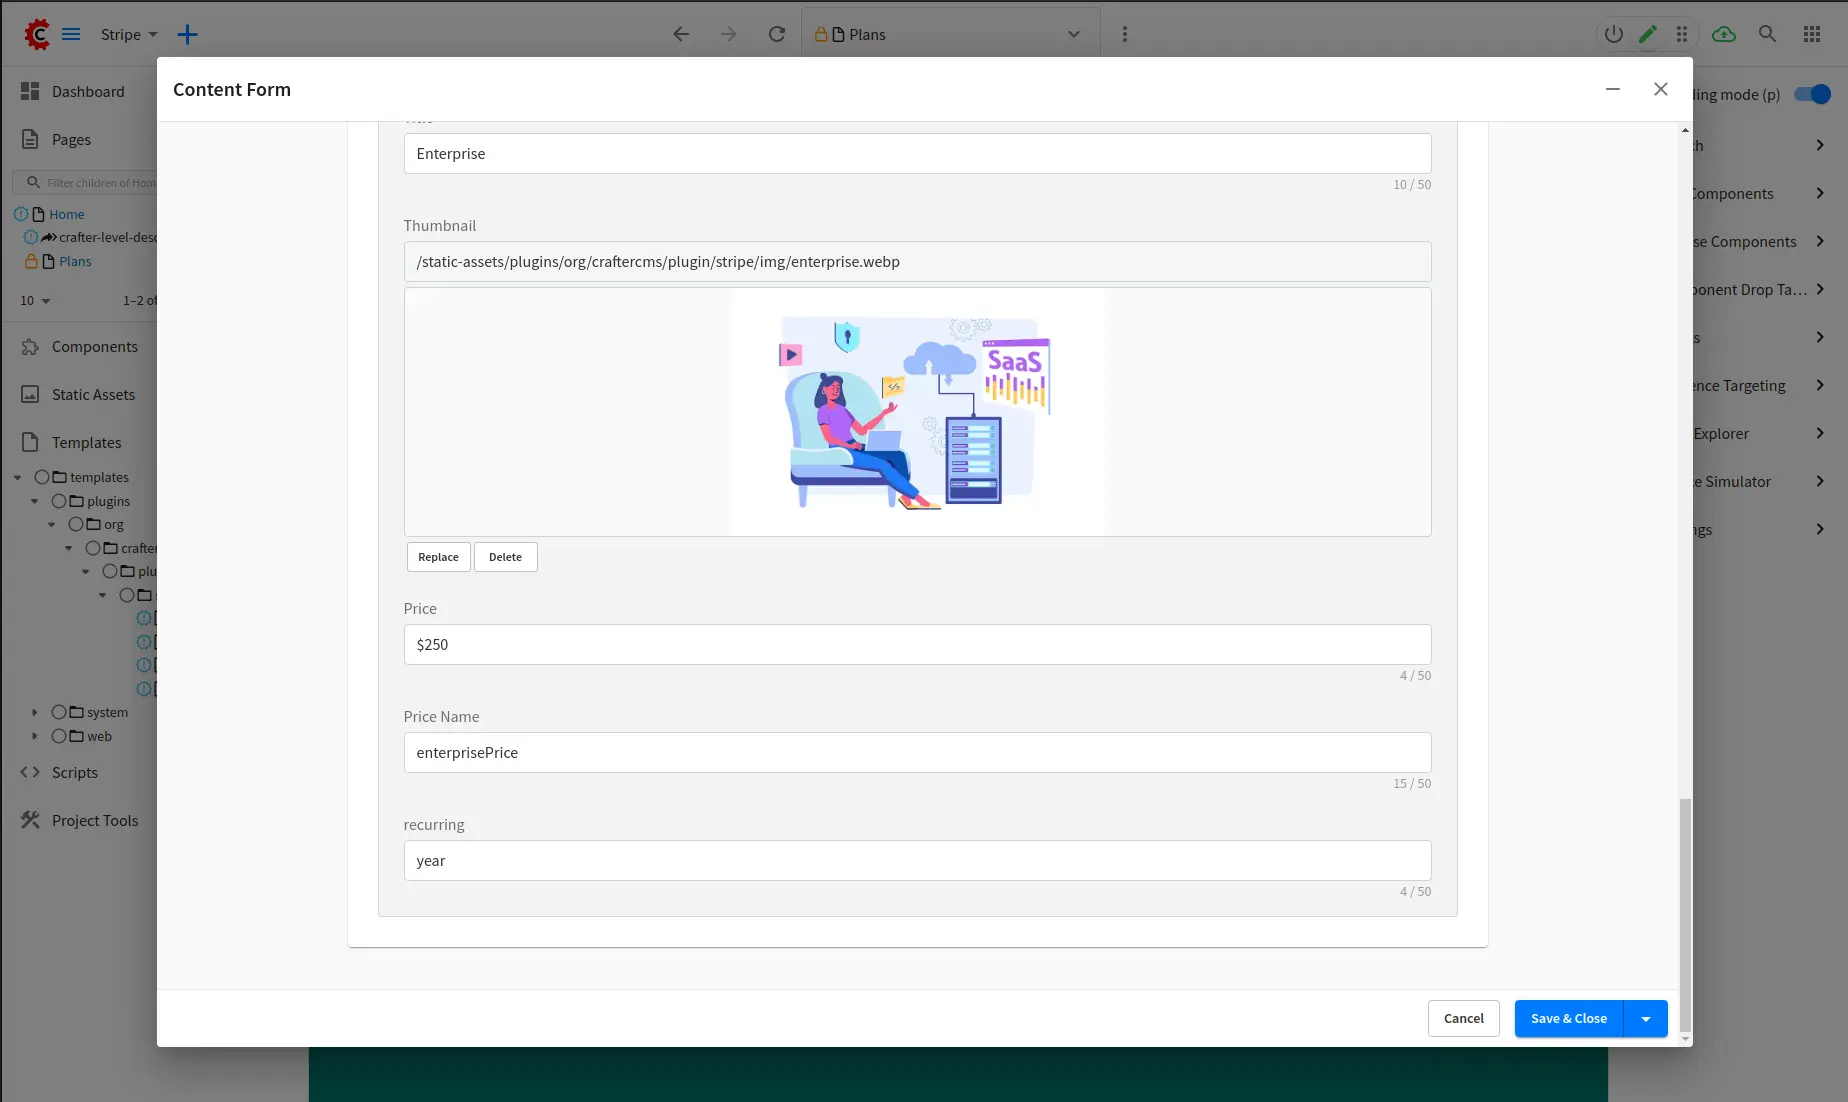
- enterprisePrice:
- Title: Enterprise
- Thumbnail: /static-assets/plugins/org/craftercms/plugin/stripe/img/enterprise.webp
- Price: $250
- Price Name: enterprisePrice (Note: Price name has a determined value to retrieve from server API /scripts/rest/plugins/org/craftercms/plugin/stripe/config.get.groovy)
- recurring: year
Observe that the recurring attribute has the value of month for basicPrice and proPrice, and the value of year for enterprisePrice.
Upon creating the Plan page, you also have the option to edit it with the Experience Builder.
Use the Stripe CLI to create equivalent products
In the previous section, we developed a plans page. To make this functional, we also need to create the corresponding products in the Stripe system. This can be accomplished via the Stripe Dashboard UI or using the Stripe CLI tool.
In this section, we will employ the Stripe CLI tool. You can refer to this documentation to get started with the Stripe CLI.
- Create products
Starter product:
Professional product:
Enterprise product:
- Create prices
Please record the id value for the products you just created as you will require this to create prices. For example:
Now you can a create price for the basic product, substituting ID_OF_STARTER_PRODUCT with the appropriate product Id:
Next, create a price for the premium product, substituting ID_OF_PROFESSIONAL_PRODUCT with the appropriate product Id:
Lastly, create a price for the enterprise product, substituting ID_OF_ENTERPRISE_PRODUCT with the appropriate product Id:

With all the prices created, you can now navigate to Engine Project Configuration to update with these values:
Test Plan Page
When everything is ready, visit http://localhost:8080/plans to test the plan page. When you choose a plan, the browser will redirect you to the Stripe payment page:
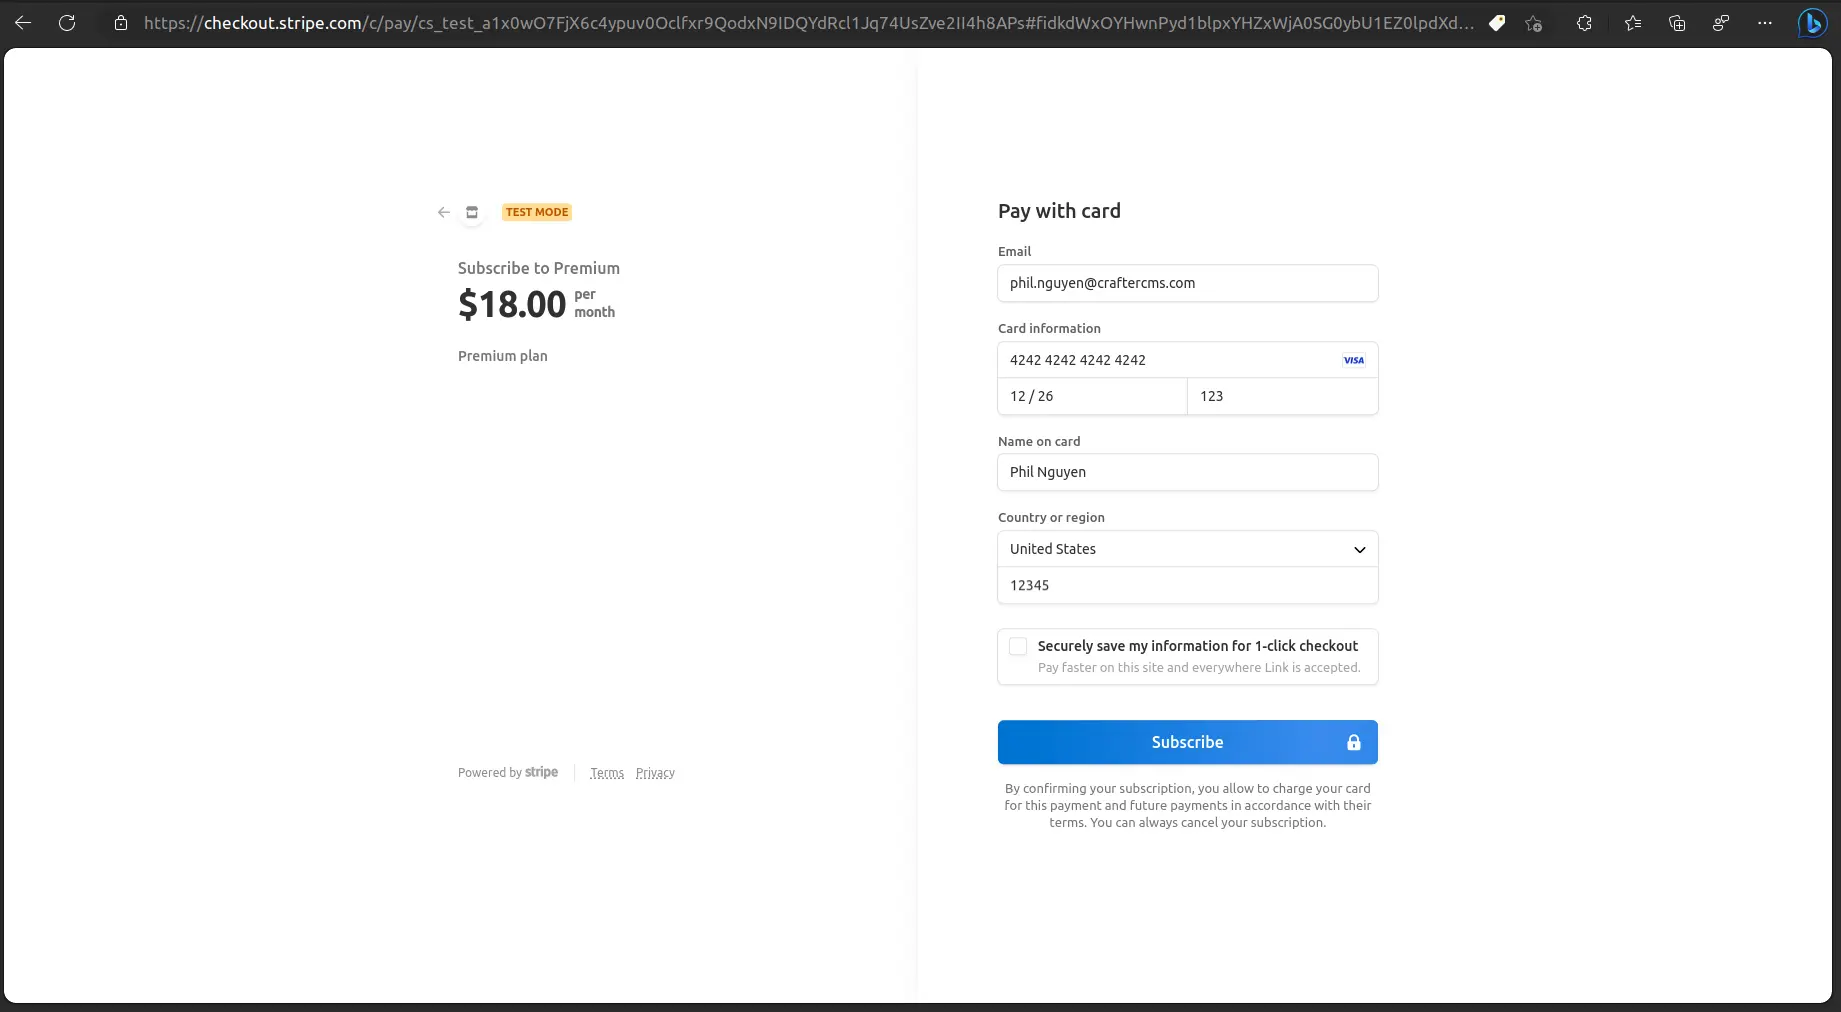
To test the payment functionality, you can enter 4242424242424242 as a dummy credit card number. The rest of the details can be arbitrary.
Once the subscription is processed successfully, you will be redirected back to your website with a confirmation page indicating that the payment has been completed.
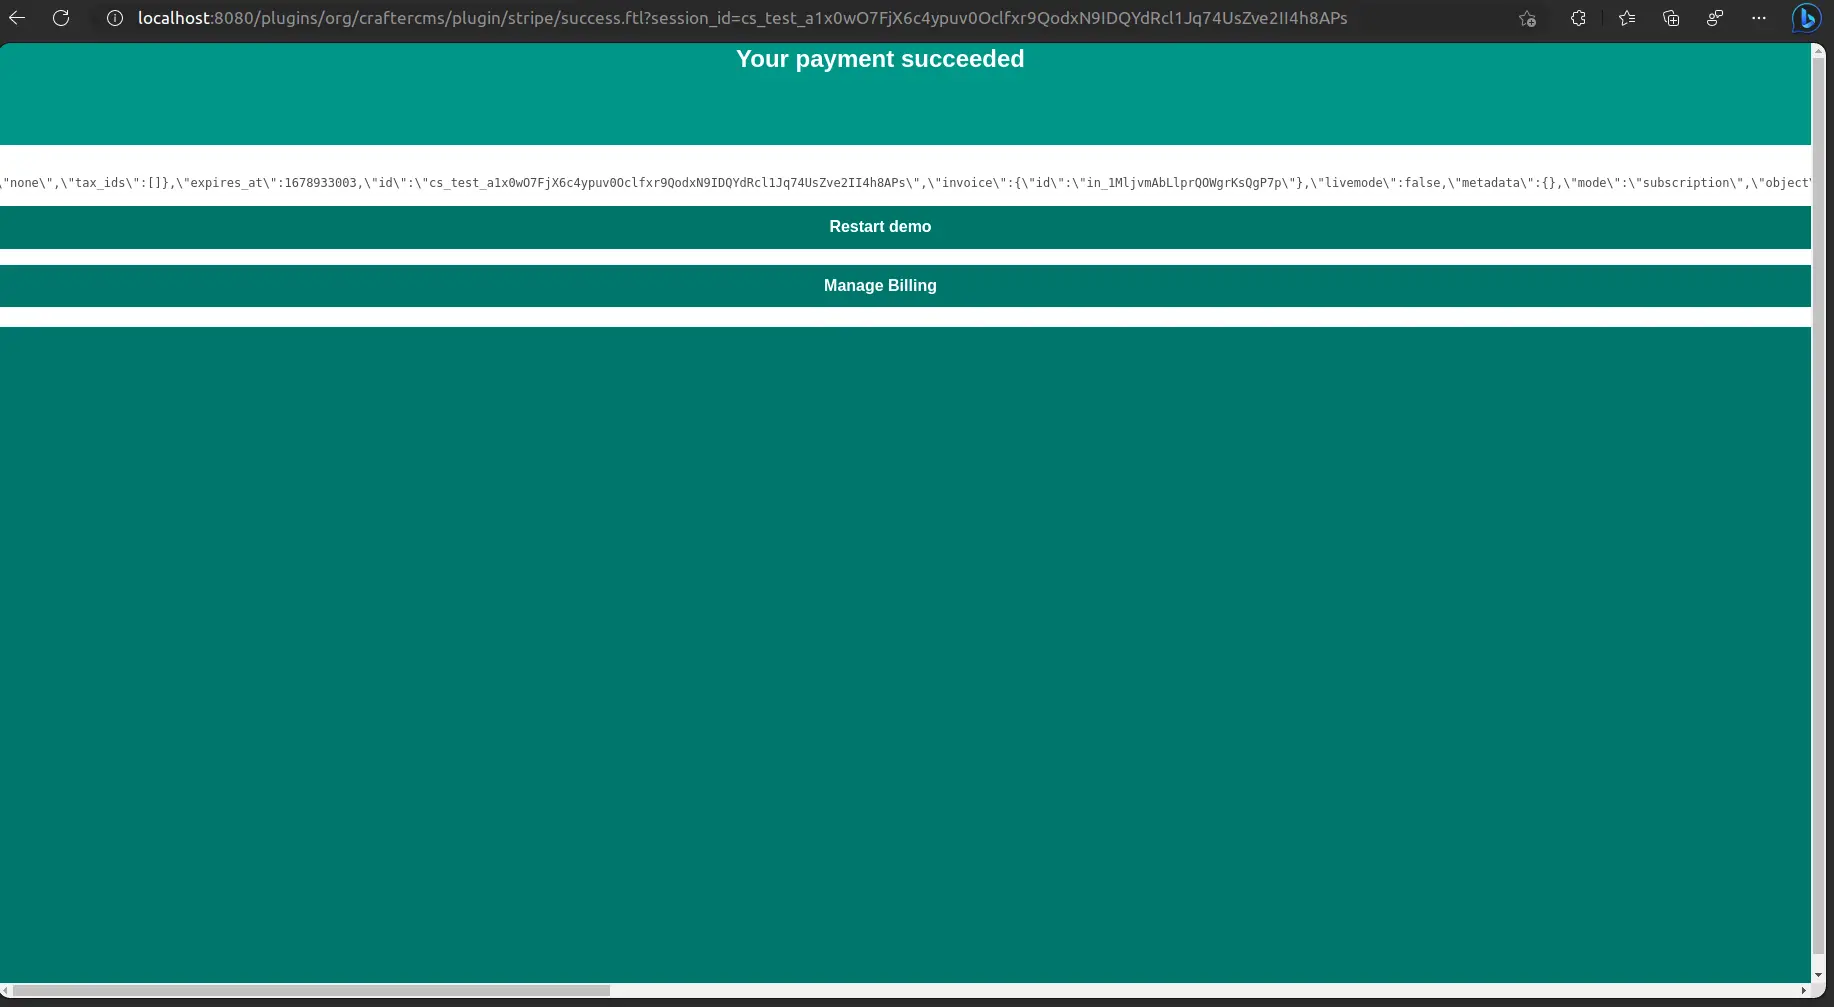
If you access your Stripe admin dashboard, you should be able to see a new payment record.

Congratulations on your first Stripe subscription!
Inside the Plugin - How it works
In the preceding section, we presented our pre-built Stripe payment plugin and explained how to integrate it with CrafterCMS.
In this section, we will examine the plugin source code in detail to comprehend its structure and its integration with the Stripe APIs.
Stripe Payment Core functionality
Our plugin utilizes Groovy script to implement all Stripe core functionalities with the help of their Stripe Java client library.
The @Grab annotation is used to incorporate the stripe-java library in our Groovy scripts:
Workflow
Our Stripe Prices page content type employs the template /templates/plugins/org/craftercms/plugin/stripe/index.ftl as the view in the MVC model. When accessing the plans page http://localhost:8080/plans, the index.ftl Freemarker template is utilized to display the plan's content.
Within the template, you can observe that we execute a POST on submitting the form when a user selects a plan:
In this case, create-checkout-session is a controller that is located in /scripts/controllers/plugins/org/craftercms/plugin/stripe/create-checkout-session.post.groovy. This controller handles the form submission by using the default form handler:
/scripts/classes/plugins/org/craftercms/plugin/stripe/form/DefaultFormHandler.groovy
In this default form handler, we will create a checkout session to direct the user to the Stripe payment gateway.
Examining the SessionCreateParams in more detail, you can notice that we also provide callback URLs if the payment is completed or when the user cancels the payment:
We also configure the subscription payment mode with the following line:
REST APIs
This plugin also contains 2 supporting REST APIs:
/scripts/rest/plugins/org/craftercms/plugin/stripe/checkout-session.get.groovy
This API retrieves a payment session by its ID and displays it in the succes.ftl page when a payment is completed.
/scripts/rest/plugins/org/craftercms/plugin/stripe/config.get.groovy
This API retrieves the publishable key and prices IDs which are used in the client-side script (/static-assets/plugins/org/craftercms/plugin/stripe/js/script.js) to replace price keys with their IDs.
We also use the siteConfig templating API variable to decrypt our credentials in Site Engine Configurations.
This concludes the plugin source code overview.
Conclusion
This tutorial illustrated the benefits of integrating the Stripe payment platform with CrafterCMS for enhancing the payment options on your website. By adhering to these straightforward steps, you can integrate your CrafterCMS-powered digital experience with Stripe and begin accepting payments online. Further, with Stripe’s support for a comprehensive range of payment methods and robust fraud detection tools, you can devise a flexible and secure payment processing system for your website.
This tutorial also demonstrates how to construct and deploy plugins in CrafterCMS. A plugin is an add-on that augments the functionality of the content management system.
In this instance, we developed a plugin to integrate Stripe Payments with CrafterCMS, endowing your sites and apps with the payment functionality powered by the headless CMS. The plugin encompasses the requisite API calls and methods for integrating with the Stripe payment gateway, as well as a bespoke UI that is editable with the Experience Builder.
Have questions about CrafterCMS? Join our Slack channel today.